


Share your craft projects
Make new craft buddies
Ask craft questions
Blog your craft journey

Brit
594 posts
and
41 followers
in almost 12 years
in almost 12 years
More from Brit
YouTube makes me laugh
Beginner's Guide to Sharpening Western Saws
The Humble Hand Brace - A Beginner's Guide to Restoring, Buying and Using #8: Part 8 - Tips and Tricks on Using a Hand Brace
The Humble Hand Brace - A Beginner's Guide to Restoring, Buying and Using #6: Part 6 - What to Look for when Buying a Secondhand Brace and more
The Humble Hand Brace - A Beginner's Guide to Restoring, Buying and Using #5: Part 5 - Tuning a Brace
The Humble Hand Brace - A Beginner's Guide to Restoring, Buying and Using #7: Part 7 - Sharpening an Auger Bit
This is
part 7
in a
8 part
series:
The Humble Hand Brace - A Beginner's Guide to Restoring, Buying and Using
I know I said that sharpening an auger bit would be part 8 of this blog series, but I've taken the liberty of bringing it forward since the 'Using a Hand Brace' part isn't finished yet. After spending precious time restoring a hand brace, you will soon realize that it isn't much use when drilling a hole if the auger bit you are using isn't sharp. A sharp auger bit is a pleasure to use and cuts very quickly.
Auger bits have evolved through the years. Manufacturers kept improving their designs and building on previous patents. For this reason, a variety of different designs come up on the secondhand market. At the height of their evolution, there were two types of auger bit that were widely available. They were the Irwin Patent bit and the Jennings Patent bit. Both of these types cut in the same way and and both are sharpened the same way.
Auger bits have evolved through the years. Manufacturers kept improving their designs and building on previous patents. For this reason, a variety of different designs come up on the secondhand market. At the height of their evolution, there were two types of auger bit that were widely available. They were the Irwin Patent bit and the Jennings Patent bit. Both of these types cut in the same way and and both are sharpened the same way.
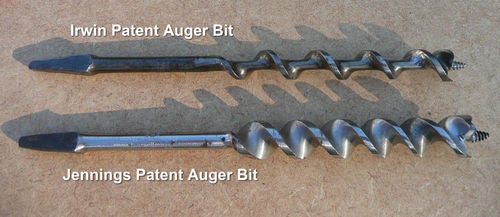
You can tell them apart because the Irwin patent bit has a solid metal core running through the business end of the bit into the shank making it very strong in use. The Jennings Patent bit looks like someone took a flat piece of steel and just twisted it. It doesn't have a solid core and is not as strong where it joins the shank.
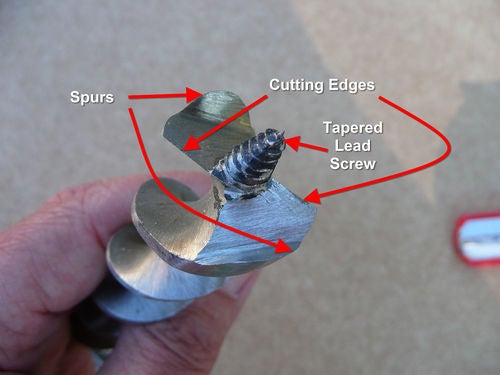
Assuming an auger bit isn't bent or heavily pitted, there are three things that determine how well it will drill a hole. They are:
• The Tapered Lead Screw
• The Spurs
• The Cutting Edges
The Tapered Lead Screw
Unlike twist, lip and spur, Forstner or sawtooth bits, the speed that an auger bit can drill is not determined by the amount of pressure you apply. The speed is governed by the pitch of the thread in the lead screw. Manufacturers made auger bits with coarse, medium and fine pitch lead screws to suit different trades. If drilling a hole with a fine finish was a priority, they used a fine pitch auger bit and if speed was a priority, they used an auger bit with a coarse pitch thread.
Whatever the pitch, the threads need to be in good shape, so if they are packed with saw dust try brushing them with an old toothbrush. Gripping the shank in a vice and cleaning the thread with dental floss is also effective.
So just to reiterate, the job of the Lead Screw is to engage the wood and pull the auger bit through the work, keeping it centered in the process.
The Spurs
As the screw enters the wood, the two spurs score the outside diameter of the hole severing the fibers and preparing the way for the cutting edges to slice the waste. They need to be sharp in order to produce a clean entry and exit hole. Under no circumstances should you file the outside surface of the spurs, only the inside surface. If you do, you will decrease the diameter of the circle that they scribe and the rest of the auger bit will have trouble fitting through the hole and start to bind.
The Cutting Edges
The two Cutting Edges pare away the wood as the bit rotates into the wood. It is important not to change the cutting geometry of the edges. Therefore, you should only ever file the beveled side of the cutting edge and take care to maintain the original angle of the bevel.

The helical flutes of the auger bit carry the waste efficiently to the surface. However, when drilling deeper than about 2" (50mm), it is better if you back the auger bit out and clear out any chips in the hole before continuing to drill deeper.
Sharpening
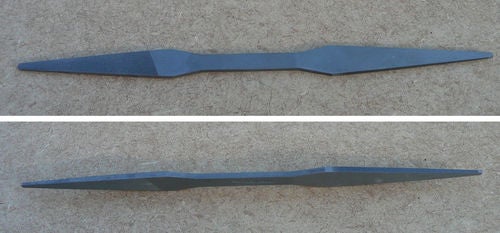
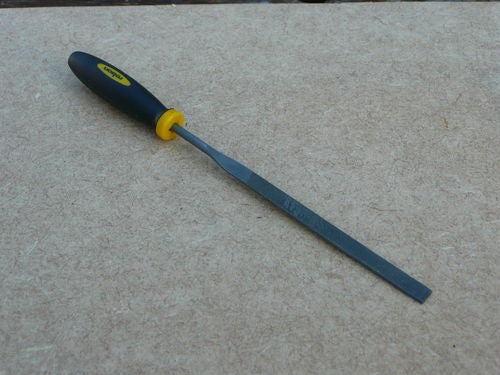
For all but the smallest auger bits, the best tool for the job is an Auger file. An Auger file is double ended and both ends are tapered. One end has teeth on the flats and none on the edges and the other end has teeth on the edges and not on the flats.
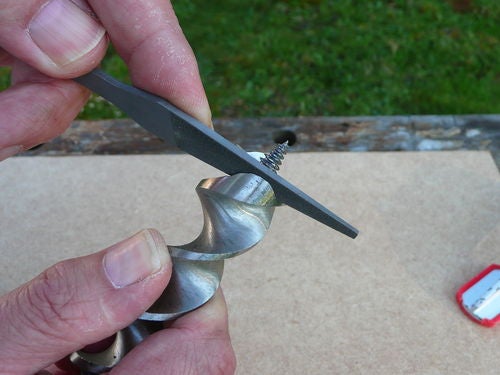
To use it, hold the auger bit as shown below so that the tapered lead screw digs into a piece of wood or MDF. File the bevels on the cutting edges first. Position the file on the bevel angle and push. It only takes about five or six strokes to restore the edge and for all you hand plane lovers, there's no need for a micro-bevel here.

After sharpening the first bevel, rotate the auger bit 180 degrees and sharpen the other bevel with the same number of strokes.
Next, sharpen the inside surface of the spurs. Again, it only takes five or six stroke on each spur.
The auger file will sharpen the bevel on the cutting edges of smaller auger bits too.
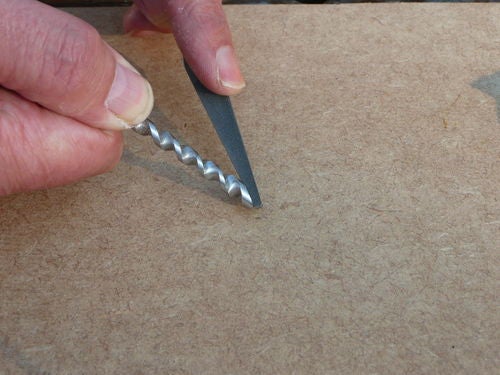
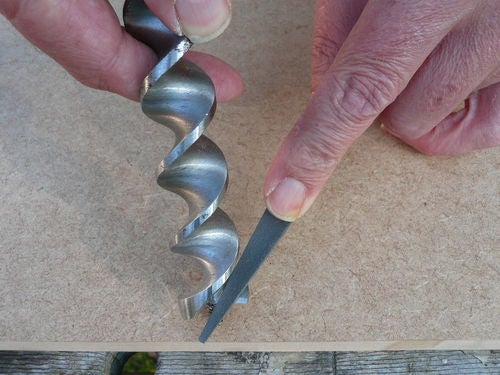
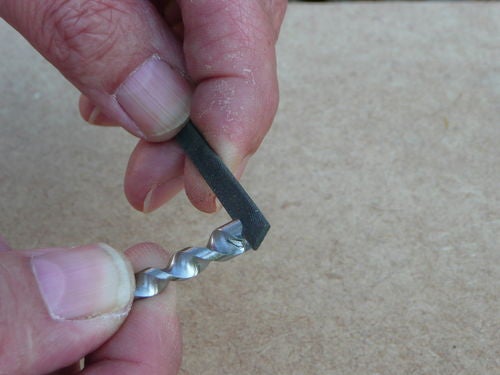
However, you may find that there isn't enough room between the lead screw and the inside face of the spur for the auger file to get deep enough. You can see what I mean in the following photo.
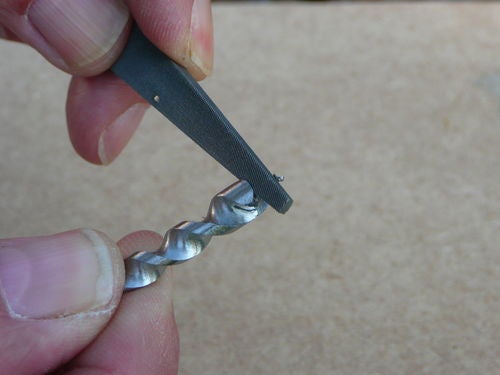
In this case, I use a flat needle file which has one safe edge.
Notice how the needle file goes right to the bottom of the inside face of the spur.
Sharpening an auger bit is quick and easy and anyone can do it. The following video is in real time and shows how little time it takes.
Thanks for watching
Andy -- Old Chinese proverb say: If you think something can't be done, don't interrupt man who is doing it.
3 Comments

Nice tutorial, well explained & demonstrated.
Learned something interesting, the lead screw, I thought the fine thread was for hard wood, and the coarse thread for soft wood, like pine, to grip without tearout.
Learned something interesting, the lead screw, I thought the fine thread was for hard wood, and the coarse thread for soft wood, like pine, to grip without tearout.
A question to all you clever people. If you watch the short video above and go to the bit where I demonstrate the auger after I've sharpened it, why is it that all the shavings try to get back in the hole from 2:05 onwards. It happens every time. Static maybe? What say you?
Andy -- Old Chinese proverb say: If you think something can't be done, don't interrupt man who is doing it.

Some good advice Andy. Need to go through my set again and see actually what I have. I believe they are all Irwin's, but I need to check on the lead screw.
Main Street to the Mountains
More from Brit
YouTube makes me laugh
Beginner's Guide to Sharpening Western Saws
The Humble Hand Brace - A Beginner's Guide to Restoring, Buying and Using #8: Part 8 - Tips and Tricks on Using a Hand Brace
The Humble Hand Brace - A Beginner's Guide to Restoring, Buying and Using #6: Part 6 - What to Look for when Buying a Secondhand Brace and more
The Humble Hand Brace - A Beginner's Guide to Restoring, Buying and Using #5: Part 5 - Tuning a Brace