


Share your craft projects
Make new craft buddies
Ask craft questions
Blog your craft journey

Brit
594 posts
and
41 followers
in almost 12 years
in almost 12 years
More from Brit
YouTube makes me laugh
Beginner's Guide to Sharpening Western Saws
The Humble Hand Brace - A Beginner's Guide to Restoring, Buying and Using #8: Part 8 - Tips and Tricks on Using a Hand Brace
The Humble Hand Brace - A Beginner's Guide to Restoring, Buying and Using #7: Part 7 - Sharpening an Auger Bit
The Humble Hand Brace - A Beginner's Guide to Restoring, Buying and Using #6: Part 6 - What to Look for when Buying a Secondhand Brace and more
The Humble Hand Brace - A Beginner's Guide to Restoring, Buying and Using #5: Part 5 - Tuning a Brace
This is
part 5
in a
8 part
series:
The Humble Hand Brace - A Beginner's Guide to Restoring, Buying and Using
During the restoration of RUSTY in Parts 1 to 4, I showed how to fix a couple of common problems. The first was scoring on the outside of the jaws caused by a rough finish on the inside of the chuck. In Part 1, I filed the jaws smooth again.
In Part 2, I showed how to smooth the inside diameter of the chuck.

In Part 3, I showed how to fix excess play in the sweep handle.
However there are a number of other problems that you might encounter on a secondhand brace. In this episode I'd like to bring these to your attention and show you how to fix them. Since it is unlikely that you'll find all these problems on one brace, I'll be showing you a few different braces along the way. The first is a Stanley No.144 8" sweep brace that I haven't done anything to apart from applying a few drops of oil.

First let's turn our attention to the head.
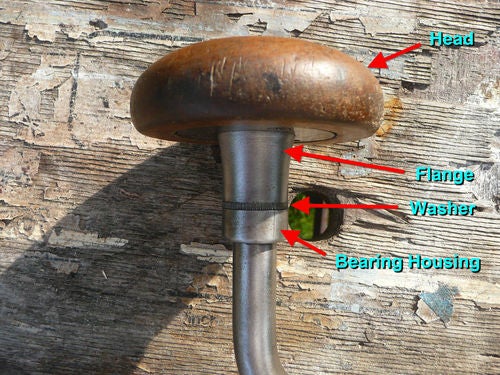
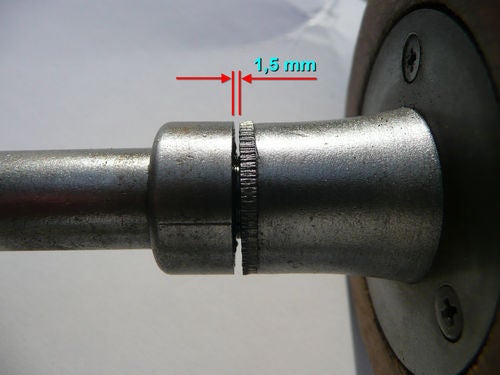
If you can move the head up and down more than 0.5mm, then you might want to fix the excess 'play' during your restoration. There are a couple of Head assembly designs that you are likely to come across. I'll show you both types, as the fix is different in each case. First let's look at the Stanley No.144. This has about 1.5mm of play.
Start by removing the three screws that secure the Head to the Flange. Remember that if the Head does not come off easily with the screws removed, then it is likely that the Head is screwed on to the flange. If this is the case, hold the flange and unscrew the Head. This one just fell off in my hand.
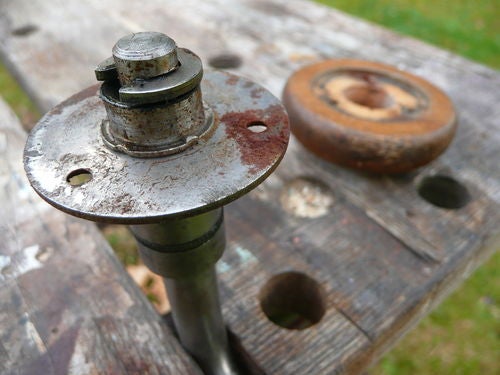
On this type of Head assembly, the metal bar has a shoulder that the Bearing Housing rests on. This is an unsealed ball bearing race so be very careful that you don't lose any of the little balls when you take it apart, especially if you are doing it over grass like me (No I didn't lose any). The washer sits on top of the ball bearings, then the flange. The whole assembly is held in place by a U-shaped key that slides into two grooves in the side of the bar.
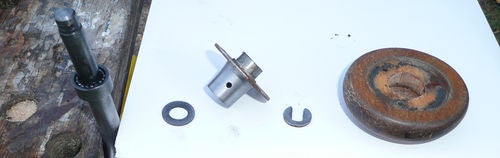
To dismantle it, slide out the key (it isn't tight), lift off the flange, followed by the washer. On this design, you can also lift off the bearing housing too as it isn't pressed or soldered onto the bar like some other designs. I opted to leave it on until I'm ready to restore this brace, at which point I'll remove it, take out all the ball bearings, clean it out and re-pack it with grease. Here are the parts laid out in the order they came off.
To remove the excess play, you either have to add a shim or simply replace the washer with a thicker one. Since the washer is knurled around the edge and is an integral part of the tool, I prefer to leave it original. In my opinion, the best place for a shim is between the U-shaped key and the top of the flange. In this way, you can remove the play and the fix will be totally hidden inside the wooden Head.
So now is the time to reach for that jar of assorted odds and ends that you kept telling the missus would come in useful one day. If you dig deep enough, I bet you'll find a washer that you can use as a shim. You might need to drill out the center hole a bit or reduce the thickness, but I'm sure you'll find a way. I use double-sided tape to stick the washer to a flat surface and reduce the thickness with a few swipes of a file. If you need to drill out the center hole in the washer, please don't try holding it with your fingers at the drill press. Instead grab a piece of scrap wood about 2" long and drill a hole through it the same diameter as the existing hole in the washer. Then turn the block on its side so the hole is horizontal and saw the block in two, perpendicular to the hole. Stick the washer over the hole with double sided tape and clamp it between the two pieces of wood by screwing them back together. Now take it to the drill press and enlarge the hole safely by drilling straight through the wood and the center of the washer.

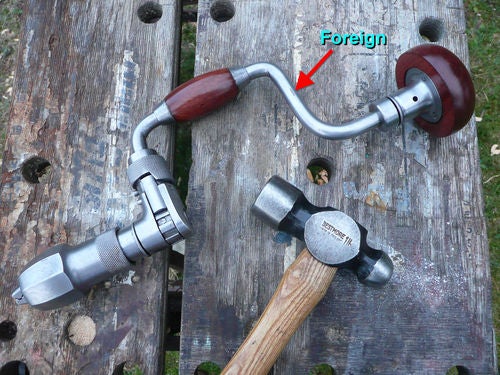
The other type of Head assembly that you're likely to come across is much easier to fix. You can see it on this lovely little 6" sweep brace, that I've been restoring in tandem with RUSTY. I've got no idea what make it is. It simply says 'Foreign' in small type and there are no other markings on it. Who cares right? She's gorgeous!
It also had excess play in the Head assembly. This is what I found after removing the three screws and unscrewing the Head from the flange.

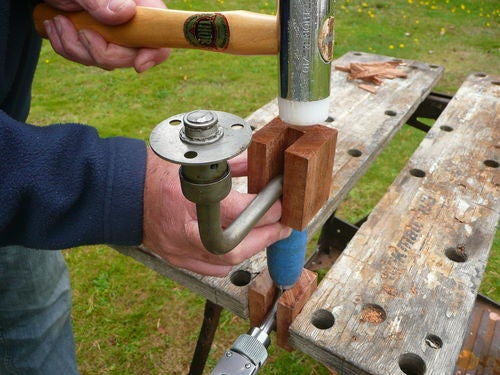
In this design, a washer sits on top of the bearing housing, then the flange, then another washer sits on top of the flange. The whole assembly is secured by peining the end of the bar itself. To remove any excess play, all you have to do is grip the bar in the vise just below the bearing housing, so that the underside of the housing rests on top of the vise jaws and then pein the end of the bar some more. For this you will need a Ball Pein hammer and you use the ball end to pein the end of the bar. I found that an 8oz hammer was too light, a 2lb hammer was too heavy and a 1lb hammer was just right for the job.

WARNING: It is a fine line between the perfect amount of play and totally locking up the flange so that it will no longer rotate. You need to sneak up on it and this is how you do it.
Raise the hammer about 4" above the end of the bar and just let the hammer drop onto the bar under its own weight. If you look at the end of the bar, the hammer will follow your gaze. Concentrate your strikes around the outside circumference of the bar, so you spread the metal out. At the same time, grasp the outside of the flange between your thumb and forefinger and continually turn it back and forth. After every 3 or 4 blows, check the amount of play. When there is no more than 0.5mm of play and the flange still rotates freely, you're done. If the flange suddenly becomes harder to turn, STOP!

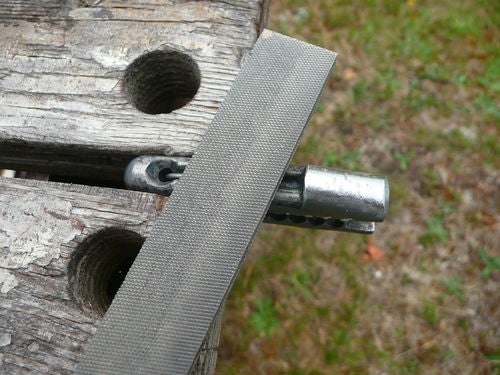
That's how you fix excess 'play' in the head assembly. Now back to the Stanley No.144 because it's time to look at a problem with one of the Pawls on the Ratchet mechanism.

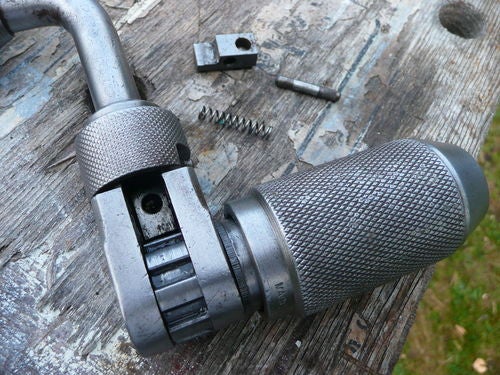
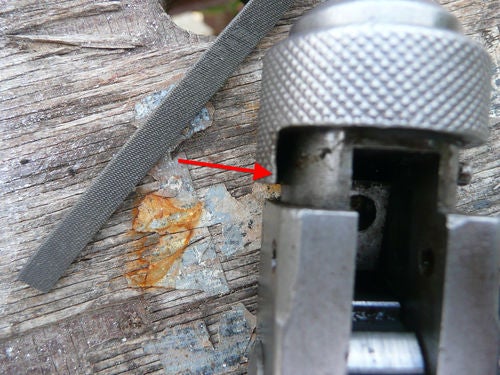
I noticed that I could turn the Ratchet Selector in one direction and it engaged the Pawl correctly, but when I rotated it in the other direction, it stopped abruptly when it met the Pawl and wouldn't ride over the surface as it should. The photo below shows where it snagged the Pawl. Now I could have just gone through life, pressing the Pawl in with my finger to allow the Selector to ride over the top of it, but why the hell should I? It was designed to work correctly and I'm sure it worked correctly when it was new, so let's make the darn thing work correctly now! Don't put up with it, FIX it.

Here's another view where you can see that with the Selector in neutral, the top Pawl sticks out more than the bottom Pawl. It's the top one that's the problem.

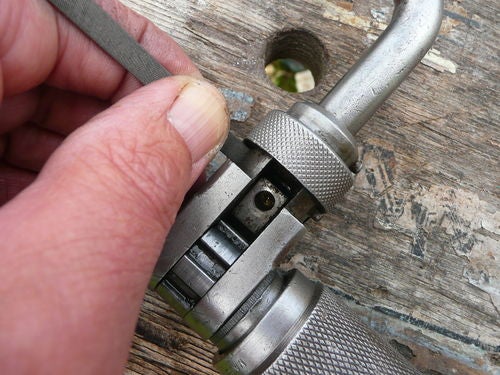
At this point, I had no idea why it was catching. Perhaps the compression spring under the Pawl was bent, or maybe there was an obstruction of some kind. To find out the cause, I had to remove the Pawl and that meant knocking out the retaining pivot pin. I couldn't find my pin punch, so I grabbed a suitable nail and filed the point off.

The pins are usually driven out towards the Head end of the brace.
WARNING: Don't forget that there is a compression spring under the Pawl and as soon as you drive the pin out, it will launch the Pawl across the room never to be seen again.
Gradually increase the amount of force with each strike of the hammer until you see the pin start to move.

One end of the pin has grooves around the circumference that go on for about 6mm. Stop when the grooves just clear the housing.

Put your thumb over the Pawl to hold it in place and wiggle the pin out the rest of the way by hand. Then slowly release your thumb and collect the Pawl and the compression spring in your hand.
In this case, there was no apparent damage to the spring or the Pawl. There was a small wood chip under the Pawl and a load of gritty grease which I cleaned out. It was then that I noticed the edge of the ratchet selector had a slight burr on it.
I filed this down with a flat needle file. I held the file close to the end and only had about 4mm of travel with each forward stoke. Even so, it only took about 45 seconds to file off the burr.
Seeing that there was no other reason for it not to work, I reassembled the spring and the Pawl and pushed the pin back in by hand to hold the Pawl in place. Then I mounted it in the vise and drove the pin home with the hammer.

Luckily when I tried the Selector again, it worked perfectly. I suspect the cause was a combination of the wood chip and the burr.
Another problem that you might encounter is excess play in the ratchet along its axis as shown below.
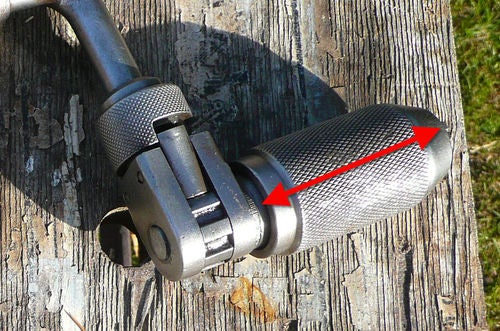
In a brace like the Stanley No. 144, there isn't really much you can do about it. However, some brace designs allow you to easily remove any excess. The following brace, a Stanley No. 923, is one such brace.

On this brace, you simply remove the split pin (see below) at the end of the ratchet spindle, turn the adjuster nut through increments of 90° in a clockwise direction and re-insert the split pin.

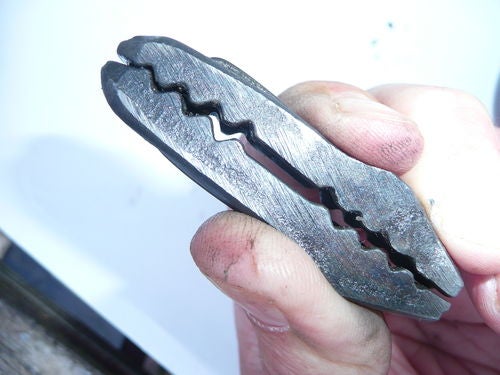
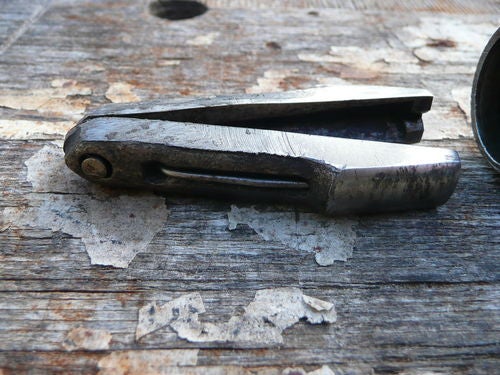
People often just look at the state of the jaws when buying a secondhand brace. Jaws, together with their spring, vary in design from manufacturer to manufacturer. The most important thing is that the jaws move in and out when chuck is rotated and that they meet at the end when the chuck is tight. If some of the teeth further back are a bit worn, the jaws will probably still work OK as long as they meet at the end. Just for reference, here are some of the different types you might encounter.


To finally wrap this part up, there is one brace that in my opinion represents the height of hand brace development in terms of functionality. It is the Yankee 2100, made by North Brothers (who were later taken over by Stanley). This example has a 12" sweep.
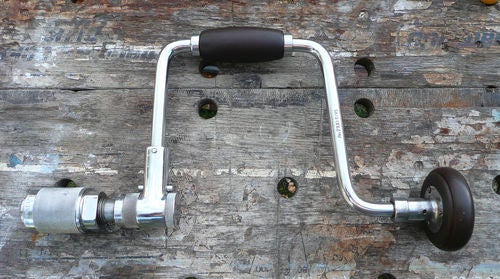
The ratchet on these and also the 2100A, 2101 & 2101A spins like a top when working correctly. It is engaged by pressing the button above the ratchet.

Many of the 2101 and 2101A versions were issued to Linemen who worked for Bell Systems in the US. Bell packed the ratchet mechanism with a type of grease that history has shown hardens over time. For this reason, many of these braces have stiff or seized ratchets. The mechanism is accessed by unscrewing the end cap as shown below.
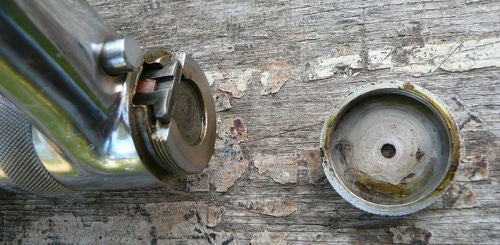
You can dismantle the ratchet, clean it thoroughly and it will work beautifully again. It isn't particularly easy to dismantle and is too detailed a process to go into here.
I hope the information presented in this episode is of some help if you decide to buy a brace and restore it. In Part 6, there will be a short video where I'll discuss some of the differences in design and what to look for when buying a secondhand brace.
Thanks for watching.
Andy -- Old Chinese proverb say: If you think something can't be done, don't interrupt man who is doing it.
1 Comment

Thanks for the pointers Andy.
Main Street to the Mountains
More from Brit
YouTube makes me laugh
Beginner's Guide to Sharpening Western Saws
The Humble Hand Brace - A Beginner's Guide to Restoring, Buying and Using #8: Part 8 - Tips and Tricks on Using a Hand Brace
The Humble Hand Brace - A Beginner's Guide to Restoring, Buying and Using #7: Part 7 - Sharpening an Auger Bit
The Humble Hand Brace - A Beginner's Guide to Restoring, Buying and Using #6: Part 6 - What to Look for when Buying a Secondhand Brace and more