


Share your craft projects
Make new craft buddies
Ask craft questions
Blog your craft journey

Brit
594 posts
and
41 followers
in almost 12 years
in almost 12 years
More from Brit
YouTube makes me laugh
Beginner's Guide to Sharpening Western Saws
The Humble Hand Brace - A Beginner's Guide to Restoring, Buying and Using #7: Part 7 - Sharpening an Auger Bit
The Humble Hand Brace - A Beginner's Guide to Restoring, Buying and Using #6: Part 6 - What to Look for when Buying a Secondhand Brace and more
The Humble Hand Brace - A Beginner's Guide to Restoring, Buying and Using #5: Part 5 - Tuning a Brace
The Humble Hand Brace - A Beginner's Guide to Restoring, Buying and Using #8: Part 8 - Tips and Tricks on Using a Hand Brace
This is
part 8
in a
8 part
series:
The Humble Hand Brace - A Beginner's Guide to Restoring, Buying and Using
...
-
Part 7 - Sharpening an Auger Bit
-
Part 8 - Tips and Tricks on Using a Hand Brace
...
- Part 7 - Sharpening an Auger Bit
- Part 8 - Tips and Tricks on Using a Hand Brace
In this episode I wanted to look at using a hand brace and explore some of the so called hints and tips out there to see if they really are useful. I'll also show you how to get in touch with your inner level.
I'm assuming you've sharpened your auger bits like I showed you in the last episode. A sharp auger bit is paramount for drilling a clean hole, however just because your bit is sharp it doesn't necessarily follow that you will get good results. So first things first, let's insert the auger into the chuck. Sounds simple doesn't it? You can actually damage the spring in the chuck if you don't do it properly, so in this short video, I show you how to insert an auger bit correctly.
NOW LET'S GET COMFORTABLE
A good stance is important when using any hand tool and the brace is no exception. When drilling vertically, stand with your feet apart facing your work. If you can, position the work piece so that the Head of the brace is about chin-height. Lean forward slightly and rest your forehead on the back of the hand holding the Head of the brace (don't fall asleep though). Why? Well as you know the auger bit has two cutting edges located opposite each other. As the auger bit rotates, both edges are either cutting with the grain or across the grain. Since it requires more effort on your part to slice across the grain, it gets easier, then harder, then easier then harder with each revolution. This makes it difficult to keep the Head of the brace steady unless you brace it against a part of your body.
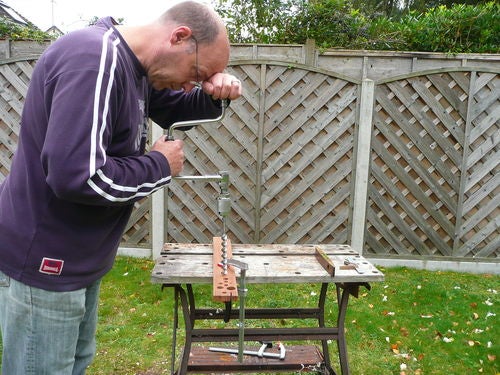
The same principle applies when you're drilling horizontally. Use whatever part of your body is comfortable to steady the Head of the brace. I find the most useful parts are the hip, belly, chest, shoulder and forehead. Also, notice the position of my feet. I am leaning slightly forward so that as the auger advances in the hole, I can take up the slack by moving my hip forward whilst still keeping the Head locked against it.

HOW TO DRILL A CLEAN HOLE
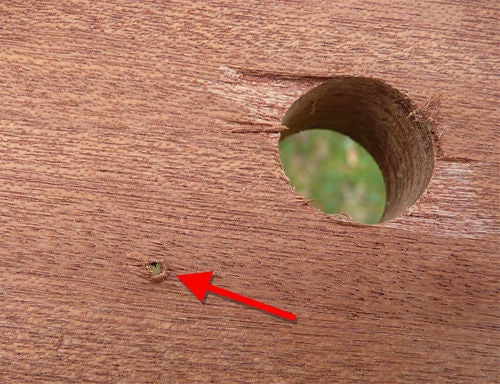
When you're drilling a through hole, as soon as the thread has exited the other side of the work piece, there is no longer anything pulling the cutters into the hole. The tendency is to compensate by pushing harder in order to cut through that last little bit and before you can stop it, the auger exits the hole at a fast rate of knots and this happens. ARGHHH!!!!!!!
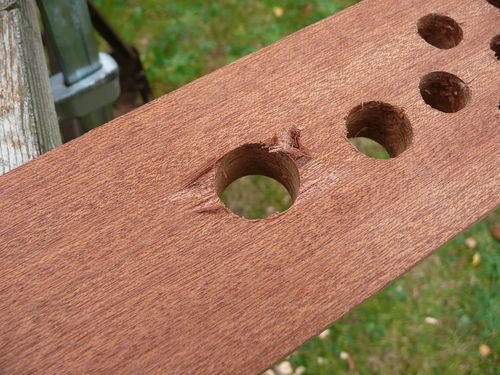
There are two ways to deal with this tear out and they both have their merits. Firstly, start drilling from the face side and periodically, feel on the backside for when the thread just starts to exit.

Remove the auger bit and turn the work piece over, then pick up the exit hole and finish the hole from the other side.
You still face the problem of having to push when the thread has nothing left to bite into and on thin stock like this, there is a danger that the spurs will catch the face side and split the wood on the surface. It is fine to use this method on stock that is over 1" though, as you have enough time to arrest the movement.
The second method for preventing tear out, and the one I like to use whenever possible, is to position a piece of scrap under the work piece and clamp them both securely to the bench. Then drill straight through from the face side. If drilling through dark wood, use a light coloured wood as the scrap piece. You know you're through when you see different coloured chips being ejected. It is also useful if you are drilling through hard wood, to use soft wood as the scrap piece. The brace will suddenly become easier to turn when you start drilling into the softwood, giving yet another indication that you are through the other side.
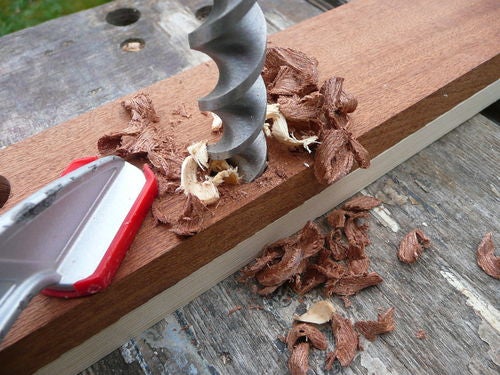
This method produces a clean exit hole even in this dry Sapele with its interlocking grain.

DRILLING VERTICAL AND HORIZONTAL HOLES ACCURATELY
There are a number of different tips related to accurate boring that surface from time to time. Before we look at them to see if they work, there is one tip that you should always utilize which relates to starting the hole. Just to recap, you've got a sharp auger, you've decided which of the above drilling methods to use and you've taken up a good stance. Use an awl to mark the center of your hole, then locate the thread on you mark. Start drilling slowly and look to see that both of the spurs start scoring the wood. This is a good indication that you are relatively vertical or horizontal. If one spur starts scoring before the other one, adjust your angle of attack accordingly.

Using squares
Many people use two squares to ensure they are drilling vertically. To do this, set the squares at 90 degrees to each other and before you drill any further ensure the auger is parallel to both squares. Adjust your angle if necessary before your continue drilling. I give this method the thumbs up, but it is not easy to do this when drilling horizontally unless you can clamp your squares to the work piece.

Ye olde ring trick
It is said that when drilling horizontally, old timers would slide their wedding ring onto the shaft of the auger before inserting it into the chuck. They would then use it to indicate whether or not they were drilling horizontally. If you can't visualize this, the following short video will demonstrate this theory. As you watch this, consider whether my wedding ring is helping me or just distracting me.
My verdict: I wish I could say this romantic theory worked, but honestly I think its rubbish, so I have to give it the thumbs down. If you agree that this technique is pants, let me tell you that it is an even worse aid to drilling vertically. LOL. There's also the ever present danger of losing your ring and having to answer to SWMBO. However I'm not one to dismiss the work practices of old timers lightly, so I thought it was worth a little experiment to see if I could improve the accuracy of this technique.
I squared up an off-cut of hard maple 180mm long, drilled a hole through it and ripped it down the middle lengthways. Then I fashioned a large washer with a file, rebated it into the middle of the two halves and glued them back together. This washer meant that there would be two fulcrum points resting on the auger shaft.

Then I drilled out the top to receive a bullseye level and centered it in the hole with epoxy.
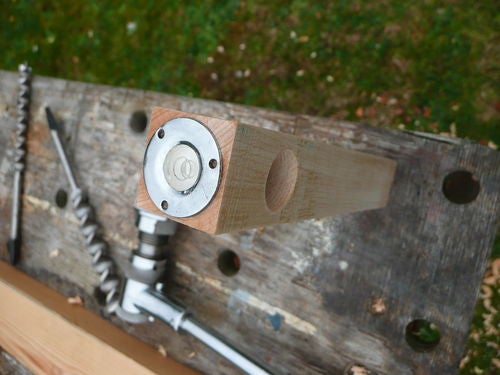
I laid a straight metal rod on my granite breakfast bar (a known flat surface) with about 3" hanging over the edge and then suspended my new aid from the bar to see if the bubble in the level centered correctly. It was slightly off but a couple of swipes with a No. 4 ½ on one side brought it back to level. With a spring in my step, I rushed outside to try it out.

My verdict: Undoubtedly better than the wedding ring, but too sensitive. I was going dizzy trying to watch the little bubble go anywhere except inside the center circle. Shame really. :-( I was going to call it a Bull's Eye Bob, as it was a cross between a bull's eye level and a plumb bob. Oh well, nothing ventured….etc.
Using reflection
The use of reflection is a wonderful aid to the hand tool woodworker. I use the reflection of the work piece in my saw plate all the time to ensure that I am sawing perpendicular and vertical. Often I don't even bother marking a line to follow, because a reflection in flat surface can't be wrong. So you could say, I had high expectations of this technique. Here's how it works:
Get yourself an old CD or DVD and tape it down to you work piece (you might have to enlarge the center hole a bit) When you are drilling vertically or horizontally, the reflection will continue in a straight line.
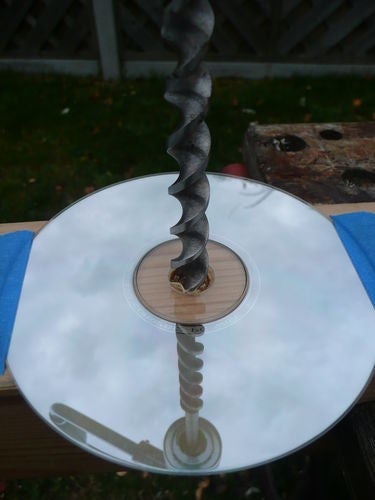
If you deviate, the reflection will bend away.
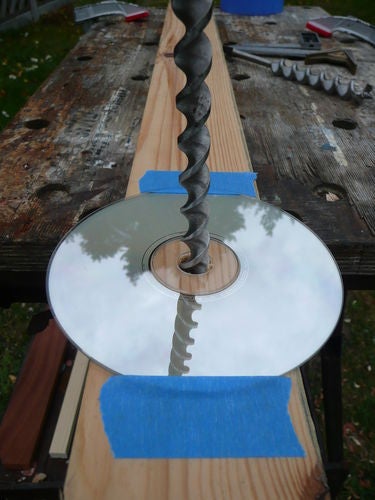
My verdict: This works a treat and by looking at the reflection from different viewpoints you can ensure you are spot on.
Drilling at an angle
Using Jennings Pattern or Irwin Pattern auger bit, with care you can also drill at an angle, at least up to about 30 degrees. It is best to engage the thread perpendicular to the work piece and as you turn the sweep handle, move the Head until you are at your angle. It is important to do this whilst turning or you risk bending the thread. You can then use a sliding bevel gauge to check your angle.

Drilling a blind hole to depth
When measuring for depth on an auger bit, you need to measure up from the cutting edge, not the tip of the thread or the tip of the spurs. Over the years manufacturers have patented a number of devices that clamp to an auger bit and act as a depth stop. Millers Falls made one I think, Stanley made one that used a spring and Eclipse made this one.
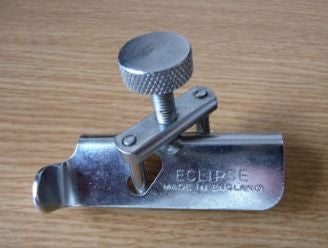
I don't own any of these, but I know Mads has the Eclipse version, so these two photos are courtesy of Mads. Thanks Mads.
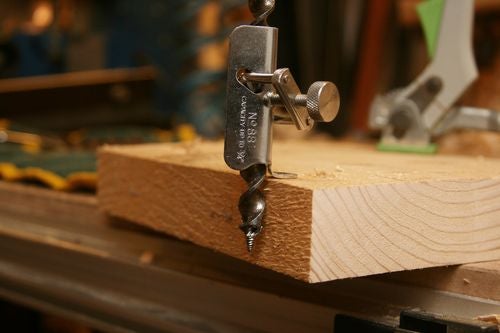

I believe the the Eclipse depth stop fits auger bits up to 3/4". At the moment though, I just wrap masking tape around the auger bit.

The only problem with using masking tape is that you need to constantly clear the chips away as the tape approaches the surface of the work piece, otherwise they can rip the tape or cause it to move up. A permanent marker would probably be better.
To sum up, whilst some of these tips and tricks do work at least in part, I'm not sure they are really necessary. The good news is that the human body has a remarkable ability to see and even feel when something is vertical or horizontal and whether something is square. The problem is that we don't use this inbuilt ability enough and are too quick to reach for the laser level. So take a moment to reconnect with your inner level.

Feel better? Good! Now grab a hunk of softwood about 3"x3" and practice boring. How many of you were satisfied with your first dovetails or any other joint come to that? Accurate drilling, like any other hand tool technique requires practice and therein lies its appeal. There would be no challenge, no sense of achievement if everything worked first time.
Mark the center points for a number of holes. Follow those marks around to the back side of the work piece and mark them there also. Start drilling and sense vertical or horizontal. Stop when the thread just exits and see where you are in relation to your mark. If you are off, correct it on the next attempt.
Well that just about wraps this blog series up. Who would have thought that there was so much to say about the humble hand brace and we've barely scratched the surface. I've really enjoyed writing this blog and I've learnt a hell of a lot along the way. It only remains for me to thank all of you for your support. I hope you've found it informative and entertaining. At the very least, I hope I've convinced you that this simple tool deserves your respect and a place in your shop.

Thanks for watching.
Andy -- Old Chinese proverb say: If you think something can't be done, don't interrupt man who is doing it.
3 Comments

like the idea of the bubble level.
Ron

Great write up Andy, good points for me to consider.
Main Street to the Mountains

Great write up! Thanks for all the information. I have really grown to love using my brace. It is really a pleasure to use and I feel like I have much more control than when using a power drill. You are 100% right about having sharp augers though. Once I figured that out it totally changed the game for me.
Jerry-Holland Mi
More from Brit
YouTube makes me laugh
Beginner's Guide to Sharpening Western Saws
The Humble Hand Brace - A Beginner's Guide to Restoring, Buying and Using #7: Part 7 - Sharpening an Auger Bit
The Humble Hand Brace - A Beginner's Guide to Restoring, Buying and Using #6: Part 6 - What to Look for when Buying a Secondhand Brace and more
The Humble Hand Brace - A Beginner's Guide to Restoring, Buying and Using #5: Part 5 - Tuning a Brace