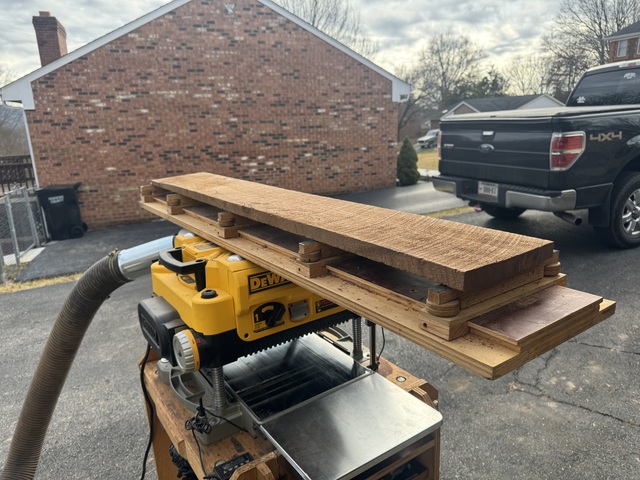
Well, I didn't really have the whole weekend but I had most of the day Saturday and a couple hours Sunday. My goal was to get all my boards milled to size and get an edge jointed. I had to open my bay door to plane the longer boards and Saturday was gorgeous so I got up and got going.
This is too much stock for me to spend the time flattening the first faces with hand planes so I used my planer jointing sled to do the work.
This is the first project I've used my Dewalt planer on. I bought it last summer from a retired fella on Craigslist. He listed it for $150 for "parts." So I called him and asked him what was wrong with it. He said he bought it 2 years earlier and could never get the feed rollers to feed boards properly. So he took it apart to see if he could fix it. Well he couldn't figure it out so he planed his boards using somebody else's planer and didn't make anything else after that. So he didn't need it and it became out of sight, out of mind. So he eventually went to try and work on it but not only couldn't fix it but couldn't figure out how to put it back together. So instead of futzing with it, he just put it on CL. He had all the parts neatly bagged and boxed and said he was certain they were all there. So I rolled the dice and went and got it.
So I spent a Saturday rebuilding it. Between pics online and the parts list drawings, I was able to get it back together and working. But I only ran a couple test boards to make sure it was cutting and feeding. Which is why I wasted my weekend...
Face jointing it worked fine with my sled but I was getting way worse snipe than I ever got with my old Delta lunchbox which was my whole reason for wanting the Dewalt to begin with. I measured .025" snipe on some boards!
So I spent some time googling and found all the usual solutions like changing blades and raising the ends of the tables slightly. I had already set the tables with a rise at the ends so I flipped the blades around even though they were cutting cleanly.
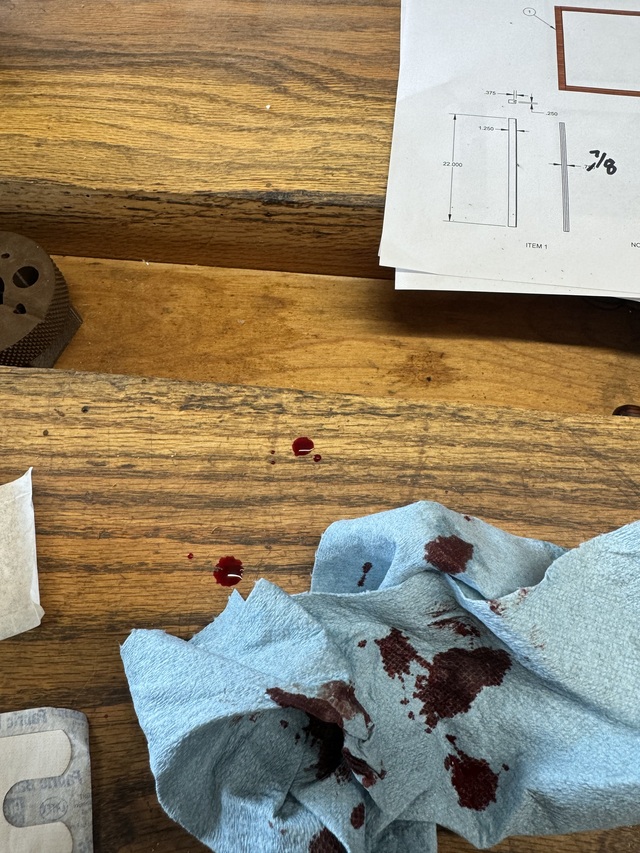
I often say that all my projects get some blood, some sweat, and some tears in them. Well, I got the blood out of the way early while changing the blades. Sliced the end of my index finger pretty good 🙄
Back at it with new blades and no improvement. I figured maybe it had to do with my sled. Even though the boards were fully supported, I thought maybe my supports were flexing and decided just to finish flattening the first side on all the boards and then see if it was better when I thicknessed them and I could clean up the sniped ends at that point.
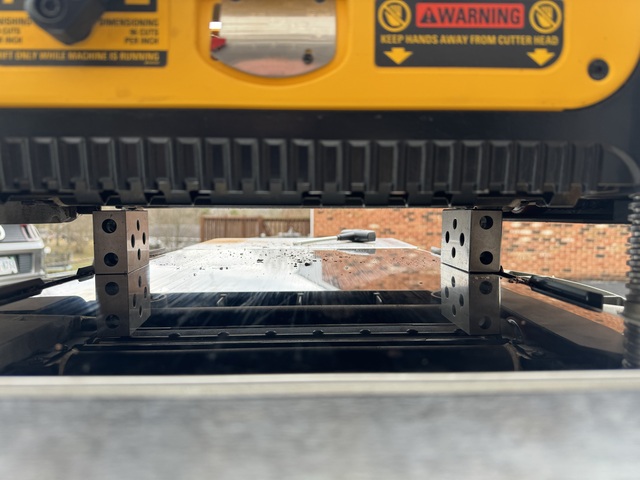
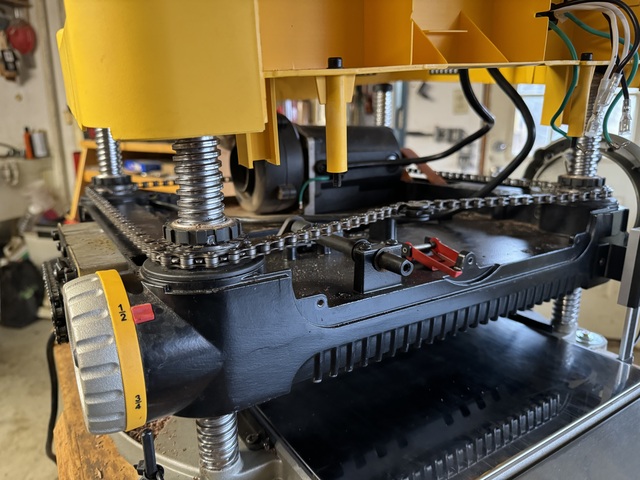
So when I got them all flat, I ran the first board through. Once I cleaned up the second side I measured along both edges and it was .050" thicker on one edge than the other! So I checked to make sure all the blades were still properly seated and they were. So I stuck my 1-2-3 blocks under the sides of the cutterhead and it was obvious it was out of alignment. The roller is touching the block on the right with daylight clearly visible between the rollers and the one on the left. Good grief. So off I went to google and YouTube. Apparently I'm one of the very few people who have gotten one of these planers that was misaligned because there was nothing I could find about adjusting the head alignment other than a couple forum posts with people asking how to do it. The only advice anyone offered was to take the drive chain off, rotate the sprockets so it was aligned properly, and put the chain back on. So that's what I did. But, no bueno. The sprockets didn't align to the chain links when the head was set parallel and they are keyed to the posts so they can't be rotated independently. Grrrrrr.
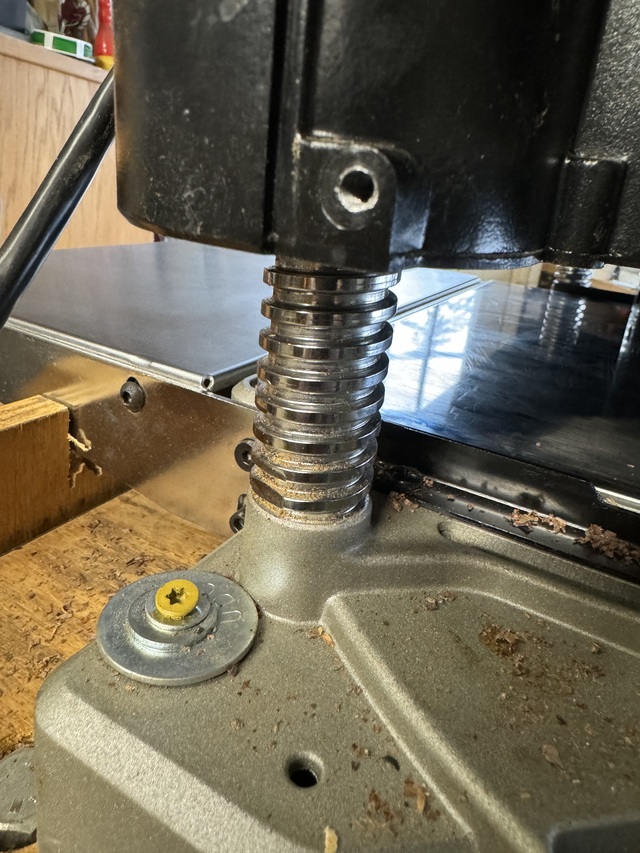
So I figured I was going to have to take it off the stand but when I was removing the first mounting screw, I noticed a wrench flat on the post: Bingo. I put the chain back on the sprockets and clamped the adjustment wheel so they couldn't turn and was able to adjust each post independently. I couldn't find a good way to measure from the cutter to the table so I just used my blocks and aligned it so both rollers barely touched the blocks on both sides. I figured if the cutter wasn't parallel to the rollers, I could adjust it based on a test board. But I ran a test board through and it was within .005" on both edges which is plenty good enough for me. And BONUS, the snipe went away almost entirely 😎 I also noticed that the feed was much stronger so I suspect the misalignment of the head was the problem for the CL seller from the get-go.
So last night after work I pushed it out into the driveway and finished thicknessing my boards. All went smoothly other than I found out I mounted the scale on my digital height gauge upside down. So I flipped that around. All of my boards are now thicknessed though. The only real damage from the planer issue is that the board I had planned to use for the door pieces needed to be 7/8" thick. And that was the board I ran through the misaligned edge. By the time I got it cleaned up it was too thin.
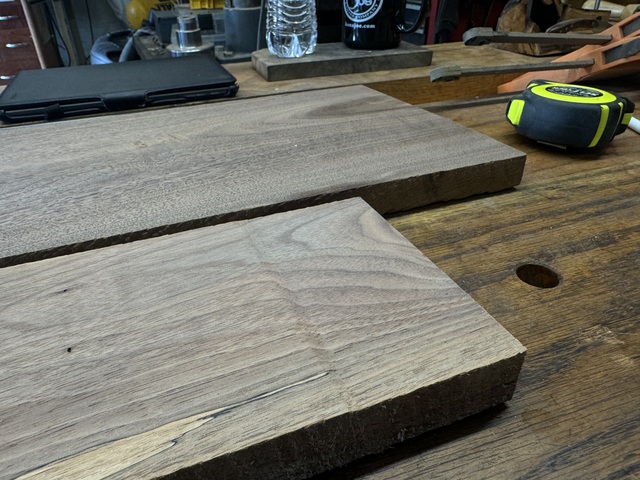
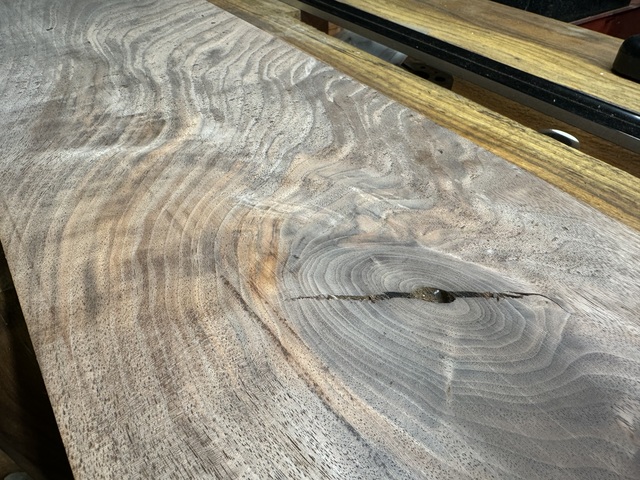
So I decided to go back to my original plan and use my "sexy" board for the door pieces. It has some really great grain and color but I had originally decided not to use it because it has a big knot and I couldn't get all the door pieces from the board if I cut the knot out. But it is plenty thick so I decided that I could deal with the knot.
I can get two clean pieces from the left edge and one from the right but the edge of the knot will end up in the last piece. I decided that with the way the door is constructed it would end up stable and if I do it just right, I'll only end up with the edge of the knot visible on the inside edge of one of the door members. Before I processed the board, I figured I should fill the knot to hopefully strengthen the area and for appearance sake. So I used a pick and an air gun and cleaned it out and dyed some epoxy black. Taped up the back side and poured it full.
So when the epoxy cures I'll thickness this board and start jointing edges. That's normally a hand plane job for me since I don't have a jointer anymore. But I also have a straight-edge rip jig for my table saw that I may resort to in the interest of time.
I also made my decision on hardware. I bought a 12-pack of SOSS invisible hinges on Ebay. And decided on these latches instead of hasps for the other side. The unmatched hardware was bugging me though so RyanGi was gracious enough to offer to powdercoat the latches for me to match the hinges. Thanks Ryan! 😁
quite the saga there lol Sounds like much of my experience with planers... spend a while chasing your tail feeling like you'll never get there, then all of a sudden "Holy crap, it just works" :D
Well, wait until you get the latches before you thank me 😂 Metalic colors can be tough to match with powder…I see you doing some work on those hinges to make them match!
Ryan/// ~sigh~ I blew up another bowl. Moke told me "I made the inside bigger than the outside".
There's no need for an exact match. They won't be visible unless the box is open other than the lever on the latches. Brass and brass-ish will work just fine 😎
I've got a second one on the docket now for my mom. Completely different design but I'll likely do some of the work in parallel like milling and ripping. Mos' project post gave me the finishing touches I was looking for on the design 😁
It should be easy enough to get the brass to patina up and look ‘browner’ to match the bronze powder…at least from what the pics look like! We’ll see soon.
Ryan/// ~sigh~ I blew up another bowl. Moke told me "I made the inside bigger than the outside".
Well look at it this way, The planer is now fixed, so going forward you have that in your arsenal. I think an indispensable piece.
Hopefull the one scratch is all the bad luck and bleeding you will do.
You ended up with a fabulous looking board. The whorl, and burlie looking area around the knot makes it worth keeping.
I think it's gonna be a great looking shadowbox.
I looked at Dad's and like the box, just wish I had used some better looking wood, it's just plain Walnut, not a lot of character. I had some of the same Walnut I kept, and when he died made his flag case from it, it came off one of our old farms, so I doubt I'll ever change it out.
Thanks for the comments guys. The planer was a bargain money-wise but there's always that time/money tradeoff. I got it for 25% of a new one but between rebuilding it and my adventures this weekend, I probably have close to 20 hours of work in getting it running like new. I'll tell you what though, the dust collection on that thing is awesome! I was running the first boards through and when I turned it off, I noticed the top bag on my DC deflated and realized I never turned the DC on 😂 The planer blows so hard, the DC motor is unnecessary! I knew it when the collector bag got full too because chips started coming out of every opening in the planer... That's what leaf blowers are for 😉
Yeah George, the rest of my boards for this build are just nice clear Walnut. Nothing special. But I've been hoarding that sexy board for several years for just the right project and the door for this box feels like the right one so I'm glad plan A fell apart so I was forced to reconsider using it with the knot. I think it'll look fabulous 😎 I'm a little jealous that it won't be in my house so I can see it every day though...