


Share your craft projects
Make new craft buddies
Ask craft questions
Blog your craft journey

Ron Stewart
953 posts
and
24 followers
in over 3 years
in over 3 years
More from Ron Stewart
 - Project by Ron Stewart")
 - Project by Ron Stewart")


Modern Sideboard with Aluminum Accents


I originally documented this project on July 3, 2020.
My wife and I designed, and I built, this sideboard for our kitchen, which is in the final stages of a remodel. We won't use it to hold dishes or serve food. Instead, we'll store cookbooks in the main cavity, office supplies in the drawers, receipts, menus, and working papers in desk trays in the open cubby, and odd and ends wherever they will fit.
Aside from the storage requirements, my wife wanted the visible edges on the front of the sideboard to be thin to give it a more refined, less chunky appearance.
The sideboard will be located along a short wall near the opening to our family room, so it needed to be as narrow as possible while remaining practical. Overall, it's 42" wide, 32" high (not including the 6" legs), and 13 1/2" deep.
For the finish, we opted for paint even though I really, really dislike painting. (I don't have a sprayer, and I always struggle to achieve a smooth, even finish.) We tested a few paint types and settled on General Finishes Milk Paint in Queenstown Gray. Internet sources vary on whether a topcoat is needed. I didn't topcoat it, so I hope it's durable. We also wanted some interesting accents and decided on inlaid aluminum strips, brushed nickel finger pulls, metal legs, and shadow lines between the sides and top/bottom.
Because of the painted finish, I decided to build the sideboard entirely from Baltic birch plywood. I thought its void-free composition would let me paint the exposed edges without resorting to edge banding.
My wife is really happy with the sideboard, and it fits well with the modern design of our new kitchen.
For anyone who is interested, I'll describe some construction details and challenges below. Thanks for looking!
Building the Case
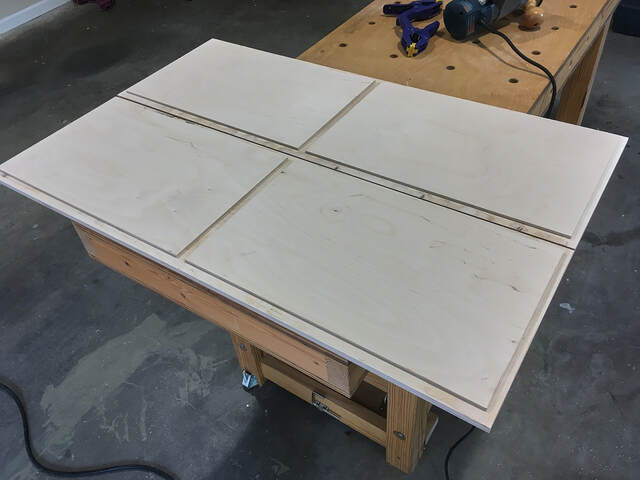
I don't build many large cabinets, and I was worried that 1/2" plywood would flex or sag over time. I opted for 1/2" plywood for the sides, but 3/4" for the top, bottom, and vertical dividers.
To make the top and bottom look like they were made of 1/2" plywood, I cut rabbets on the front edges (above the drawers and below the doors).
My wife and I designed, and I built, this sideboard for our kitchen, which is in the final stages of a remodel. We won't use it to hold dishes or serve food. Instead, we'll store cookbooks in the main cavity, office supplies in the drawers, receipts, menus, and working papers in desk trays in the open cubby, and odd and ends wherever they will fit.
Aside from the storage requirements, my wife wanted the visible edges on the front of the sideboard to be thin to give it a more refined, less chunky appearance.
The sideboard will be located along a short wall near the opening to our family room, so it needed to be as narrow as possible while remaining practical. Overall, it's 42" wide, 32" high (not including the 6" legs), and 13 1/2" deep.
For the finish, we opted for paint even though I really, really dislike painting. (I don't have a sprayer, and I always struggle to achieve a smooth, even finish.) We tested a few paint types and settled on General Finishes Milk Paint in Queenstown Gray. Internet sources vary on whether a topcoat is needed. I didn't topcoat it, so I hope it's durable. We also wanted some interesting accents and decided on inlaid aluminum strips, brushed nickel finger pulls, metal legs, and shadow lines between the sides and top/bottom.
Because of the painted finish, I decided to build the sideboard entirely from Baltic birch plywood. I thought its void-free composition would let me paint the exposed edges without resorting to edge banding.
My wife is really happy with the sideboard, and it fits well with the modern design of our new kitchen.
For anyone who is interested, I'll describe some construction details and challenges below. Thanks for looking!
Building the Case
I don't build many large cabinets, and I was worried that 1/2" plywood would flex or sag over time. I opted for 1/2" plywood for the sides, but 3/4" for the top, bottom, and vertical dividers.
To make the top and bottom look like they were made of 1/2" plywood, I cut rabbets on the front edges (above the drawers and below the doors).
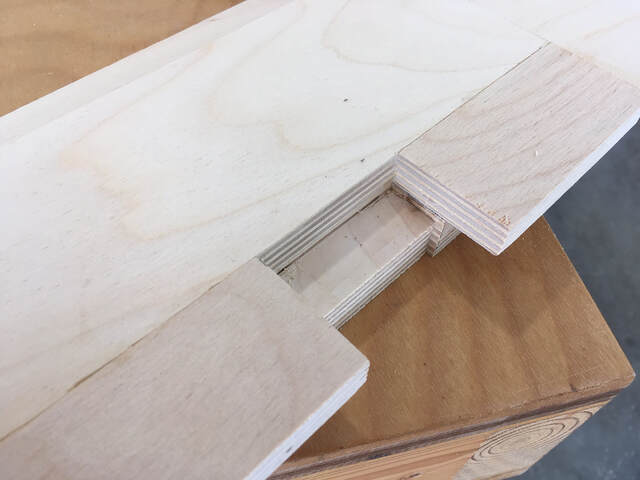
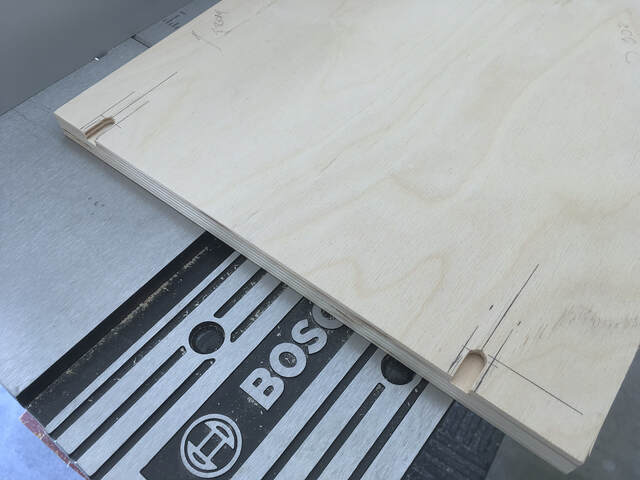
I also cut rabbets and dados for joints. That let me easily test-fit the case parts and kept everything aligned during glue-up.
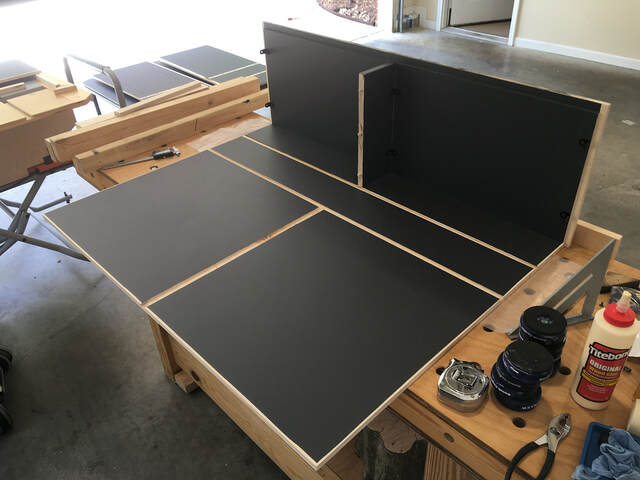
I'll talk about this more later, but I painted the interior surfaces before assembly.
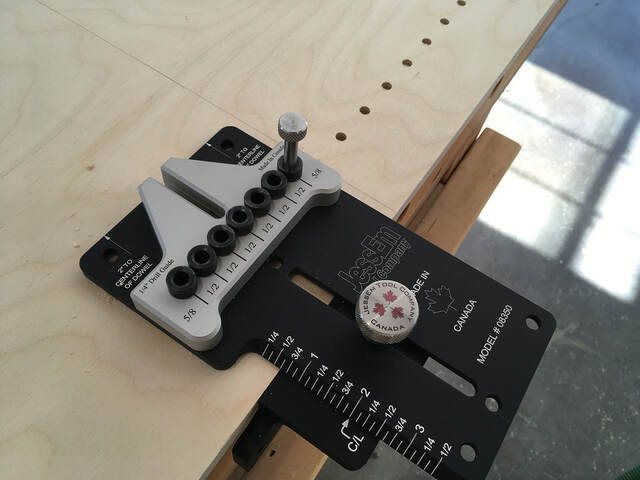
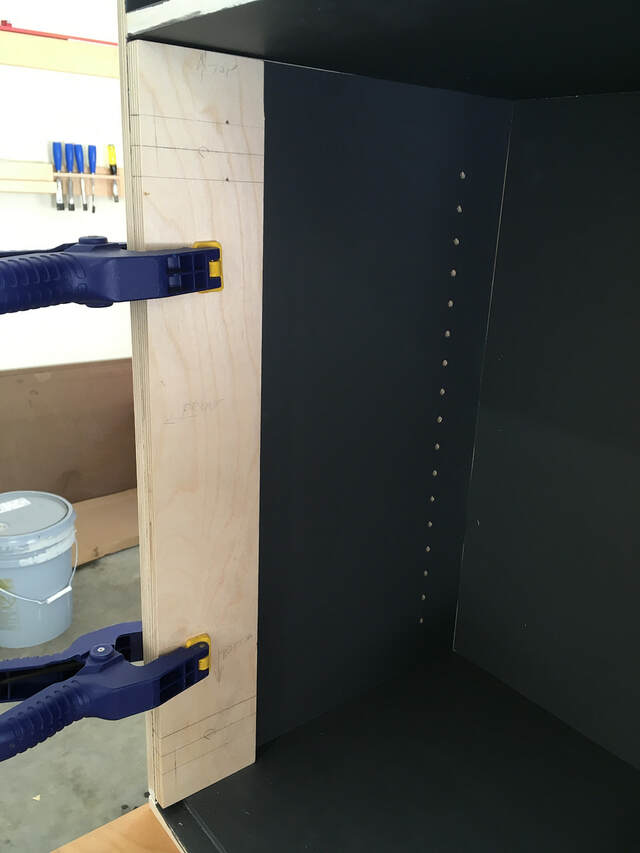
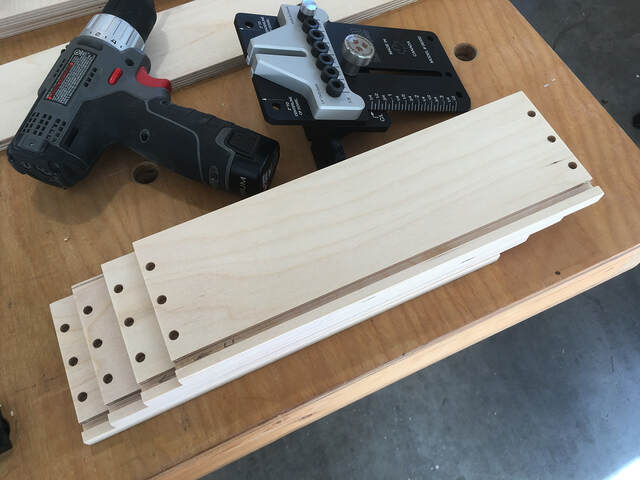
Because the sides were so thin, I didn't cut dados for the cubby shelf and under-drawer dust panel. I used dowels instead. My new JessEm doweling jig made that job easy. (I don't know if it's possible to love a tool, but this jig makes me think it's possible.)
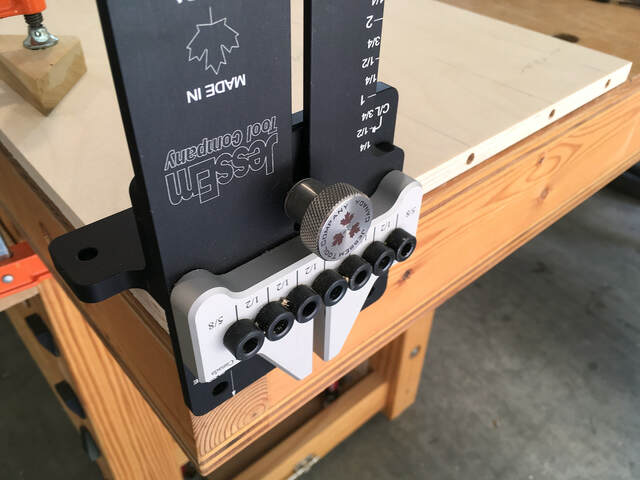
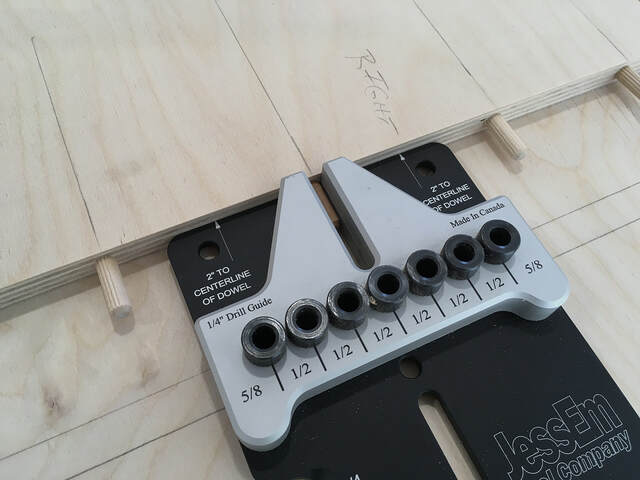
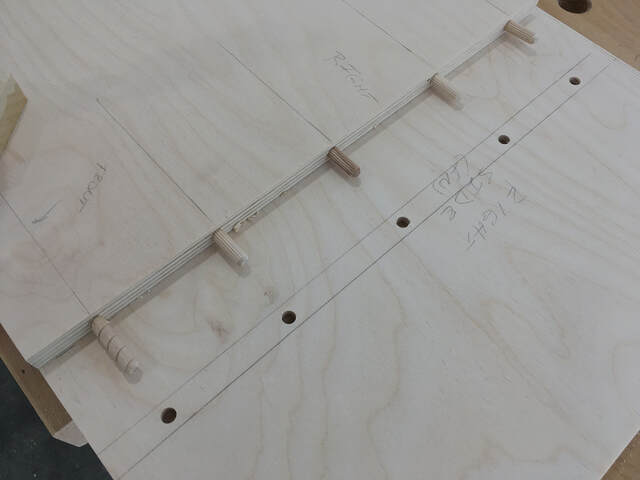
I also used the JessEm jig to drill the shelf pin holes.
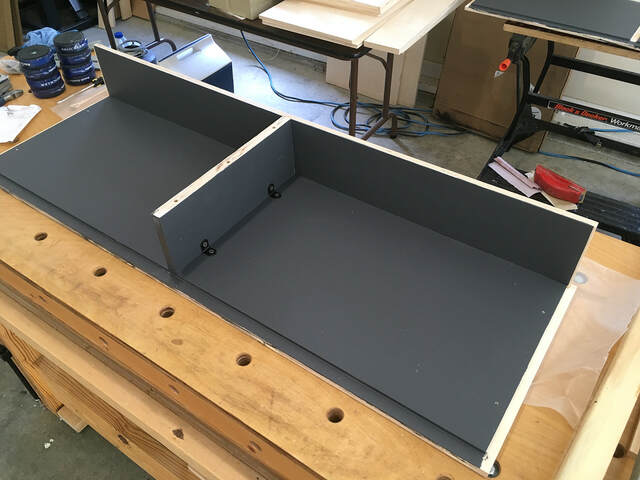
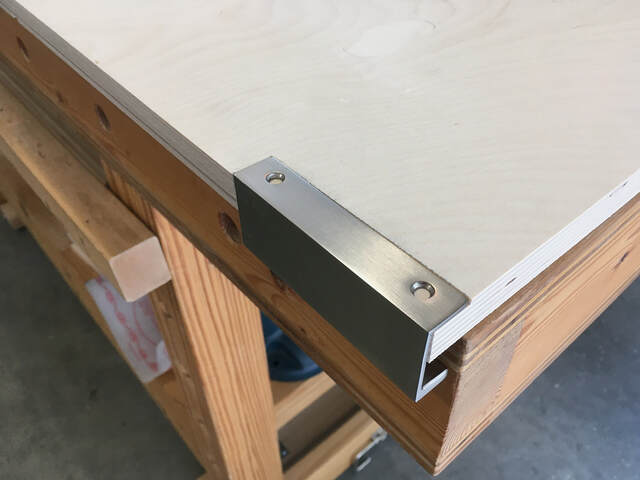
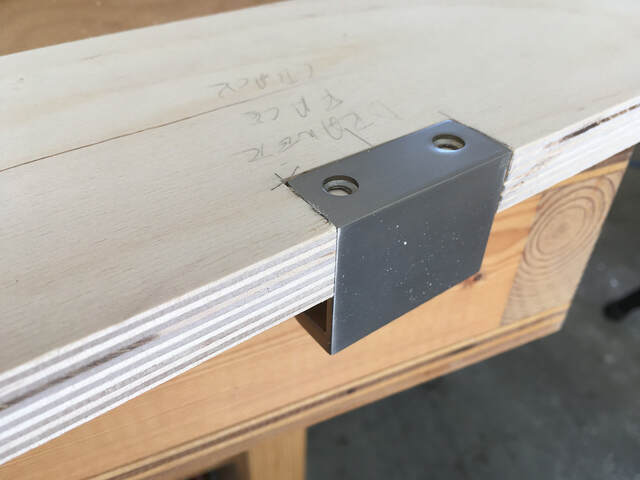
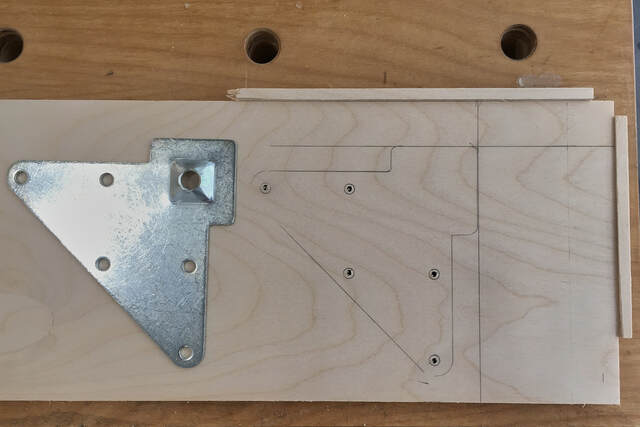
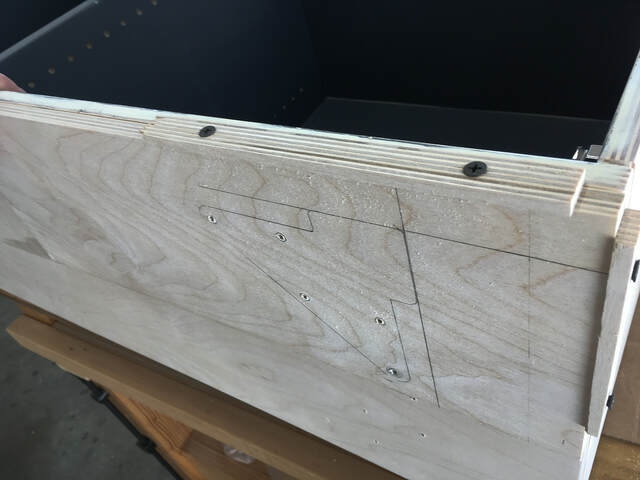
To strengthen the side/top joints, I added small metal angle brackets. They're hidden by the drawers.
I used dowels through the bottom into the sides to reinforce those joints.
I opted for a 1/2" back to further strengthen the case. I had to piece it together in sections because of how I had the plywood cut for shipping (and to omit the vertical dado from the back of the cubby).
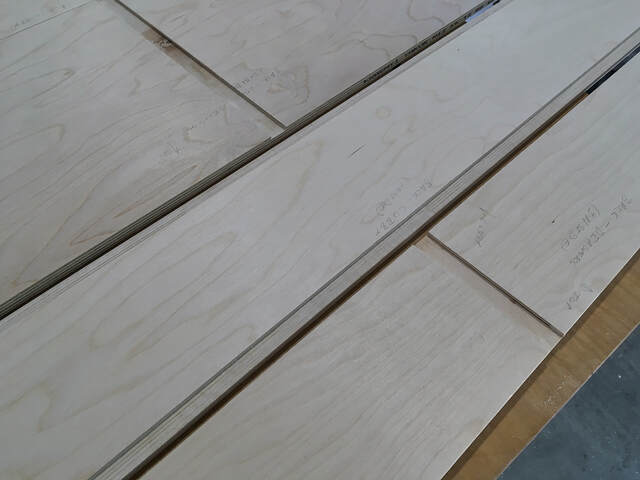
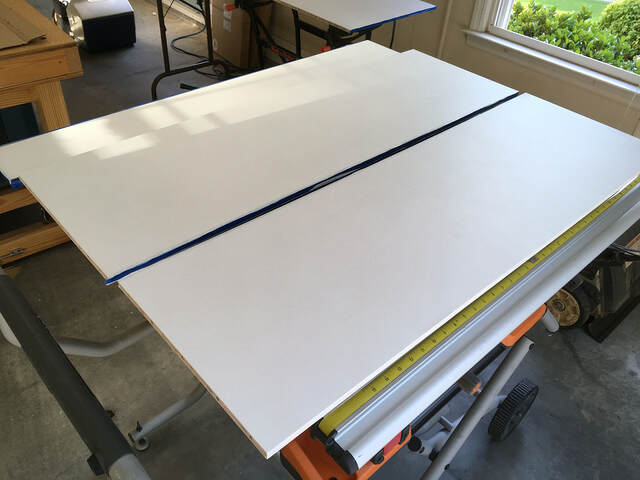
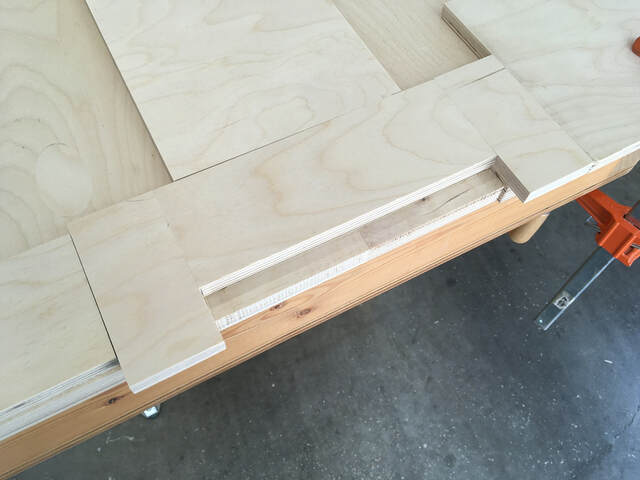
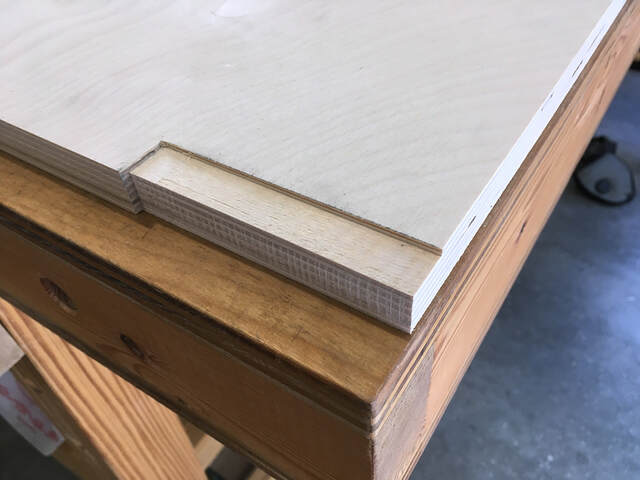
Cutting Dados for the Aluminum Accent Strips
I recently built a kerfmaker based on the design from YouTube creator I Simply Built This (https://www.youtube.com/watch?v=uhPvanE9fnc). I have seen several designs, and his is my favorite.
This project gave me my first opportunity to use it on a real project. It worked very well. I used it with my table saw to cut all of the dados and rabbets for this project, including the dados for the aluminum inlay on the drawers and door fronts.
To use it, I lined up the cut closest to my sled's stop, used the kerfmaker with the tongue extended to set the stop block's position, and made the cut.
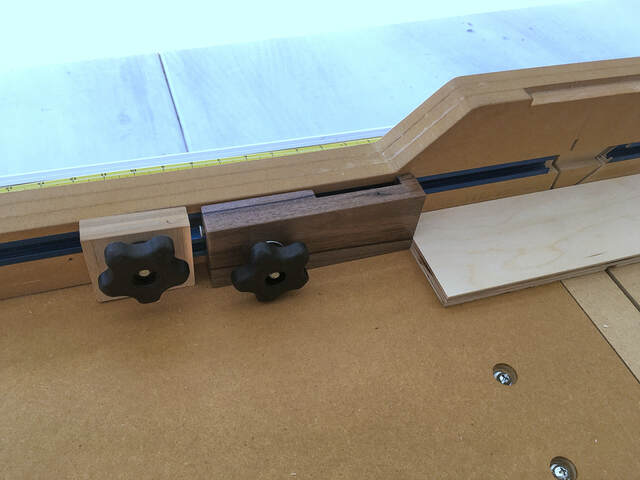
Then, without moving the stop block, I rotated and moved the kerfmaker so its set screw touched the stop block, moved the work piece to contact the kerfmaker, and made the second cut.
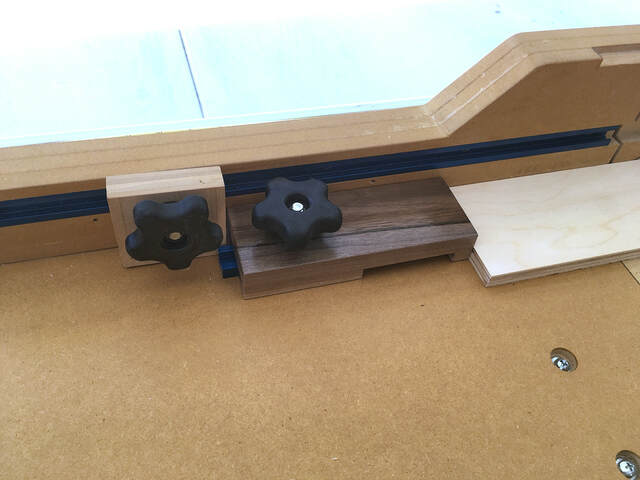
Then I just made repeated cuts to remove the remaining material.
The only thing that would have made this job easier was a flat top grind saw blade. It took some sanding/scraping to flatten the grooves left by my saw blade.
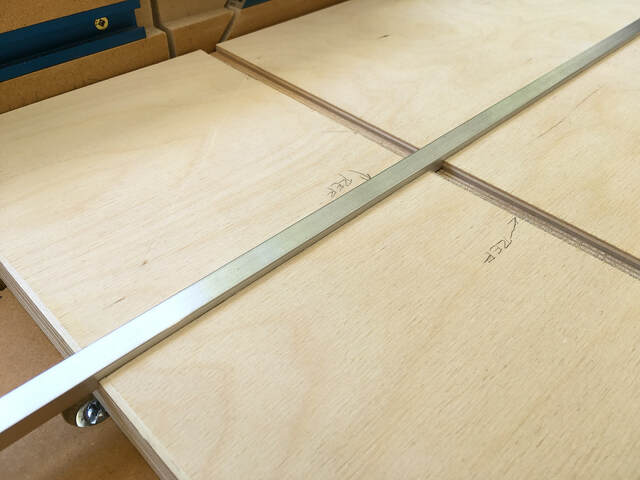

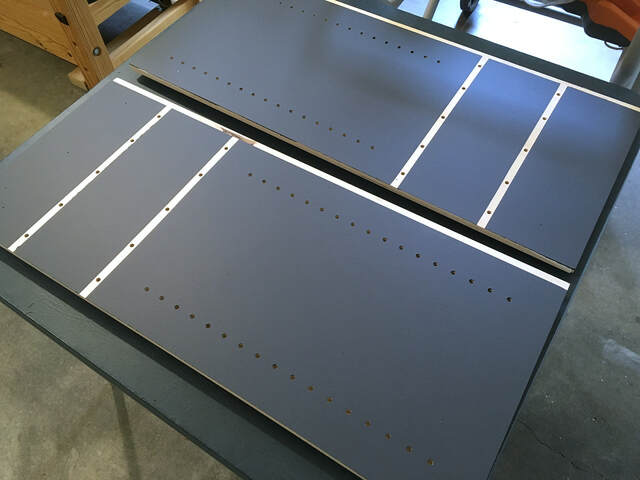
Working with Aluminum
The accent strips are 3/8" wide, 1/4" thick 6061 aluminum bar stock from McMaster-Carr.
The worst thing about working with it is cleaning it. I used a combination of 150-grit sandpaper and Scotch-Brite pads. It makes quite a mess (very fine dust particles), and I've learned to cover my workbench when cleaning metal to avoid powder stains.
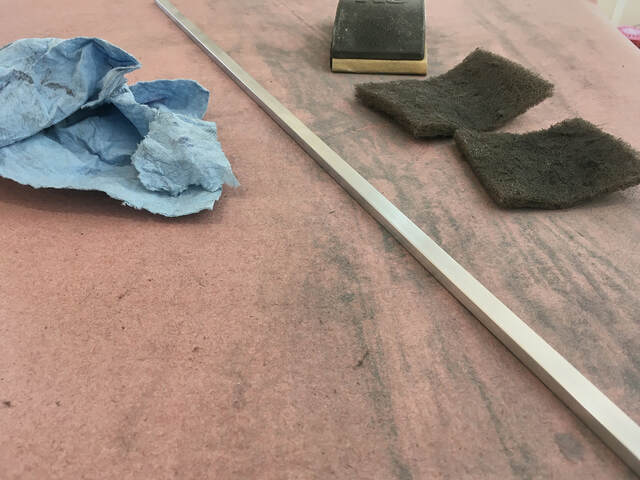
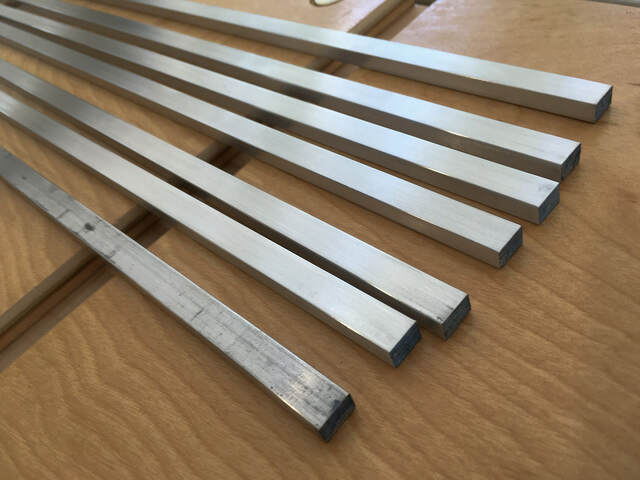
Otherwise, it's not too different from wood. I used my table saw to cut the pieces to size, and I used sandpaper to round over the outside ends.
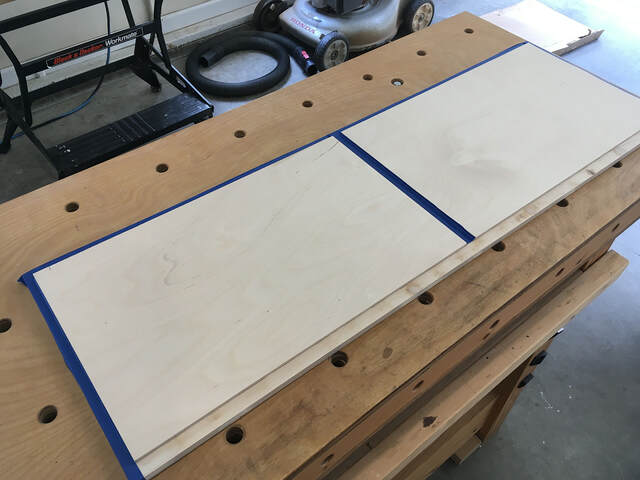
Painting (Prefinishing)
As I mentioned in the introduction, I don't like painting. I'm hopeless with a brush and only slightly less so with a mini foam roller. I didn't relish the idea of painting the inside of the sideboard after construction, so I decided to paint all of the interior surfaces first.
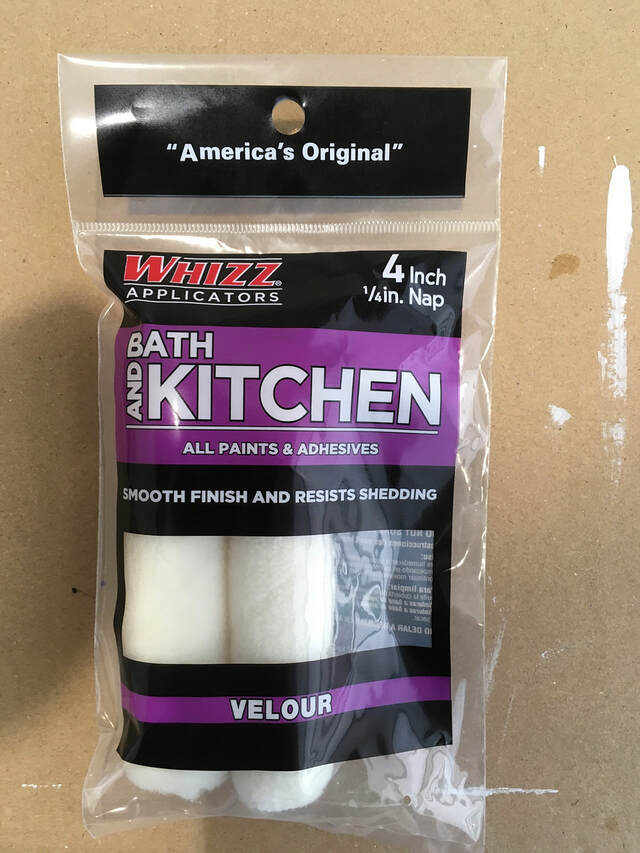
I tested both foam and short nap (1/4") rollers and got slightly better results from the latter. The main difference was that the short nap roller didn't show pressure/friction marks as easily as the foam roller.
This photo is more of a reminder for me if I forget what to use in future projects. I found it at Lowe's.
Before priming, I taped off all of the dados and rabbets that would later receive glue. That was very tedious.
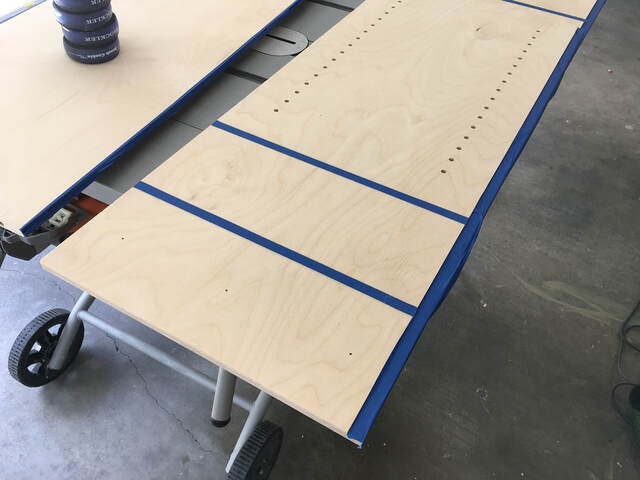
I applied two coats of Zinsser 1-2-3 primer. It was easy to apply, dried quickly, and sanded well. I don't know if BIN (shellac based) would have been better or not.
I used General Finishes Milk Paint (Queenstown Gray) for the finish. I really like this paint. If it ends up being as durable as I hope, it will be my go-to for all future painted projects. It's fairly thick, but it's easy to apply with a roller. (I think those of you who are good with a brush would also like it.) It doesn't stink, and it dries quickly. I applied three coats, waiting two hours and sanding lightly between coats.
I'm not sure how I feel about pre-painting. The taping took a long time, and I needed every horizontal surface I had to place the drying panels. In a few places, my tape encroached a bit too far into the cabinet interior, leaving unpainted slivers at inside corners that I had to touch up later. I also had to take a lot of extra care during and after assembling the case to avoid scratching or marring the paint.
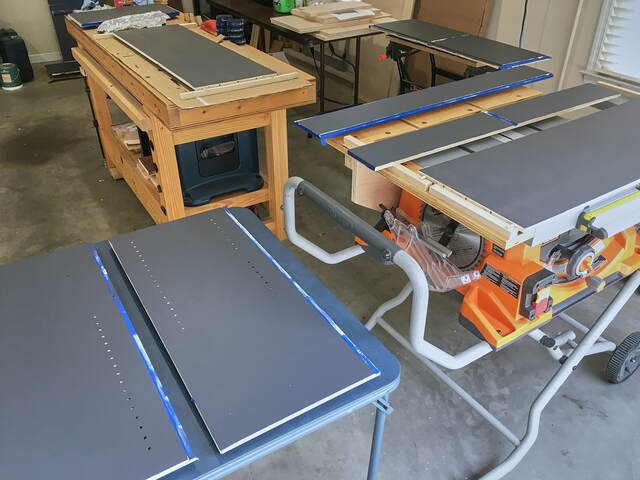
On the other hand, if I had tried to paint everything after assembly, I'm sure I would have had just as many problems, particularly with a roller.
One last note. Earlier, I mentioned choosing Baltic birch plywood so I didn't have to band the edges. That did turn out to be the case. So far, I'm not seeing any plies telegraphing through the paint on the exposed edges.
I did rub Zar wood patch over the edges to fill the pores. It came in a tube and squeezed out like very thick toothpaste. I just smeared it on with my finger and sanded it when it dried. It was similar to using joint compound, but it was slightly less messy during sanding.
Mounting the Hinges
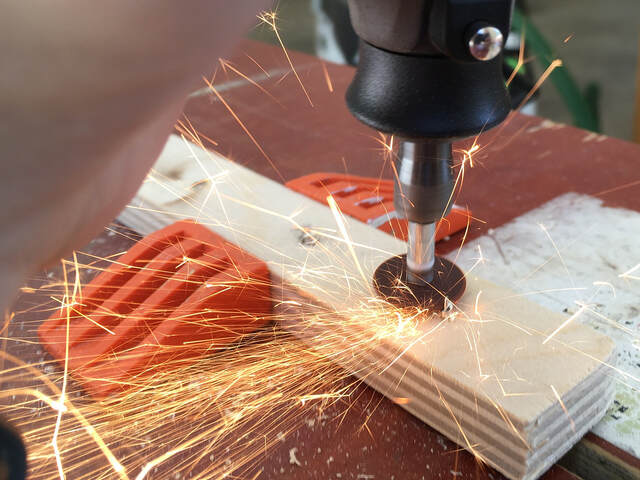
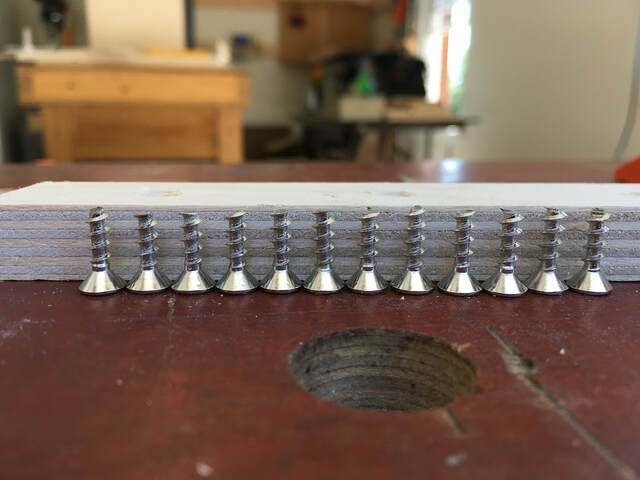
I used Blum Euro hinges for the doors. I used my drill press to drill the cup holes and a temporary jig to drill the mounting bracket holes in the sides.
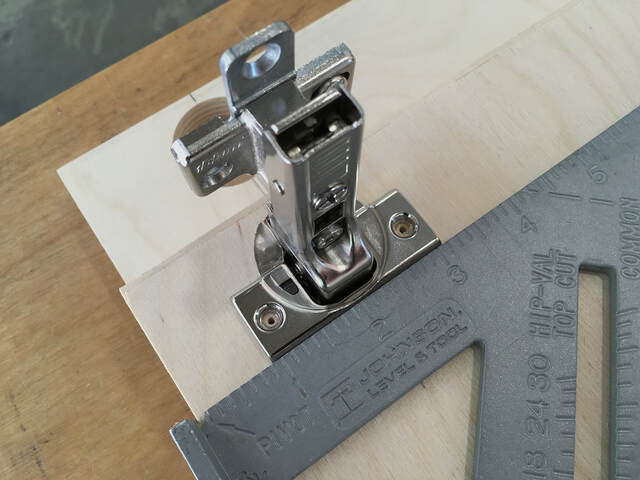
The thin sides created a minor headache. The screws that came with the hinges are 5/8" long and were slightly too long for the thin sides. Instead of trying to find and order 1/2" screws, I used my Dremel to cut off the tips.
I drilled countersunk holes in a piece of 1/2" scrap and drove the screws. Then it was easy to cut the screws to length.
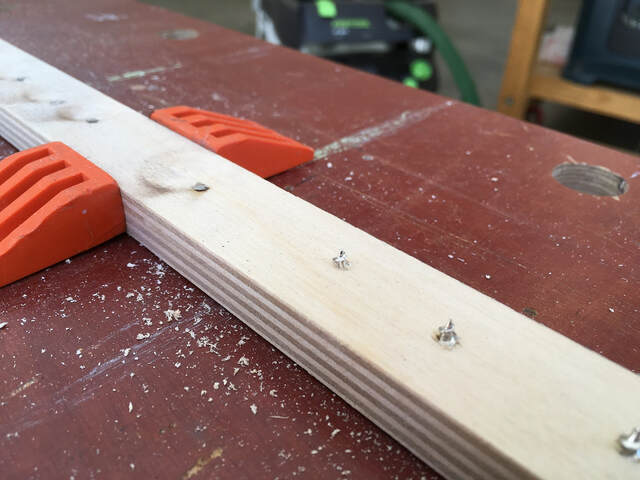
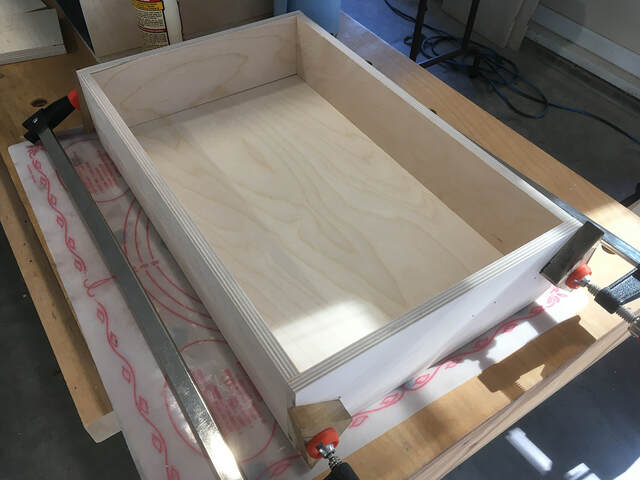
Building the Drawers
In the past, I've used pocket screws to assembly my drawer boxes. For this project, I used my doweling jig. It was just as quick and easy, and it looks better.
Mounting the Finger Pulls
The finger pulls (Sumner Street Hardware Martin, 4" for the doors, 2" for the drawers) look nice, but they're a bit of work to mount because they require mortises on both the edge and back of the drawer face or door.
The edge mortises are just very shallow dados, so I used my table saw and kerfmaker to cut them. I couldn't do that for the back mortises, so I made temporary jigs and used my router and pattern bit. After that, I cleaned up the mortise corners with a chisel.
The pulls are mounted on the top inner edge of the doors, so I butted the doors together and cut the mortises for both at the same time.
The drawer pulls are mounted in the centers of the top edges of the drawer fronts, so I had to cut them separately, but I used a similar jig.
When I installed the door pulls after painting, I wished that I had cut them slightly wider than necessary. Because of the thickness of the paint or slightly out-of-center screw holes, the pulls protruded slightly from the door edges and contacted each other. I had to slightly widen the back mortises to eliminate that contact.
Securing the Adjustable Shelves
The main cavity is divided in half vertically, and there's an adjustable shelf in each half. I used dowels as hinge pins, and I didn't want the shelves to slide. To ensure that, I routed short, 5/16" wide slots in the shelf bottoms. When the shelves are in place, those slots wrap around the dowels to secure the shelves. The slots will also work with metal shelf pins (the kind with flat spades) if I rotate them slightly.
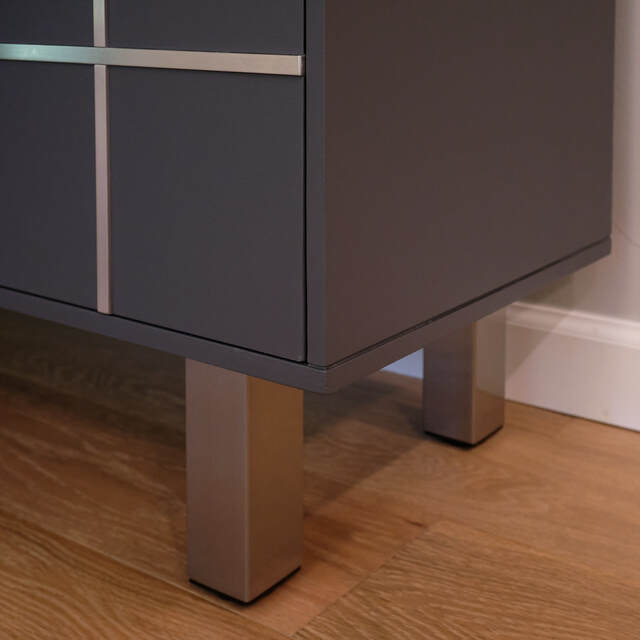
Mounting the Metal Legs
The legs we selected (Peter Meier 556 in brushed steel) have five-hole mounting plates. To simplify drilling the screw holes, I built a jig. I drilled holes through the jig with my drill press to make sure they were perfectly perpendicular so I could flip the jig upside down as needed.
8 Comments

A very well constructed cabinet, great color with the accent. Nice write up also. Well done.
Main Street to the Mountains
Thanks, Eric!

first off your wife has great design skills,love the look.second your build skills are excellent. love all the pic's and description on how this was put together.you guys make a great team.
working with my hands is a joy,it gives me a sense of fulfillment,somthing so many seek and so few find.-SAM MALOOF.

Very sharp looking cabinet. Great write up as well.
That JessEm jig looks pretty handy.
That JessEm jig looks pretty handy.

Another great team project. Your level of detail in design is inspiring to me and I appreciate all the background on the process and approach. Wow!

Nice design and build, Ron. The aluminum inlay is an attractive design element. Your home is a good showcase for your creations. Kudos to you and the rest of your design team.
Thanks everyone for the nice comments.
My wife is heavily involved in the conceptual phase of most of my projects. It’s common for me to convert her hand gestures or crude sketches into SketchUp models or, in some cases, prototypes until we arrive at something we both like. It takes awhile sometimes, but we always get there. And I make no final decisions about finishes without creating a few samples.
BB1: I’m glad you find my posts useful. My level of detail is probably excessive for most members here, but I write them the way I do for less experienced members (we’ll eventually have them here) and also for myself. Every project is a learning experience for me, and I often refer to my posts to refresh my memory on how I did certain things.
The details are very appreciated (as one of the "less experienced"). Very kind to share.
More from Ron Stewart