


Share your craft projects
Make new craft buddies
Ask craft questions
Blog your craft journey

Ron Stewart
953 posts
and
24 followers
in over 3 years
in over 3 years
More from Ron Stewart

 - Project by Ron Stewart")


Round Kitchen Table (and jigs)
")
")
")
")
")
I originally documented this project on July 13, 2020. When I posted it, I received some good-natured (and well-deserved) ribbing about using basswood for a tabletop. It's held up fine, though, and looks the same as it did back then. (The last photo is of our dog Wendell, posing like a canine supermodel while I was taking photos of the finished table.)
Early this year, my wife and I decided to move ahead with the kitchen remodel we've been discussing for over a decade. We hired a contractor not long before Covid-19 struck. Concern about the virus delayed the start of the work for over a month, but we finally decided to proceed, and the overall project is nearing completion.
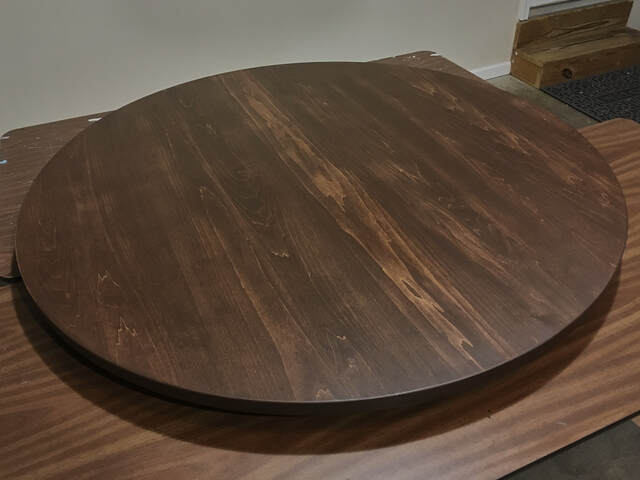
As part of the remodel, I built this kitchen table to replace our old one. The tabletop is 52" in diameter, 1 1/4" thick (at the perimeter, 3/4" everywhere else), made of basswood (I know… more about that unusual selection below), finished with Rubio Monocoat Oil Plus 2C (Chocolate) and Universal Maintenance Oil. The base is a tablebases.com metal B36 center-pillar metal X-base. Between the two is a lattice-like support structure that stabilizes the top.
The table is nice and stable, but time will tell if our material and finishing choices were solid. I'll try to update this page in a year or so to report how the table holds up.
In concept, the tabletop is pretty simple, just a standard glue-up of nine 6" wide boards. In practice, it got a bit more complicated, and I'll cover some construction details below. In particular, I wound up building four different jigs along the way: jointing and tapering jigs for my table saw, and circle cutting and offset bases for my plunge router.
A SketchUp model is available on the 3D Warehouse. (The pedestal base in the model is just an approximation of the actual base I used.)
Thanks for looking!
Selecting the tabletop lumber
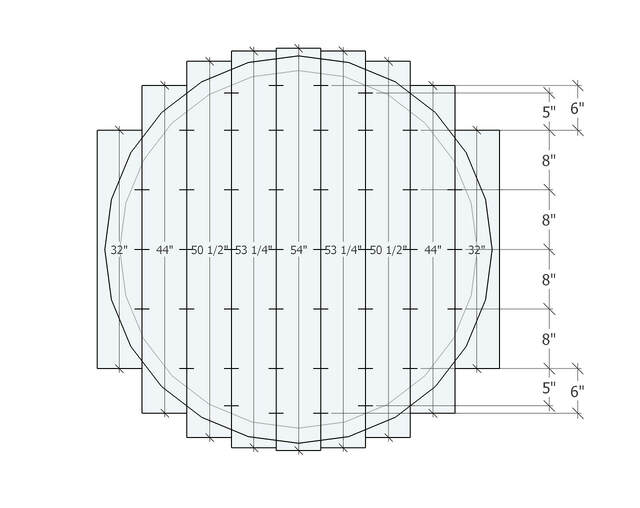
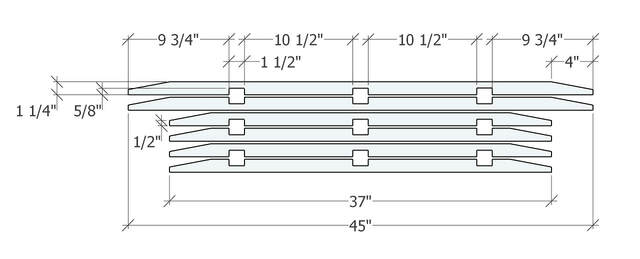
We wanted a medium thickness (1 1/4") tabletop, but I doubted I would find any 5/4 lumber at the yard. I thought I'd be able to find some 8/4, but I didn't have a bandsaw for resawing, and I didn't want to plane 3/4" off it (that's a lot of material, and money, to convert into planer shavings). As a result, I designed the top with 3/4" lumber in mind, wrapping planed-down 1/2" thick stubs around at the board ends to simulate thicker planks. SketchUp helped me optimize the cuts to minimize waste.
Early this year, my wife and I decided to move ahead with the kitchen remodel we've been discussing for over a decade. We hired a contractor not long before Covid-19 struck. Concern about the virus delayed the start of the work for over a month, but we finally decided to proceed, and the overall project is nearing completion.
As part of the remodel, I built this kitchen table to replace our old one. The tabletop is 52" in diameter, 1 1/4" thick (at the perimeter, 3/4" everywhere else), made of basswood (I know… more about that unusual selection below), finished with Rubio Monocoat Oil Plus 2C (Chocolate) and Universal Maintenance Oil. The base is a tablebases.com metal B36 center-pillar metal X-base. Between the two is a lattice-like support structure that stabilizes the top.
The table is nice and stable, but time will tell if our material and finishing choices were solid. I'll try to update this page in a year or so to report how the table holds up.
In concept, the tabletop is pretty simple, just a standard glue-up of nine 6" wide boards. In practice, it got a bit more complicated, and I'll cover some construction details below. In particular, I wound up building four different jigs along the way: jointing and tapering jigs for my table saw, and circle cutting and offset bases for my plunge router.
A SketchUp model is available on the 3D Warehouse. (The pedestal base in the model is just an approximation of the actual base I used.)
Thanks for looking!
Selecting the tabletop lumber
We wanted a medium thickness (1 1/4") tabletop, but I doubted I would find any 5/4 lumber at the yard. I thought I'd be able to find some 8/4, but I didn't have a bandsaw for resawing, and I didn't want to plane 3/4" off it (that's a lot of material, and money, to convert into planer shavings). As a result, I designed the top with 3/4" lumber in mind, wrapping planed-down 1/2" thick stubs around at the board ends to simulate thicker planks. SketchUp helped me optimize the cuts to minimize waste.
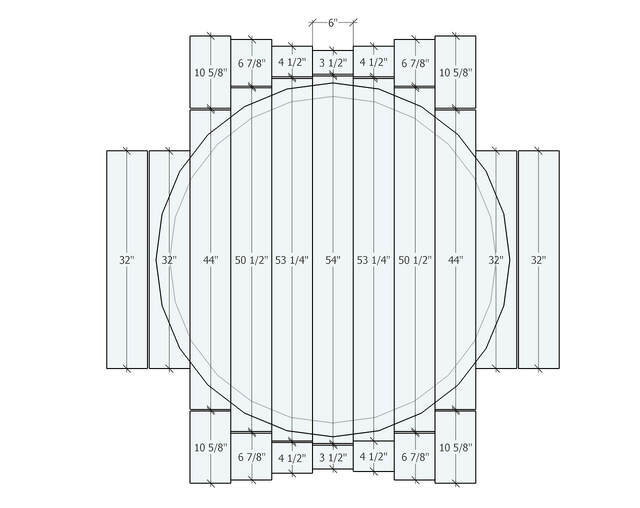
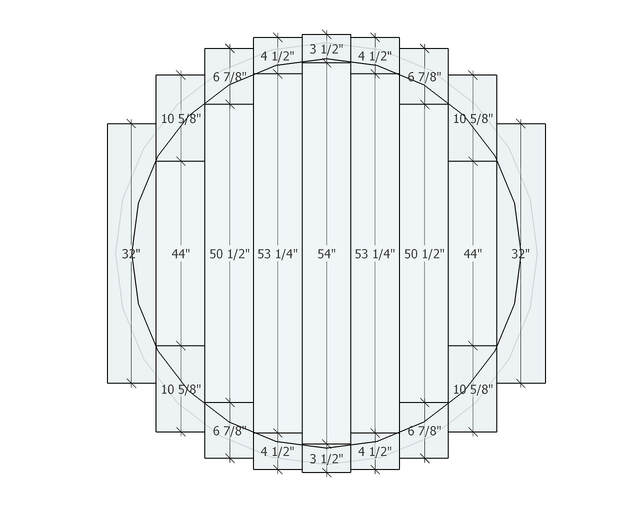
This image shows the stubs placed under the planks. The faint outer circle is the tabletop's outer perimeter.
At the lumberyard, we found 3/4" maple and walnut, but my wife is particular about board-to-board color and grain consistency, and we couldn't find enough matching boards. We didn't want oak, cherry, or ash, but we did find a good set of basswood boards. I didn't know that much about it, other than it was soft, light, and relatively inexpensive.
It wasn't until we got home and I started researching basswood finishing that I realized that nobody builds furniture with it because of its softness. It seems to be more of a woodcarver's wood. I decided to proceed anyway. Our kids are grown, and we're both careful people, so I thought the tabletop might be durable enough for us. If not, I'll just build another top out of proper hardwood in a year or two.
Jointing the boards
The boards I bought were 7" to 8" wide, and I needed to rip them to a uniform 6" width. As usual, their edges weren't completely straight. Some were slightly curved, and some were waney. I don't own a jointer, and I should have paid the lumberyard to joint the edges, but I didn't.
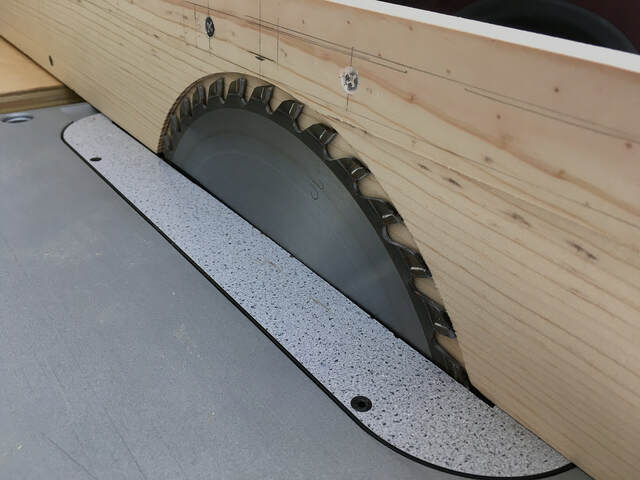
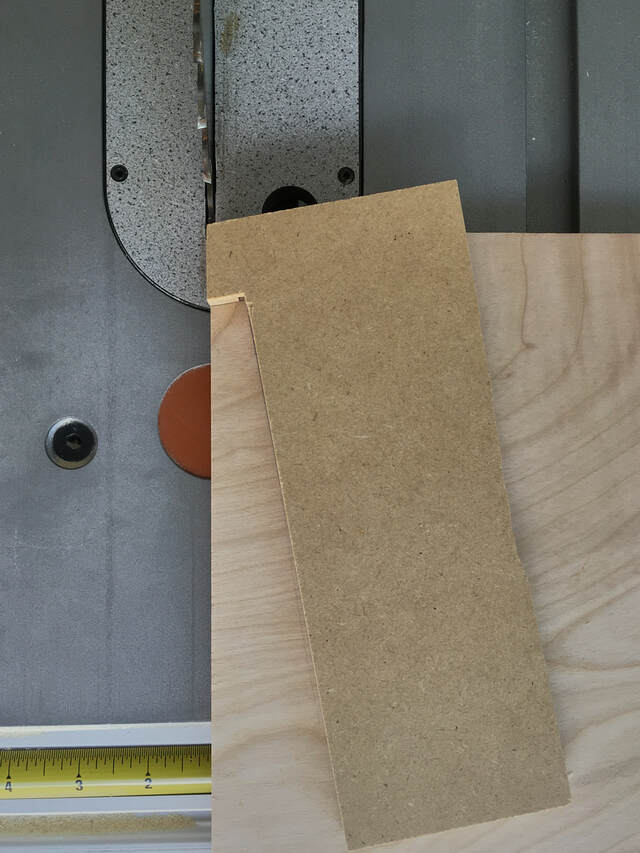
Instead, I built a simple table saw jointing jig. It's basically a 54" auxiliary fence that wraps around the saw's fence. In has a semicircular blade pocket in the center of its left edge, and the edge in front of the blade is inset by about 1/16", or about half the width of the blade. The inset edge acts like a real jointer's infeed table (if you turned the jointer sideways), and the edge behind the blade acts like the outfeed table.
Building it was easy. After building a bottomless box that fit snugly around the fence, I centered the box relative to the blade. (A stop inside the box butts up against the back of the fence to preserve that centering.) Then I lowered the blade completely, aligned the left edges of the jig and blade, turned on the saw, and raised the blade to its full height to create the blade pocket. To complete the jig, I removed it and placed it against the fence so half the blade width was exposed, then pushed the jig forward to cut the inset face (the infeed "table").
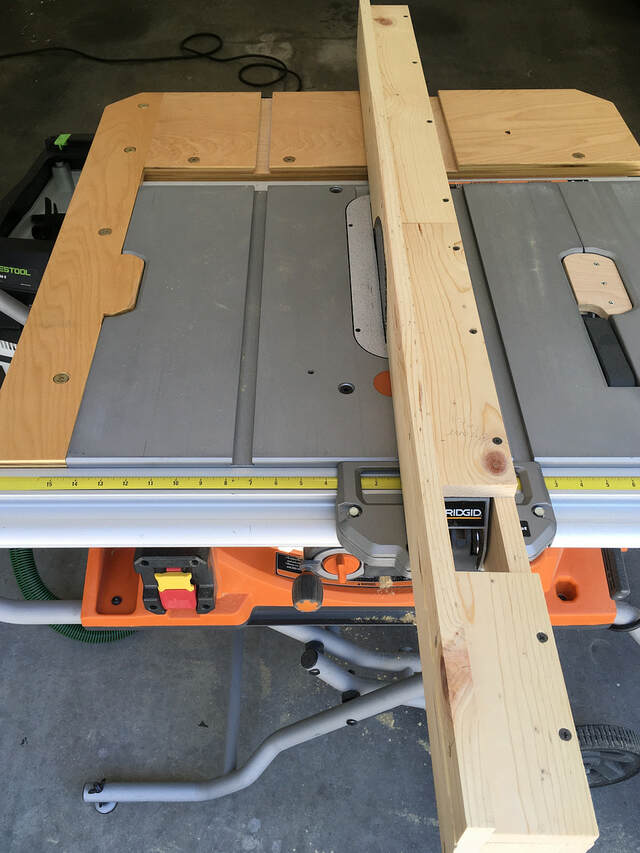
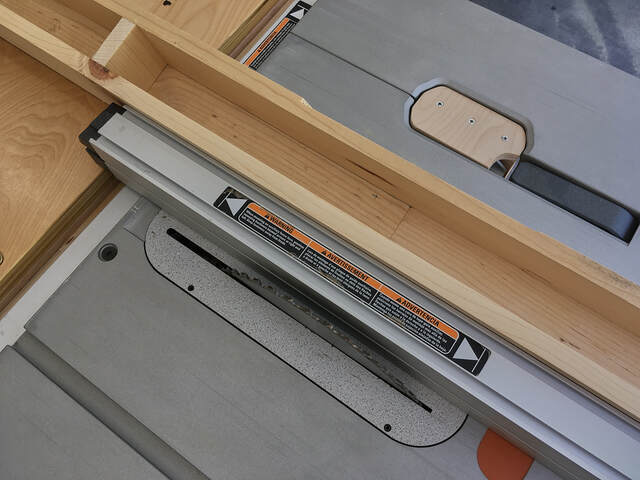
To set up the jig for jointing, I placed it back over the fence and slid the fence so the jig's left edge lined up with the outside of the blade's teeth.
To joint a board, I just held it firmly against the jig and ran it through several times. Each pass removed a tiny bit from parts of the board's edge. Eventually, the trimmed edge was basically straight. It wasn't straight enough for glue-up, but it was close enough that placing it against the fence and ripping the opposite edge did produce a glue-ready edge (after some cleanup with a sanding block in some cases). Then I placed that straight edge against the fence to rip the board to its final width.
It was a tedious process, but it did work. Afterward, I discovered that my jig wasn't perfectly straight. I think the problem was that I used an old scrap pine board I found in our crawl space for the jig, and it wasn't perfectly straight or flat. (Again, due to Covid-19 concerns, I used what I had rather than risking a trip to Home Depot.) Maybe one day I'll build a new jig out of better material when I'm not in a such a big hurry to get back to my real project.
Assembling the tabletop
Assembling the tabletop was similar to gluing up any other wide panel from multiple boards. The only source of difficulty was the 54" width of the panel. Neither my cauls nor my clamps are long enough for that.
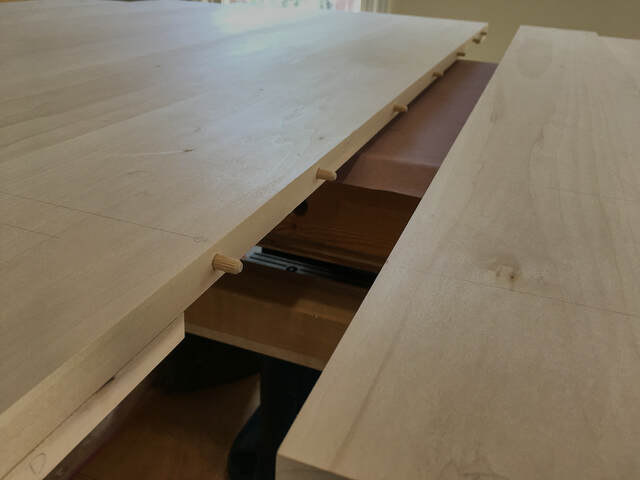
Before gluing up the panels, I glued the 1/2" thick wraparound underboards to the planks. I thought this approach would produce tighter edge seams, and that was the case.
I glued up the nine boards in sets of three to create 18" wide sub-panels, using dowels to align the boards. I used SketchUp to map out the dowel locations, keeping them away from the perimeter cut line. My new Jessem doweling jig made it easy to align the dowel holes.
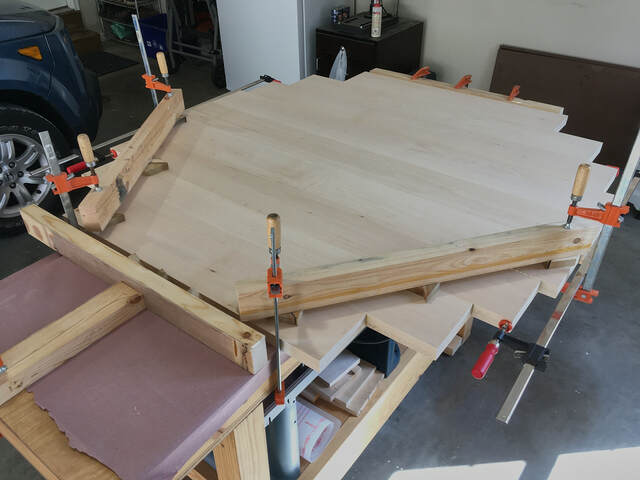
Gluing the first two sub-panels together was routine. My cauls and clamps can work with 36" wide panels.
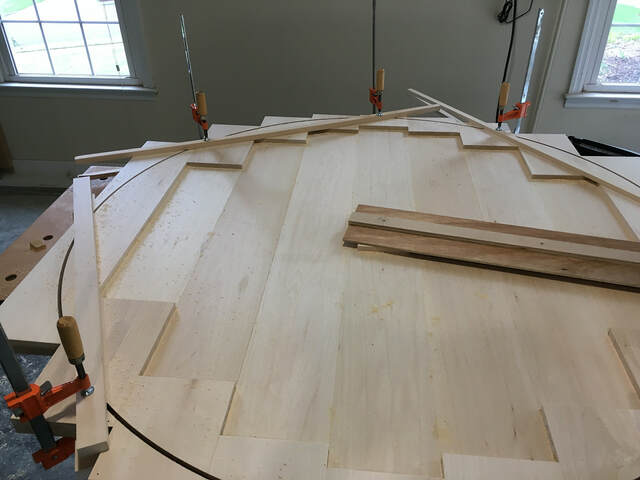
Gluing the third sub-panel to the rest was the tricky part. Because of the stepped board lengths, I could clamp the sides of the assembly, and I could also use my cauls at an angle to maintain flatness. To clamp the center, I used two 2×4s and my bench like a big vise. I clamped one 2×4 to the end of the bench, parallel to the sub-panels. I used the other 2×4, perpendicular to the sub-panels, to apply pressure to the center. I clamped this second 2×4 to the bench to maintain that pressure.

Cutting the tabletop circle
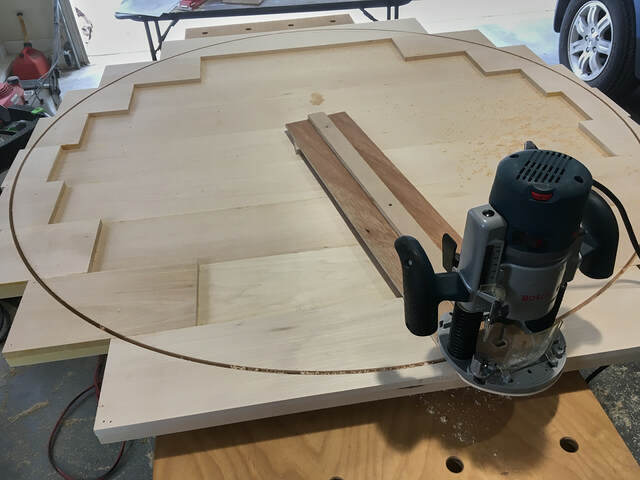
To cut out the 52" circle from the assembled panel, I needed a large router circle cutting jig. I didn't feel like spending $50+ on one, so I made my own from luan scrap. It's just a long, narrow router base with a hole drilled at the pivot point to create a 26" radius. I also added a stiffening board to the jig to prevent flexing.
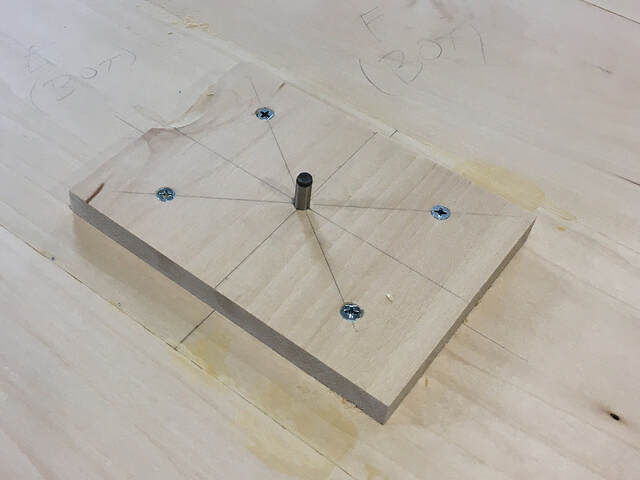
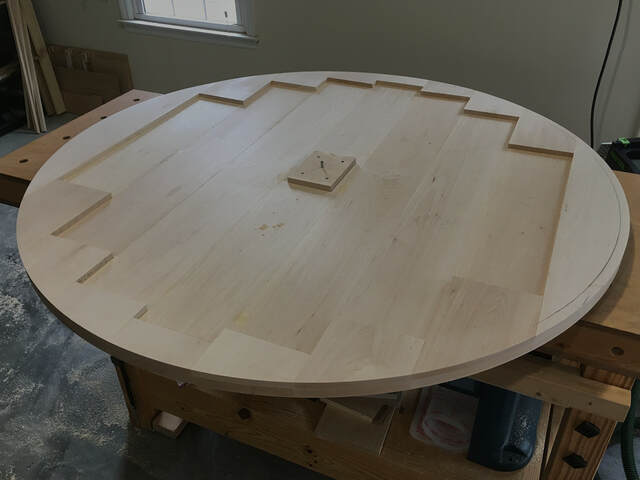
I decided to cut the circle from the bottom to avoid drilling, then filling, a hole in the top surface. Because of the underboards I used to simulate a thick panel, the glued up panel was 1/2" thicker around the edges than in the center. To work around that difference, I screwed a small 1/2" thick block of scrap to the center of the panel's underside. A 1/8" hole in this block's center held the circle jig's axle (which I borrowed from my Jasper 200 circle jig).
With the jig set up, cutting the circle was easy. I made multiple passes with my plunge router and Whiteside RU2100 1/4" spiral upcut bit, removing 1/8" of depth each time. I cut the final pass in sections, clamping supports behind and ahead of the router to keep the offcut from falling.
I'm really impressed with that Whiteside bit. It produced an extremely clean cut that required very little cleanup before finishing. It's much better than my fluted straight bit.
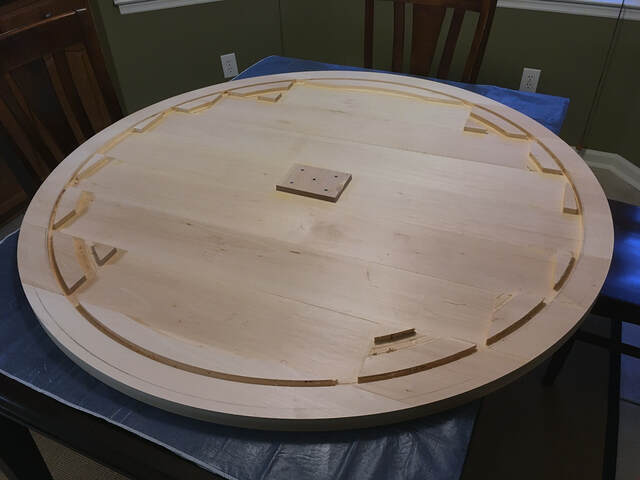
Removing the excess from the underboards
The underboards were stair-stepped, and the heaviest ones were at the ends of the tabletop (under the shortest boards). To reduce weight, balance the top, and for looks (even though nobody will ever see), I removed most of the underboards, leaving a 2" wide ring around the top's perimeter.
To do this, I drilled more pivot holes, 1/2" apart (to match a 1/2" straight bit) in my circle jig. Then I just routed out increasingly smaller circles until I had removed all of the excess. I took multiple 1/8" deep passes for each circle.

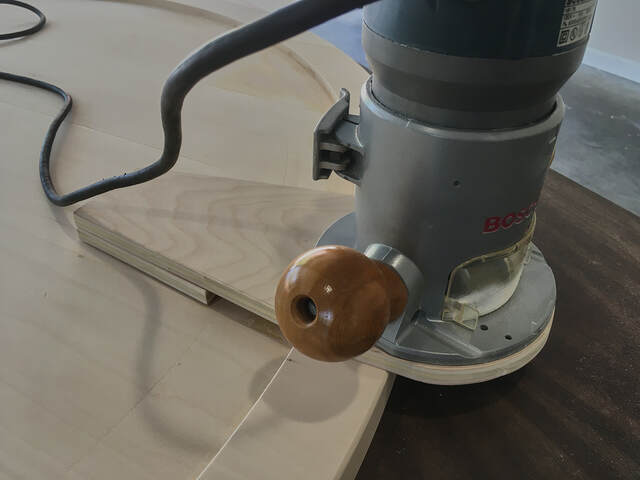
Rounding over the tabletop's edges
I used a 1/8" round over bit to round the tabletop's top and bottom edges. Routing the top edge was simple because I had a nice flat surface for the router base.
Routing the bottom edge was riskier because the router had to balance on the 2" underboard ring. If the router tipped, the bit would gouge the tabletop's edge. To eliminate that risk, I made another jig, an offset router plate with a 1/2" thick standoff on the end. That jig made the job easy, and the tabletop was ready for sanding and finishing.
I'll probably never use the standoff again, but the offset base will come in handy for future projects.
Building the support structure
After I completed the tabletop, I made a disturbing discovery. The basswood was so soft that the top drooped under its own weight (across the grain at the top's "ends"). That didn't bode well for a pedestal base like we wanted.
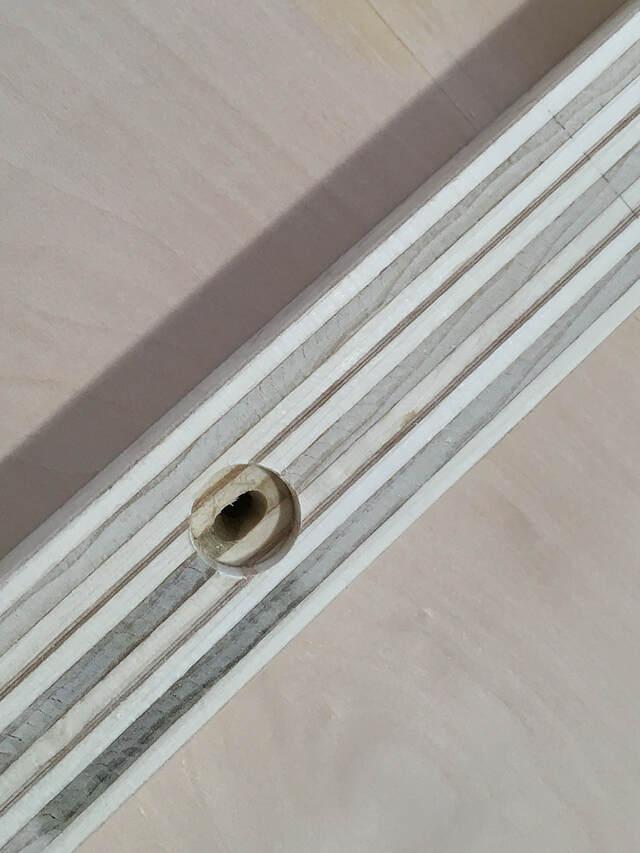
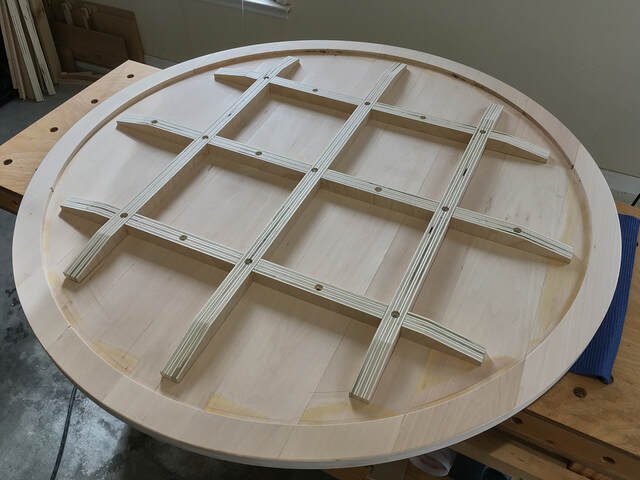
Necessity being the mother of invention, I devised a solution-a lattice-like support structure. I didn't have any hardwood to use for it (and didn't want to go out to buy any due to Covid-19), but I did have some scrap 1/2" birch plywood. I laminated three pieces of it to form each support beam.
I wanted to hide the support structure from view, so I tapered the ends of the beams down to 1/2". I had to throw together a temporary taper jig to do that. Then I used half-lap joints to assemble the structure. (I have since built a kerfmaker and learned how to use it. I wish I had it for this project, because my half-laps joints would have been much tighter.)
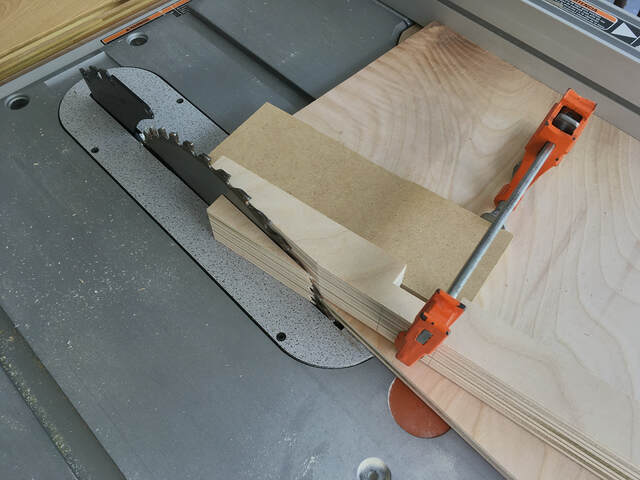
I drilled elongated screw holes in the support beams to allow for wood movement in the top, then used barely tightened pocket hole screws to attach the structure.
The result looks like a giant Eggo waffle, but the overall top is rigid and reasonably light. And the support structure is invisible on the completed table unless you sit on the floor.
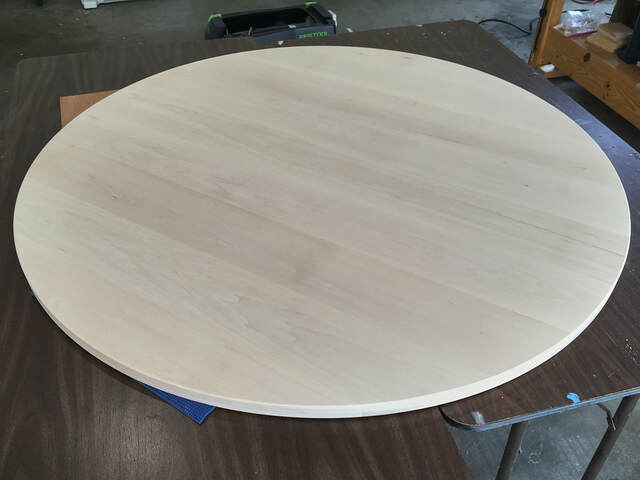
Finishing
We wanted a dark brown finish. In the past, I've used both TransTint dye and Zar stains to color wood and Arm-R-Seal wiping varnish as a topcoat. My wife wasn't crazy about the colors of the dye/stain I had, and I was worried about getting a perfectly smooth finish on the large tabletop surface. Even with wiping varnish, I've had problems with friction streaks on the final coat of past projects. My wife also didn't want a glossy film finish, so I searched for alternatives.
During my research, I ran across Rubio Monocoat Oil Plus 2C. It sounded too good to be true-an easy-to-apply (no lap marks), environmentally-friendly (no stink), one-coat, durable finish. Plus, it was designed for use on wood floors, so it should be durable enough for a kitchen table. It's biggest drawback was its price, but at least I could by samples for about $11-still pricey, but not prohibitively so.
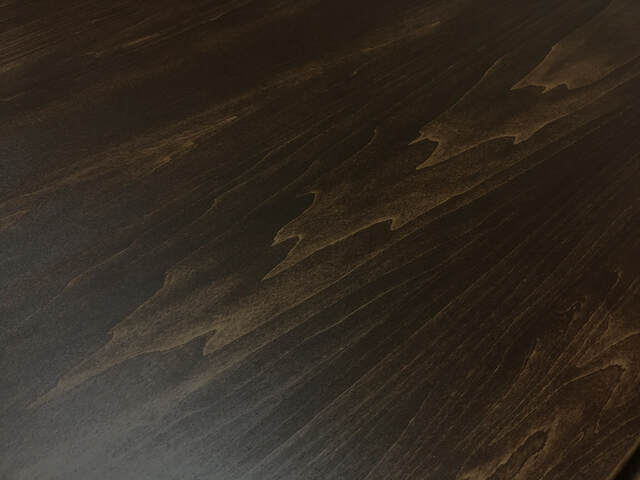
We decided to give it a try, and I ordered a sample of the Black color, which is sort of a blackish brown. It was slightly dark and muddy. Next we tried Ice Brown, which was too light and yellow. Finally, we tried Chocolate. It wasn't perfect, but it was the best compromise.
As advertised, the oil was easy to apply. I just poured a bit on the surface, spread and buffed it with a white Scotch-Brite pad, and removed the excess with old towels. It colored the wood like any other pigment stain on close-grained wood. Wiping off all the excess removed almost all the color from the densest parts of the wood. I ended up making two applications (it's not accurate to call them coats), removing most, but not all, of the excess.
The resulting finish was okay, but a little blah. It was very matte, similar to that of a dried water-based dye that hasn't been top coated. So we decided to give Rubio more of our money and ordered a bottle of their Universal Maintenance Oil. I applied it the same way, and it added some life--a bit of depth and a slight sheen-to the finish.
If I had to do this again, I think I'd try a water-based dye under the Oil Plus 2C Pure color. The dye would penetrate the wood better, and I'd have more control over its color and tone. I suspect that Rubio's Precolor Easy products are just water-based stains, but I haven't actually read that. (In my testing, I did try Oil Plus 2C over TransTint dye, and dye didn't seem to interfere with the oil.)
Finding a base
We wanted a black metal pedestal base for the table, partially for looks, and partially to avoid legs that would interfere with seating. Using Pinterest, Google, and Etsy, we found a number of candidates, but most were very expensive. I didn't want to spend $400+ on a base.
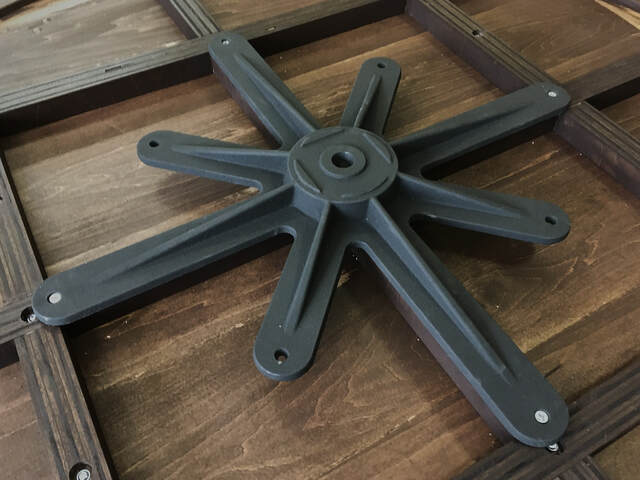
I somehow stumbled upon tablebases.com (which seem to target restaurants) and found two good candidates, the XB36 for $125 and the B36 for $145. Both are simple X-style pedestal bases: a big X at the bottom, a sturdy mounting plate, and a big round pipe connecting the two. The XB36 was out of stock, so we ordered the B36.
It's a great base. It's really solid (the mounting plate looks like it could support a car) and bolts together easily. I used 1" #10 wood screws to attach the base to the support structure.

I wasn't impressed with their packing methods, but everything else about the company was first-rate, including customer support before and after the sale. My first base arrived with some of the powder coating scraped off (because it shipped in the same box as the mounting plate, with only a few layers of foam blanket separating the two), but they sent me a replacement quickly.
12 Comments

Great job and wish I had this explanation in hand before I had done my kitchen table (my "wrapping" was not pre-planned). Good find on the base in terms of price and match with the clean design.
And...the picture of the table with Wendell is my favorite.
:-) I thought you'd like that one, Barb.

great project write up and plenty of pic's showing the process. i would never have considered using basswood myself.looks great though.
working with my hands is a joy,it gives me a sense of fulfillment,somthing so many seek and so few find.-SAM MALOOF.
I think you were one of the guys who gave me a bit of a hard time about the basswood, pottz. :-)
I just didn't know much about it at the time. I'd never use it again for a furniture project either; it seems pretty prone to splitting on top of just being a weak wood.
I just didn't know much about it at the time. I'd never use it again for a furniture project either; it seems pretty prone to splitting on top of just being a weak wood.

Nice looking table and interesting writeup.
I assume the basswood is holding up well? I bought a basswood plank years ago in anticipation of a carving project that never happened. I ended up using it for drawer fronts in our travel trailer because of the color match. The material has worked out well there.
I assume the basswood is holding up well? I bought a basswood plank years ago in anticipation of a carving project that never happened. I ended up using it for drawer fronts in our travel trailer because of the color match. The material has worked out well there.

A very nice table and the write up is great with the details. Never would have thought about Basswood. Usally that is a carving wood. Well done.
Main Street to the Mountains
Thanks, Steve and Bentlyj! I'll be up front--my editing pricing is steep. :-)
The basswood has held up well, but just the two of us use it, we always use placemats, and we tend not to drop things on it or drag things over it. The Rubio seems to be holding up well too.
The basswood has held up well, but just the two of us use it, we always use placemats, and we tend not to drop things on it or drag things over it. The Rubio seems to be holding up well too.

Well done Ron.
-- Soli Deo gloria! ( To God alone be the Glory)
Thank you, oldrivers!

Really nice table, well made & looks great. I like your approach to cutting out the round table & then finishing the underside with the router - circle cutting jig. Pretty smart.
Thanks, Oldtool!
More from Ron Stewart