Here’s a new crosscut sled I just built for my Grizzly G0899 table saw. In this post, I’ll focus on describing the sled and its features. I’m planning on writing a blog series to explain the reasoning behind some of my design decisions and describe some construction details.
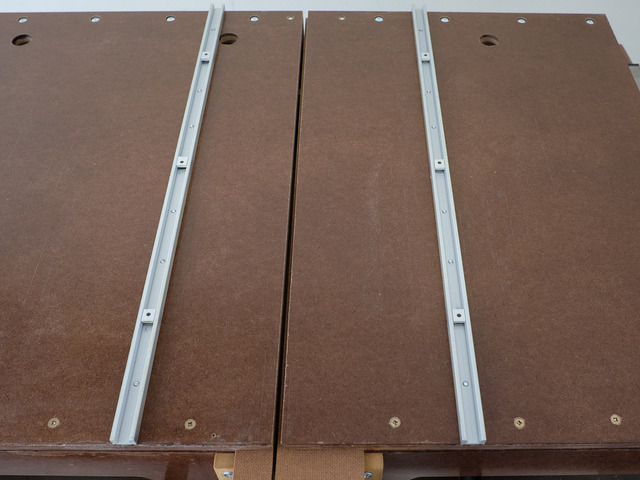
Overall, the sled is 36” wide, 24” deep (with a cut capacity of just over 21”). The bed is 5/8” thick, and the fences are 1 3/8" thick. Aluminum T-track on the face of the near fence holds a sliding stop block. The sled rides on a pair of Incra miter slides.
I applied three coats of Arm-R-Seal and paste wax to both sides of the bed and fences. I’m hoping that will prevent excessive wear on the bottom of the bed.
I’ve been meaning to design and build a new sled for years. When I bought the Grizzly, I had no choice. Its slots are spaced differently than the ones on my old saw, so my old sled wouldn’t work.
When designing the new sled, one of my must-have features was replaceable bed and fence inserts so I could have a pair of inserts for each blade/bevel angle combination I use. I wanted the inserts to be cheap and, ideally, easy to replace without tools. (My old sled had bed inserts, but I had to flip the sled over and remove/replace four screws to change them.)
Sandwich Construction and Inserts
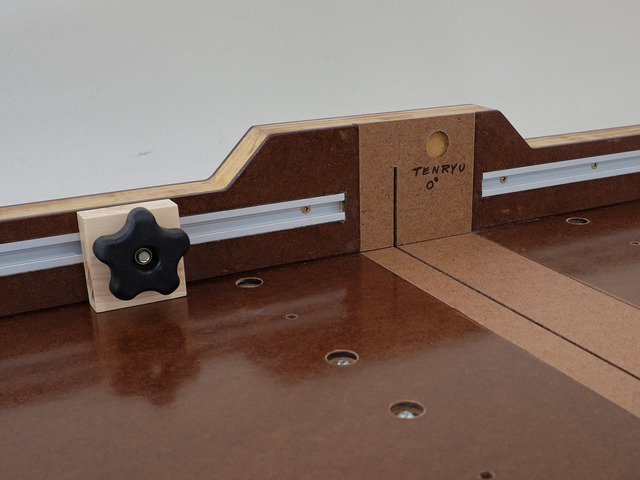
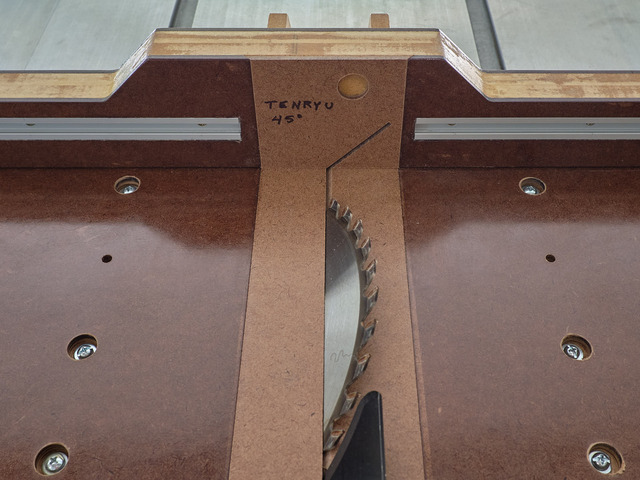
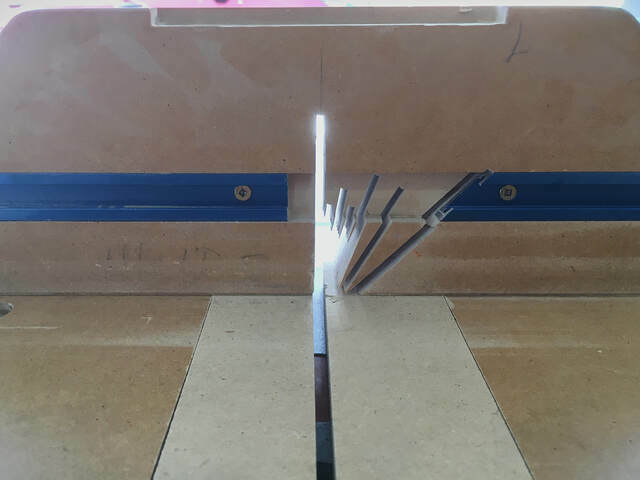
To meet the cheap and easy-to-replace requirements, I decided to use a sandwich of hardboard skins over an MDF core for the sled’s bed and fences. The inserts are wedge-shaped (beveled 45 degrees on the sides, wider side at the bottom) and slide into matching slots in the bed and fence. (It’s basically a sliding dovetail arrangement.) Because both the skins and inserts are made of 3/16” thick hardboard, and because of their wedge shape, the inserts stay flush with the skins along their entire lengths.
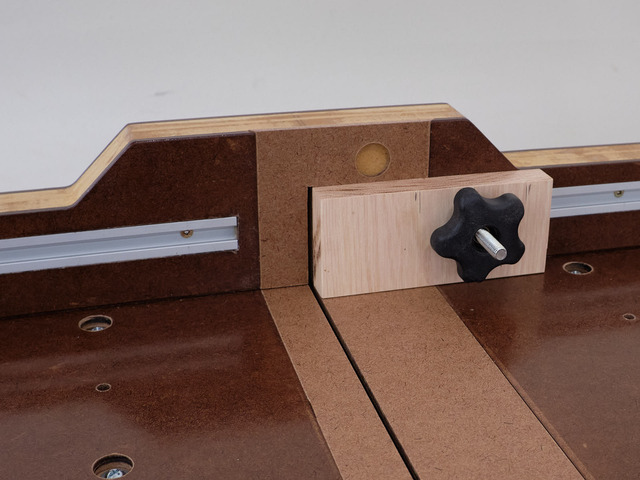
To meet the tools-free requirement, I built a retainer plug to hold the bed inserts in place and prevent their kerfs from closing. The plug has a handle on top and two 1/4" aluminum rods that go all the way through the far fence, insert, and bed. The fence inserts are held in place by friction. (During use, there’s no force on the insert that would cause it to slide out.)
The near ends of the bed inserts are extended to keep them in one piece (to maintain the kerf on that end and to simplify storage). Every insert has a 3/4" diameter finger hole to make it easier to slide out if it fits too snugly.
Stop Blocks
A T-track on the near fence’s inner side supports sliding stop blocks. The standard stop block is as narrow as possible (2 1/8“) to allow for the widest range of cuts. This stop block cannot move close to the blade because of the 4” wide fence insert.
To deal with very short cuts, I built a secondary stop block that reaches the blade from either side.
Blade Guard
For safety, a blade guard (made of 1/2" MDF) surrounds the blade on either side. I left its top open so I can see the blade when it crosses the fence. So far, I haven’t added any mechanism for stopping the sled from moving so far forward that it cuts the guard in half. I know others have done that, so it’s something I can consider later.
I used screws to attach the guard in case I ever need to replace it.
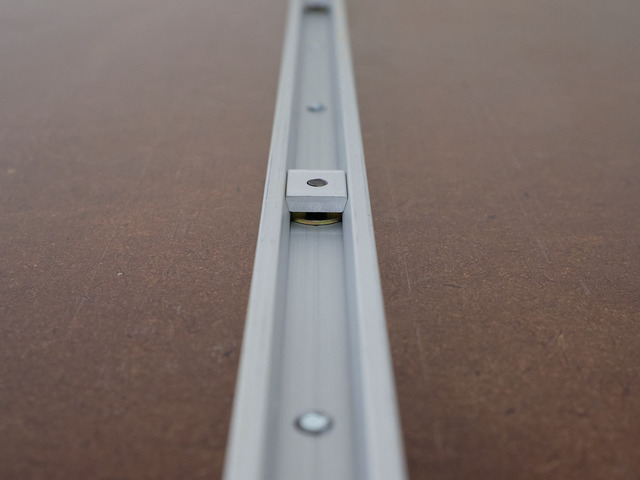
Incra Miter Slides
I’m guessing that some Craftisians are not familiar with Incra’s miter slides, so I thought I’d describe them. I used them on my original sled, and I like them a lot.
They’re made of aluminum, and each slide has three wedge-shaped nuts that can be tightened from above the sled with an Allen wrench to spread/widen the slide to make it fit slightly over-wide table slots. Each slide also has six threaded holes. To attach the slides, you drill counterbored holes in the top of the sled bed and insert the bolts from there. (You also drill access holes for the tops of the spreader bolts.)
Some Inelegance with Bevel Cuts
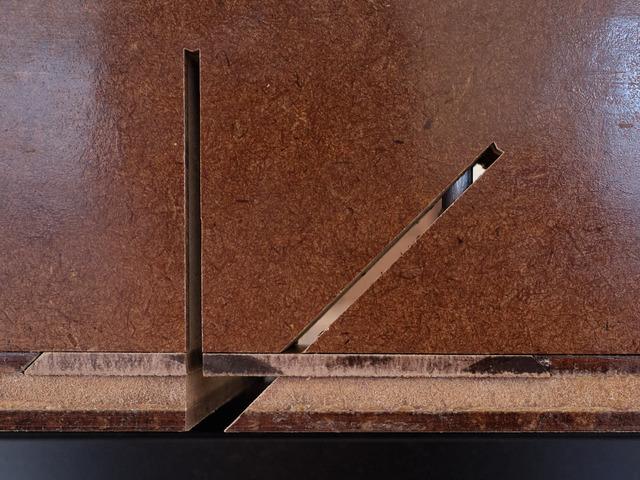
When I designed and modeled the sled, I decided that I wouldn’t need to bevel any stock thicker than 3/4" to 1”, so I sized the inserts and retainer plug accordingly.
The only problem with that decision is that I completely forgot I had made it when I cut the initial 45-degree kerf in the finished sled.
Fortunately, I cut the vertical and 45-degree kerfs in the sled before I built the retaining plug. I used 1/4" dowel pins to secure the inserts when I made those cuts.
After I made the 45-degree cut with the blade raised all the way up, something looked off—way off. The kerf extended much farther than it did in my SketchUp model. (The blade also nicked the inside of the blade guard on one side. You might notice that in one of the gallery photos.) A shiver went down my spine, and a cold sweat formed on my brow. I thought I must have modeled the tilted blade incorrectly in SketchUp or positioned the hump in the fences and the insert slots too far to the right (both unrecoverable errors). Then I remembered my original decision, which now makes less sense to me than it originally did.
Fortunately, the situation is not too bad, just a little embarrassing and inelegant. For most bevel cuts, the retainer plug will work just fine. If I ever need to bevel any thick stock (over 1” or so), I’ll just have to remember not to use the retainer plug (or just use it on one side) and use dowel pins (inserted up through the bottom of the sled). I’ll need to mark the far fence to show the maximum safe height for the retainer.
If I had to do it over again, I’d widen the inserts and fence humps by an inch or so (far enough to clear the retainer’s rod on the tilted blade side). I was trying to keep the inserts as narrow as possible—that was an over-optimization.
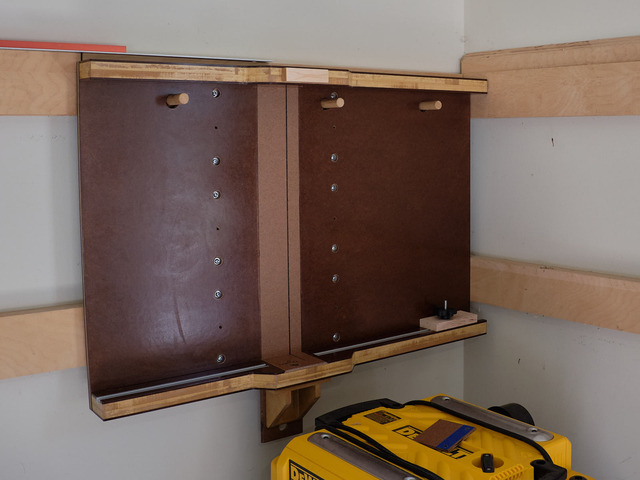
Hanger Holes
My old sled had four 1” diameter holes in the bed near the far fence so I could hang it on a French cleat hanger with 3/4" pegs. Fortunately, the peg spacing worked with three of the pegs. One peg was positioned where the bed inserts reside, so I had to cut it off the hanger.
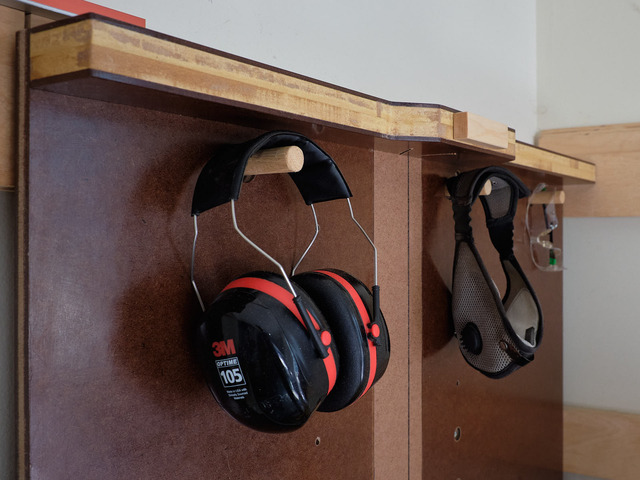
The pegs also provide a convenient place to hang my safety equipment.
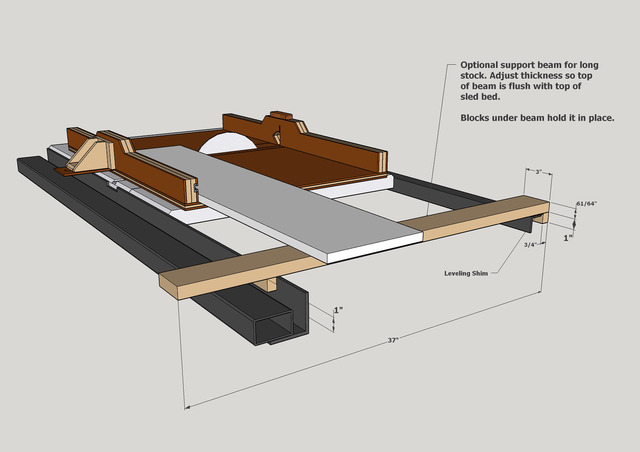
Support for Long Stock
Originally, I thought I’d add some sort of extension arm for supporting long stock, and some sort of telescoping stop block for medium-length cuts. In the end, I decided not to do either.
Instead of a telescoping stop block, I can use my saw’s rip fence (with a spacer between the fence and sled) as a stop for cuts up to 30” long.
To support long stock, I’ll just build a support beam that straddles the front and back rails of the saw. I’ve modeled, but have not yet built, this beam, but I don’t see any reason it won’t work.
Thanks, Ryan. The main reason I went with hardboard was cost. I decided to use the thicker 3/16" kind instead of the 1/8", and a sheet cost $27 at Home Depot. Talk about sticker shock...
Ron Stewart commented about 3 hours ago new Thanks, Petey and Pottz. I’ve never used a RAS, but they always look useful when I see them in videos. Is it much of a hassle keeping it aligned?
the RAS has gotten a bad rap for years because many say there dangerous. nonsense, only the people that use them the wrong are dangerous. ive been using one since i was probably 13, and have never had as much as a scratch. problem was they were marketed to do way more than they should have. they can be hard to keep accurate but ive got mine set at 90 degrees and i never change the angle so i dont have any issues with alignment. crosscuts only. id die without one.
working with my hands is a joy,it gives me a sense of fulfillment,somthing so many seek and so few find.-SAM MALOOF.
Thanks for your comments, gentlemen. I really appreciate them.
Thanks also for the additional RAS info, Pottz. I didn’t know about their reputation for being dangerous. In that regard, they don’t seem very different from table saws. I see videos on Instagram of people doing really questionable things with table saws, and I wonder how they’re still alive. I’m extra careful around mine. The only injury I sustained on this project was from a coping saw. Usually it’s a chisel…
Another well-designed project with so many useful features. I have only used MDF on a few shop projects. Curious on its use versus plywood. For flatness and stability? Does the finish and wax "seal" the edges of the MDF? I still have some of the MDF from an old project, but just haven't put it to use (maybe the mess when cutting impacts my decision).
For this project, I chose MDF for the reasons you mentioned (flatness and stability), plus cost. A 2’x4’x1/4” MDF sheet is about half the cost of a similarly sized plywood sheet at the big box stores near me. The plywood there is not always of good quality there.
I used MDF a lot before I bought a planer and started using hardwood lumber more. MDF is a good substrate for veneer. It’s also frequently used for speaker cabinets. On the down side, it’s heavy, doesn’t hold screws well, swells if you get it wet, and, as you mentioned, generates really fine, unhealthy dust.
The poly does seem to seal it well. My old sled was made of MDF, and it stayed flat for the years I used it (and I keep it in the garage, where it’s subject to wide humidity and temperature swings).
If I could buy Baltic birch locally, I’d prefer it over MDF for almost anything.
Very nice sled Ron, and a great write up of your process. I do like the insert idea and the use of hardboard. I'll have to keep this in mind on my next sled build.
Great sled, Ron. That is a very smart idea. I have a sled I use for angle cuts 45, 30 and 22.5 degrees and the center is ribbons. I may follow in your footsteps.
Cheers, Jim ........................ Variety is the spice of life...............Learn something new every day
Don't know how/why I missed this first up RS... very impressive and great engineering.
Didn't appreciate the full features till I downloaded and closely investigated your SU model.... (though I doubt your saw blade would cut butter)..... What version was it (SU, not the blade)?
When I design, I always opt for "skins" (inserts) where applicable, however, I'm just a "screw it" hack... love your tool less replacement concept.
Shame it's so big... would have been an interesting exercise to let my laser do it's thing (limit 300mm x 600mm).
If your first cut is too short... Take the second cut from the longer end... LBD
Thanks, LBD! I’ve been able to use this sled for a few projects, and I love it. It literally takes less than a minute to swap inserts. So far, I have three: 90 degrees for my medium-kerf Tenryu, 90 degrees for my full-kerf Freud FTG (for rabbets and dados), and 45 degrees for my Tenryu.
I’d like to make a smaller version. It’d be easier to take off the wall and push over the blade for most cuts I make. It’s just that I don’t have space for multiple sleds, so I sized it for the worst case. Actually, I do have space for a small sled. I guess I’m just too lazy to make one. Maybe one day… if you do try it, I’d like to hear your thoughts.
And yeah, the “blade” I modeled could use some dentures.


 - Project by Ron Stewart")
")
")
")
")
")
")