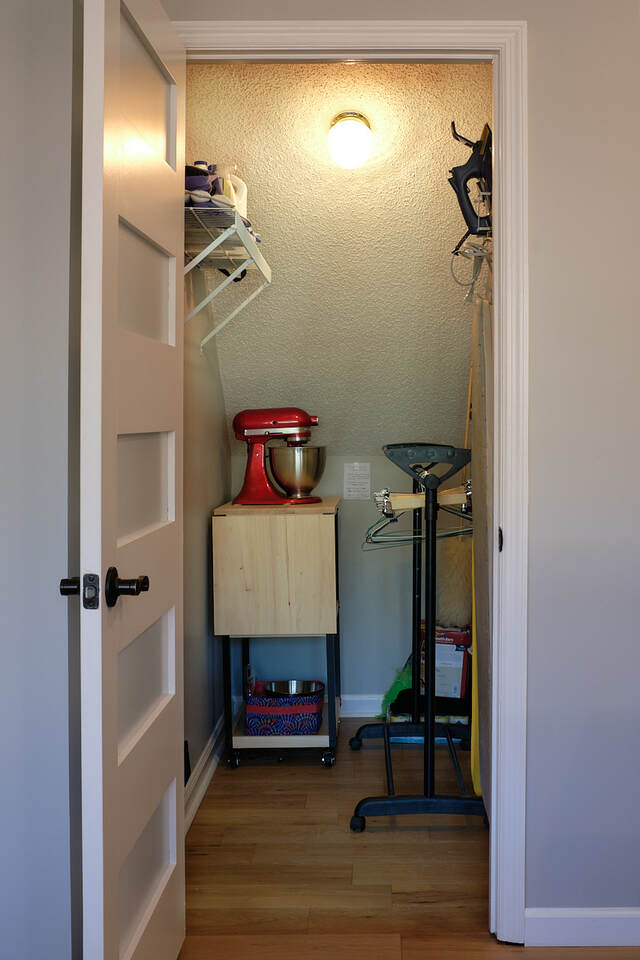
I built this rolling cart to hold and store my wife's new KitchenAid stand mixer. (My wife made the fabric storage containers for the mixer’s accessories.) It was inspired by a design I found on the web: Modern Rolling Kitchen Cart by Houseful of Handmade. My wife liked the open, airy look of that design, but we made a few changes: solid shelves instead of slatted ones, additional leg/shelf screws, folding shelf brackets for the leaf instead of flap hinges and a pull-out support sled, and smaller, unobtrusive 2” double-locking casters.
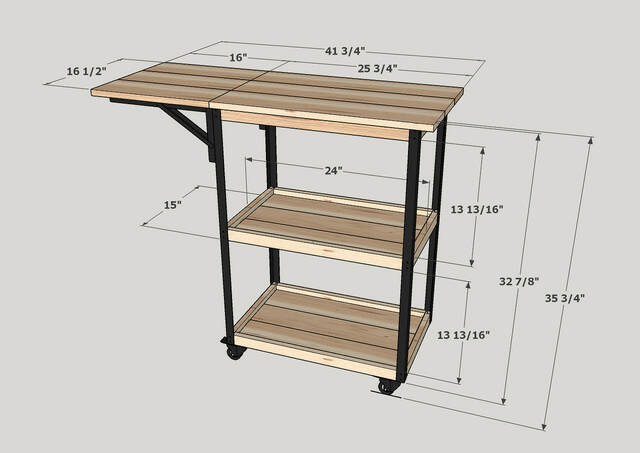
The cart’s body is roughly 24” wide, 15” deep, and 35” tall. The top adds another 3/4" of height, placing it at counter height. With the drop leaf extended, the overall work surface is about 42” x 16 1/2".
The top and lipped shelves are made of solid pecan, and the legs are 1” aluminum angle. The drop leaf is supported by 14” folding shelf brackets (LuckIn brand from Amazon), and the cart sits on 2” locking casters (Cloatfelt brand, also from Amazon). The pecan is finished with three coats of General Finishes High Performance Water Base Topcoat. For the legs (and screw heads), I used satin black Krylon Fusion All-In-One paint/primer.
When the mixer is not in use, the cart sits at the back of an under-stairs closet in the kitchen. Storing the mixer on the cart is more convenient than storing it in a cupboard. The mixer is heavy (over 25 lbs.) and sort of slippery and hard to lift.
Concerns I was concerned about the original cart’s stability. There’s no diagonal bracing, and the thin-sided shelves and apron don’t provide much room for the fasteners that connect them to the legs. I didn’t think the cart would fall apart or anything like that, but I wondered if it would rack when moved (or when the mixer was spinning at high speed). I was committed, though, because my wife really liked the cart’s look, and I had already told her I could make it work.
Using solid shelves also introduced more worries about wood movement. Making provisions for that made the shelves much more complex.
As I describe my cart’s details below, I’ll focus on how those concerns shaped its design and construction.
I’ll skip to the end of the story now, though. The finished cart feels nice and stable. I’m not about to try a sit test on it, but it seems adequate for its intended use. My wife has used it a few times. The cart does sort of vibrate in place when the mixer is spinning fast, but that movement is probably more a consequence of it sitting on four casters (even though they are locked from rolling and spinning) than anything to do with its overall structure.
Regarding wood movement, I tried to make all the provisions I could. I guess I’ll know in a year or two if they were sufficient. By then, I’ll also know if the leg/shelf screws are trying to work loose.
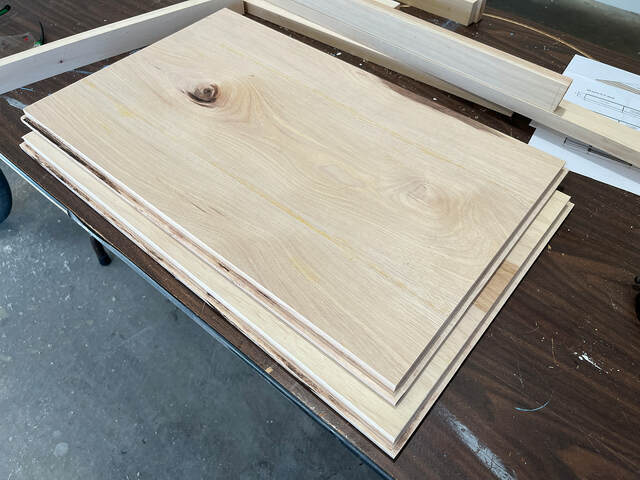
The Shelves The pecan boards I bought were between 6-8” wide, so I had to edge glue three planks for the top and shelves. The top is just a flat panel. The shelves are more complicated.
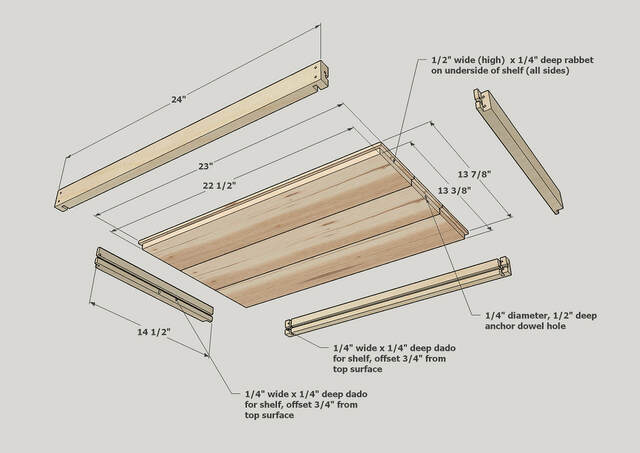
To add weight to the cart, and to lower its center of gravity, I used 3/4" thick lumber for the shelves and sides. The sides are 1 1/2" tall, with their bottom edges flush with the bottoms of the shelves. They create a 3/4" lip around the perimeter of each shelf to prevent items from sliding off.
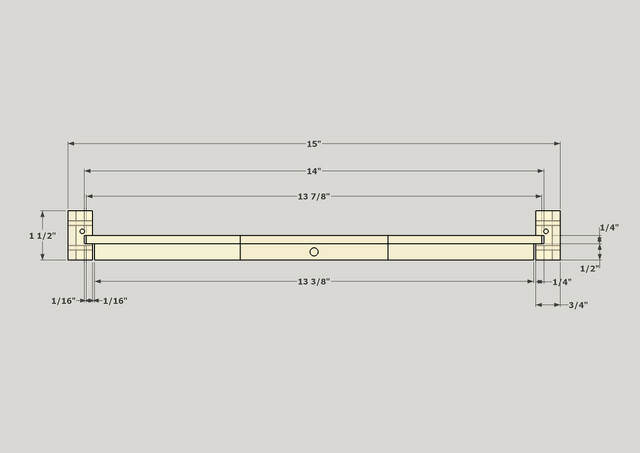
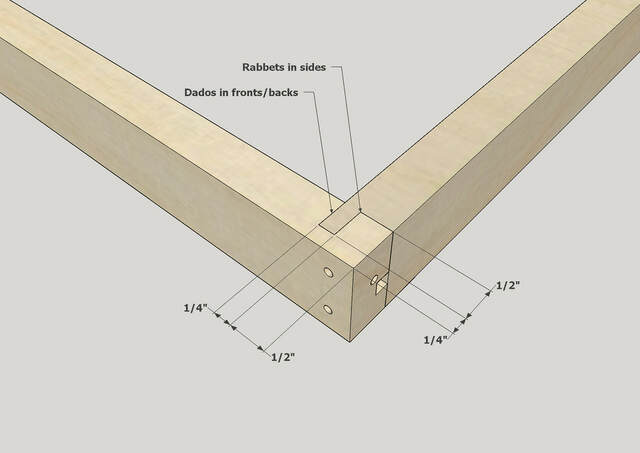
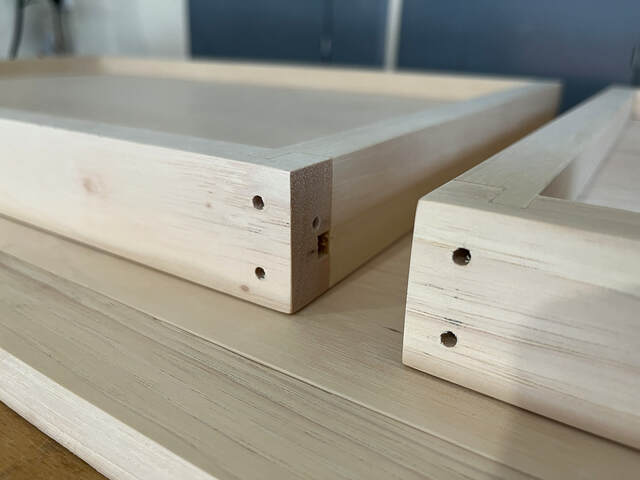
To allow for cross-grain wood movement, each shelf has a rabbet along its perimeter that floats in grooves in the sides. On the left and right, the fit is snug, and the shelf is pinned in place with a 1/4" dowel (and glue). On the front and back, there are 1/16” expansion gaps inside the groove and between the edge of the shelf and side. The idea is that the shelf will remain centered but can still expand and contract.
Because the shelves have glue only at the corners (aside from a small amount near the dowels), I wanted to use stronger joints than the dowel-reinforced butt joints I typically use. I settled on rabbet-and-dado joints. I also chose this joint because it meant that every leg attachment screw would penetrate some side grain (at least 1/4").
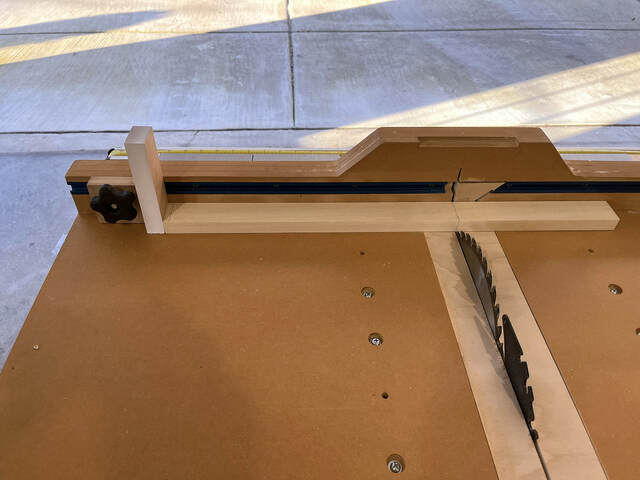
I cut the sides to length with my table saw and crosscut sled. The short sides were easy, because I could use my sled’s stop block and cut one side at a time.
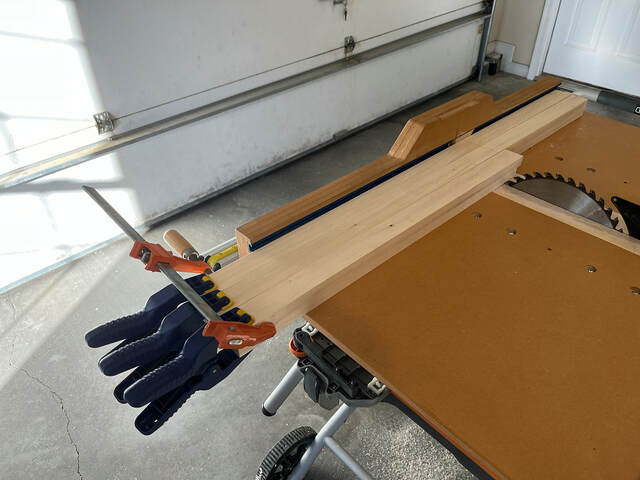
The long sides were harder because my sled is too narrow. (My next sled will have some way to extend the fence.) To make sure all the long sides were the same length, I clamped them together and cut them all at the same time.
I cut all the joinery using my table saw, using multiple passes to cut the grooves, rabbets, and dados. My blade isn’t flat-topped, so it leaves shallow grooves that I sand or scrape out (at least partially). It doesn’t create the tightest possible joints, but they’re good enough.
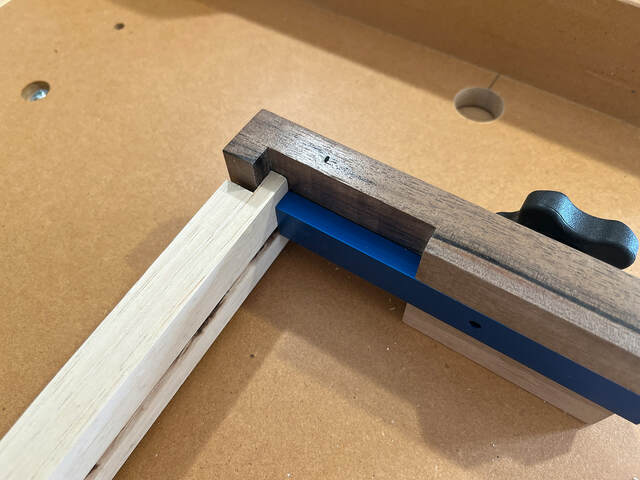
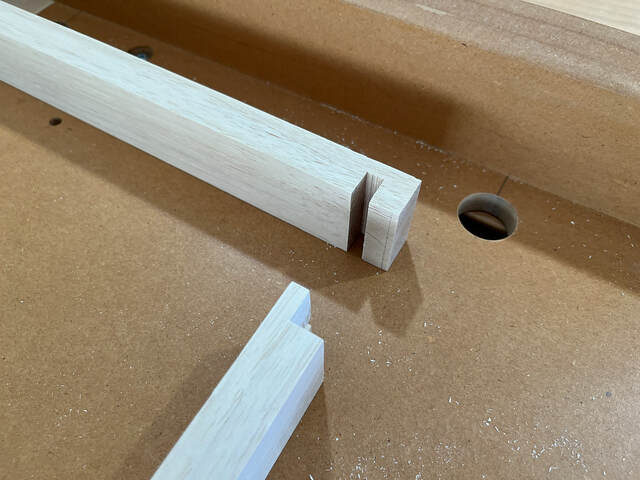
I cut the rabbets on the ends of the shelf sides first, then used my kerfmaker to size the corresponding dados.
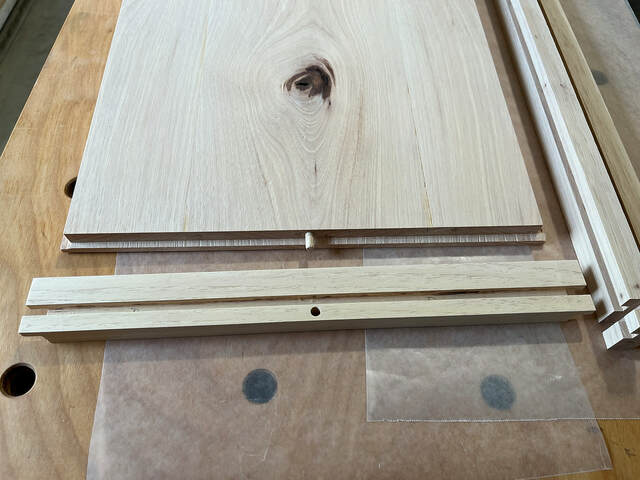
Here’s a dry test fit of a shelf assembly showing the locations of the centering dowels and the expansion joints between the shelf and front/back sides.
I used my JessEm doweling jig and dowel centers to drill matching holes for the centering dowels.
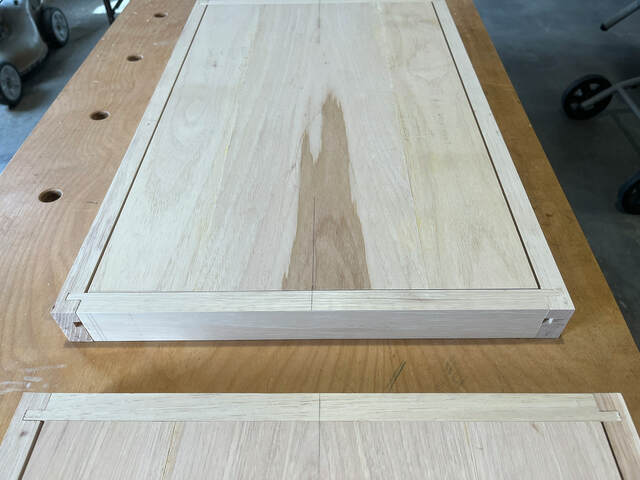
Using real joinery makes for easy glue ups.
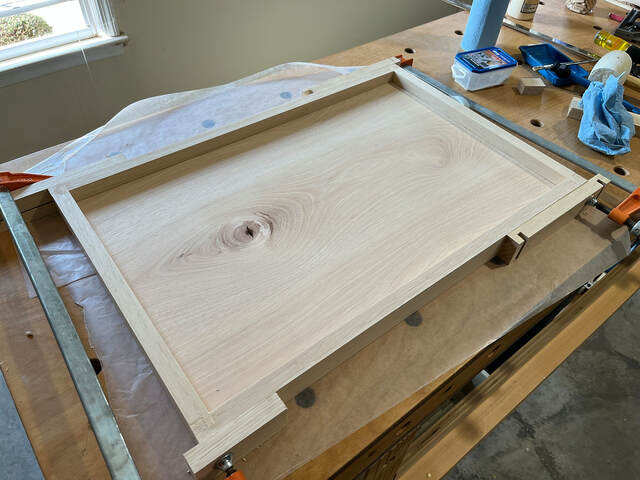
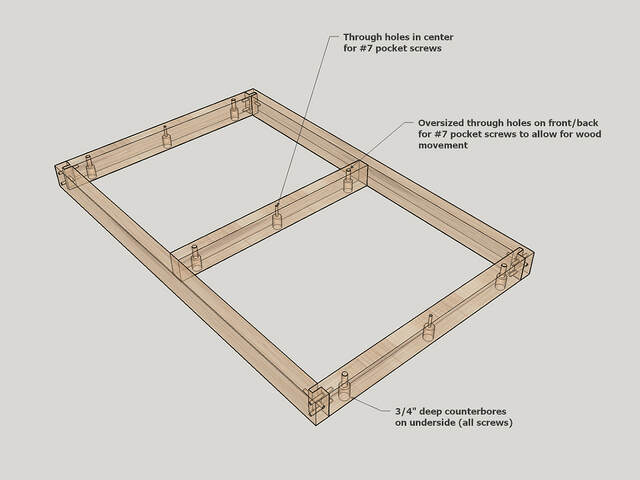
The Apron and Top Attachment The apron is just a shelf frame without the shelf grooves and with an extra cross brace. I drilled nine 1/2" diameter, 3/4" deep counterbores in the bottom of the apron. Then I drilled through-holes for the pocket screws that would fasten the top panel to the apron.
The center holes (across the depth of the apron/top) are just large enough to accommodate the screws. When attaching the top, I tightened these screws fully. The other holes are oversized, and the screws in them are just snug, not fully tightened. The idea is that the top remains centered front-to-back, with the movement occurring cross-grain on either side of the centerline (just like in the shelves).
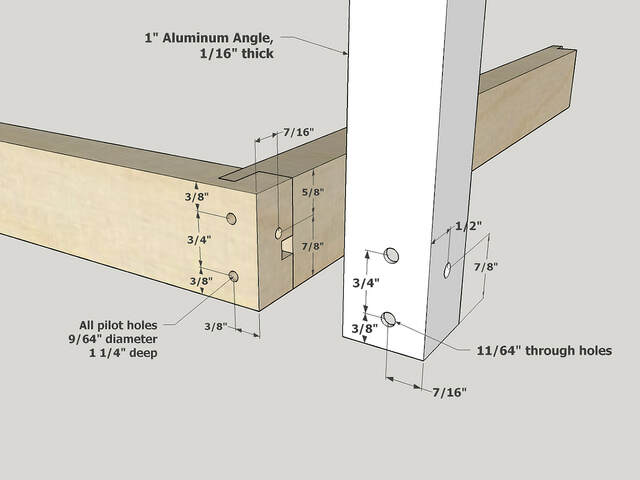
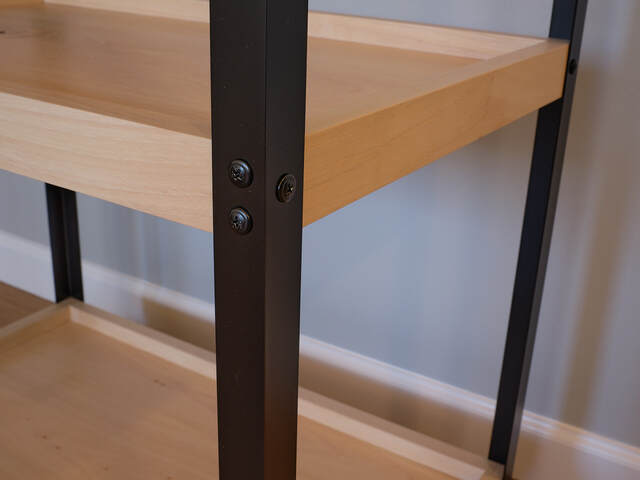
Preparing and Attaching the Legs The legs are 1” wide, 1/16” thick aluminum angle, and the longest unsupported span on each leg is less than 14”. I wasn’t worried about the aluminum’s strength. I did worry about the legs rotating relative to the shelves, causing the cart to rack.
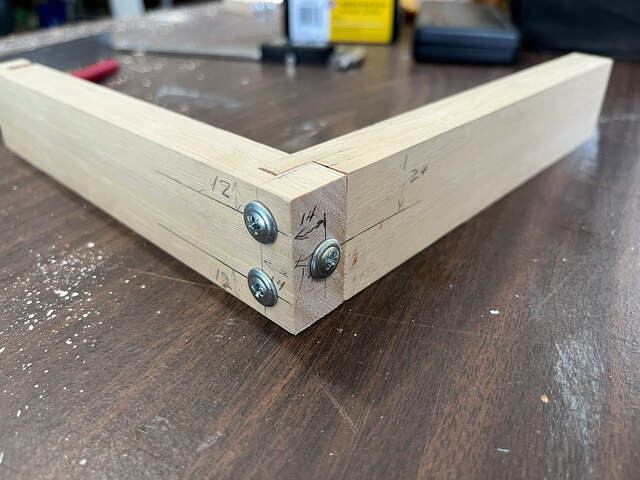
The only ideas I had to reduce the racking were using lath screws (which have wide, flat heads that apply more pressure than tapered- or round-headed screws), and to use three screws at each attachment point: two in the front (on the cart’s longest side), one on the side. The rabbet-and-dado joints I used on the shelf sides ensured that each screw would penetrate through at least some side grain. Still, most of each screw would be in end grain, and there just wasn’t a lot of room for three screws in each joint (the shelf grooves didn’t help either), increasing the changes of splitting.
To check if my plan would work, I bought some #8, 1 1/4" long lath screws, drilled 9/64” diameter pilot holes in my test-joint scraps, and drove the screws carefully. Nothing split, so things seemed fine. I think the hardness of the pecan helped a lot here. (I think softer wood would have split.)
With that settled, I finalized the screw locations in the SketchUp model.
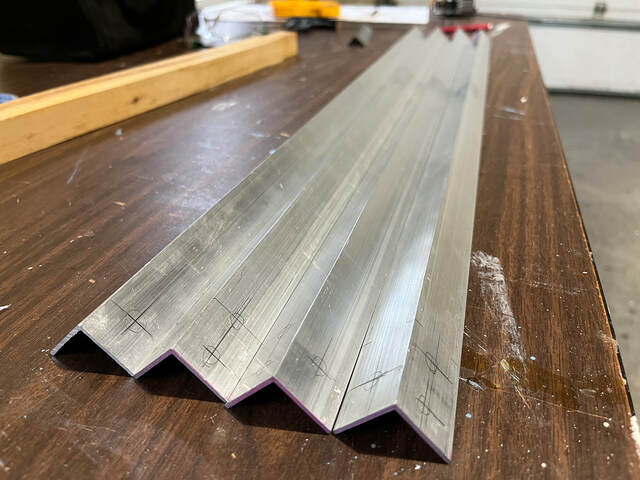
I cut the legs to length with my miter saw, then marked the locations of all the screws.
Then I drilled 11/64” diameter through-holes (36 in all) in the legs with my drill press and sanded the legs in preparation for painting.
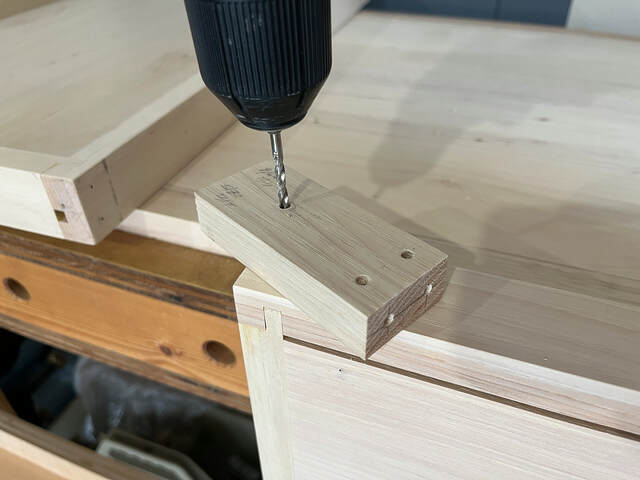
I also fabricated a pair (left/right) of drilling templates to use on the shelf sides. I used these templates and a VIX bit set to penetrate about 1/8” to mark the pilot holes in the shelves.
I ended up using these templates just once. It seemed like the side screw holes were very slightly off, so I used the actual legs to mark the remaining holes to ensure that the holes lined up perfectly.
My benchtop drill press wouldn’t accommodate the long side of the shelves, so I drilled the pilot holes by hand. To make sure the holes were straight, I used a simple guide block with a vertical hole (drilled using the press).
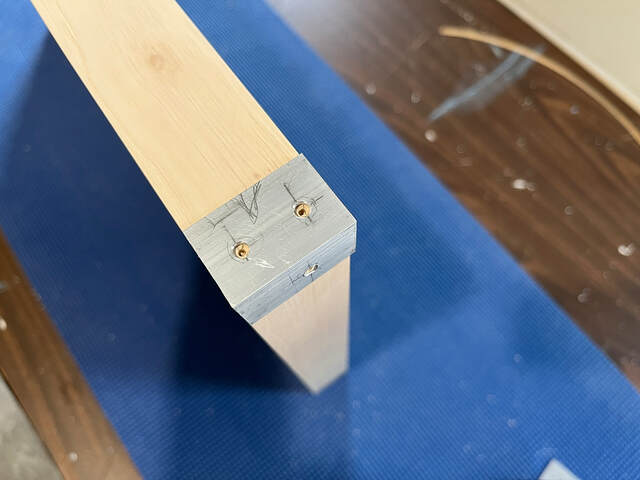
I didn’t attach the legs until I had finished and painted everything, but I didn’t run into any problems. All the screw holes lined up, and nothing split.
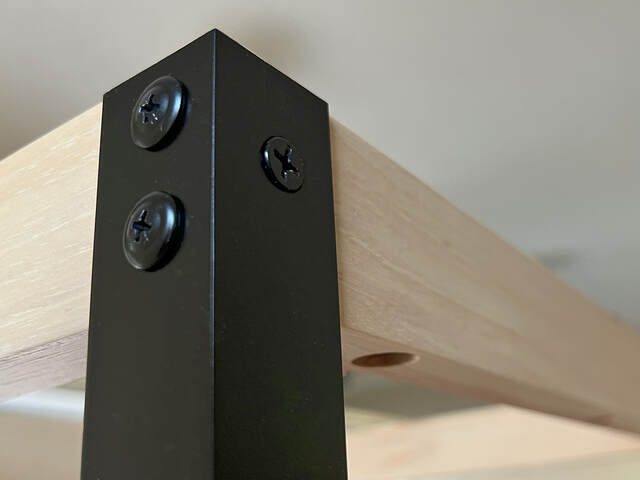
Folding Shelf Brackets The folding shelf brackets are bolted to the tops of the legs. That means that the leg screws there are underneath the brackets. The brackets have shallow indentations on that side, but the domed lath screw heads won’t fit inside them.
To deal with that, I drilled countersinks in the legs and used tapered head screws.
The brackets have three 1/4" diameter mounting holes. The top hole was located near the bottom of the apron, so I decided to use just the bottom two holes. I drilled matching 1/4" holes in the legs and used short 1/4" diameter bolts to attach the brackets.
The part of the bracket that attaches to the leaf (not shown) also has oversized holes, so I just loosely tightened the 3/4" lath screws (and washers) that hold the top in place. Unlike in the top and shelves, I made no provisions for pinning the wood movement to the center of the leaf.
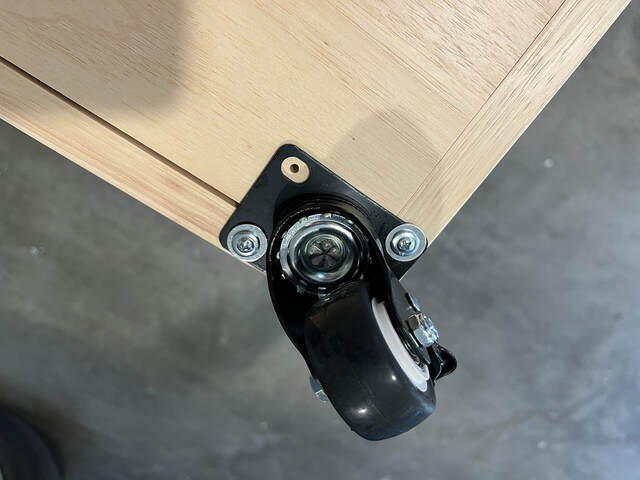
Attaching the Casters Wood movement considerations affected even the casters. For stability, I wanted to mount them as far apart as possible--in the corners of the bottom shelf. The only problems with that location were that (1) I couldn’t use the outside corner hole--the shelf corner was full of screws already, and (2) one of the mounting screws had to go into the part of the shelf, which needed to move.
In the end, I had to settle for two good screws (#8, 3/4" long lath screws and washers) in each caster. I also used a screw in the shelf, but I didn’t tighten it down fully. The mounting hole is oversized, so the screw can shift along with the wood. I don’t anticipate any problems. The cart rolls over a smooth floor; it doesn’t roll over any bumps that would apply lateral pressure to the casters.
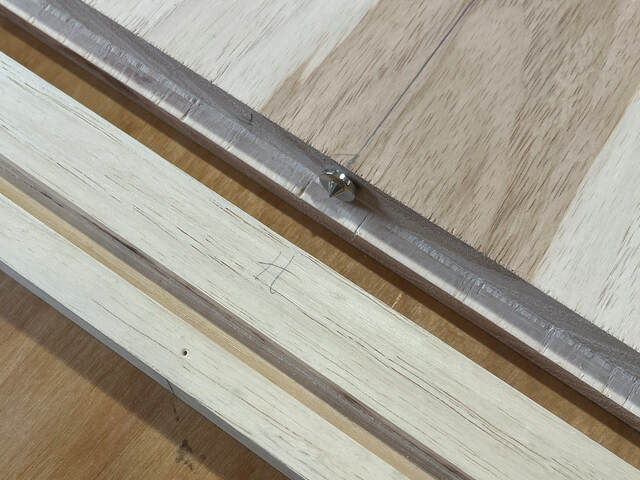
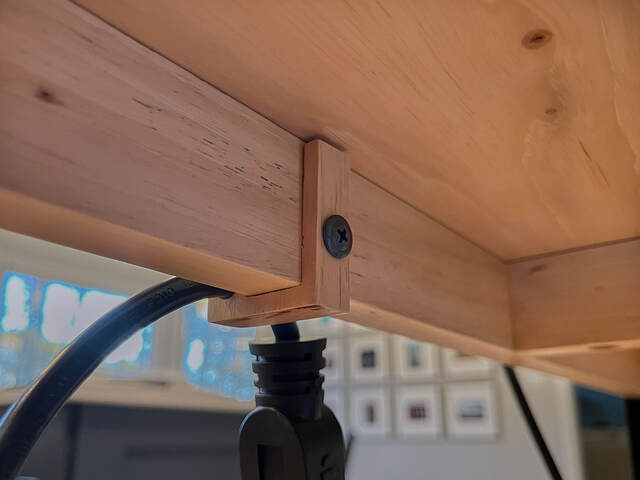
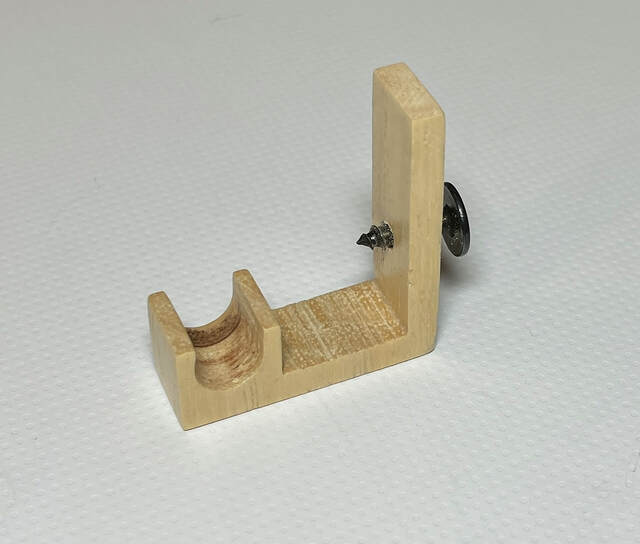
Addendum: Cord Hanger After my wife started using the cart and mixer, it became apparent that she needed a better way to store the mixer's power cord (and one-foot extension cord needed to reach the outlet), so I built an unobtrusive cord hanger that screws into the back of the apron.
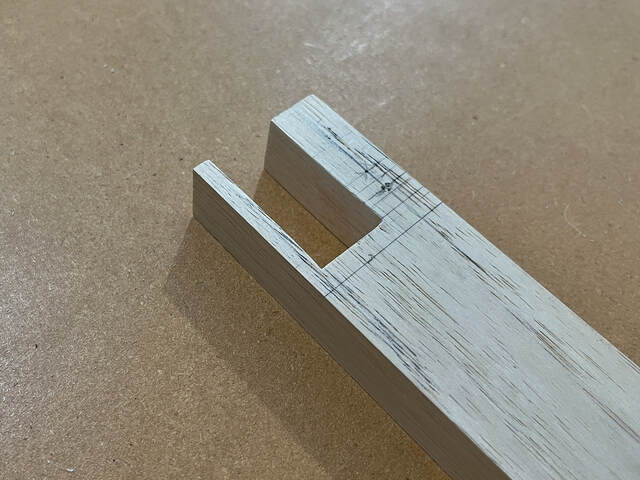
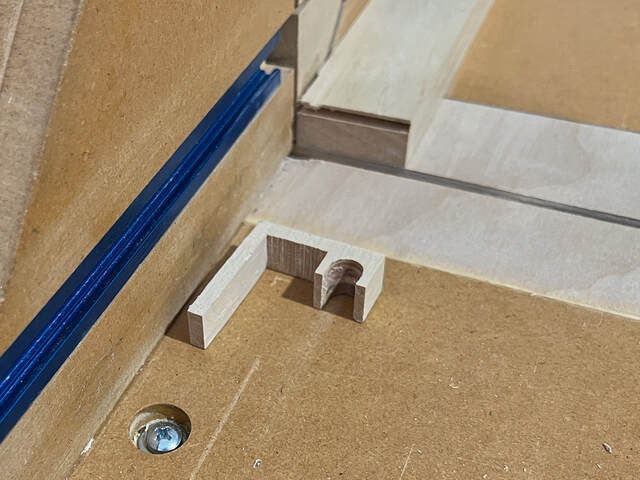
It was a quick mini-project. I used leftover piece of pecan I hadn't thrown away yet. I started by cutting a 3/4" wide dado on the end.
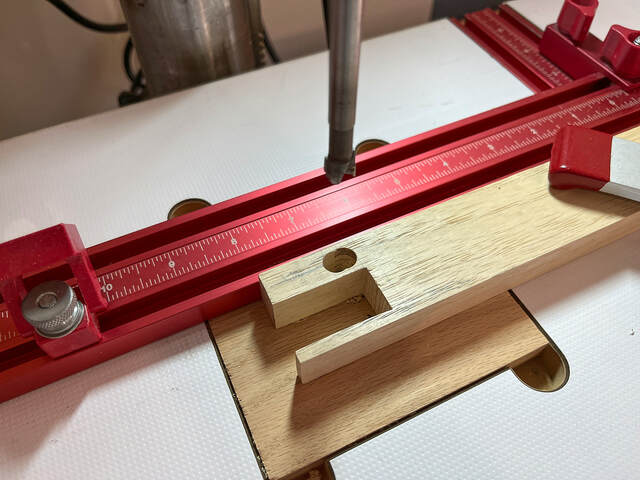
Then I used a 3/8" Forstner bit and my drill press to cut an oval hole beside the dado.
Then I made to crosscuts: one cut the oval in half to form the cord cradle, the other to cut the hanger to length.
I drilled a clearance hole for the mounting screw, applied some finish, and I was done.
Nicely done and an informative write up. The thing I noticed first was how well the cart top and the counter match. To me, that's a sign of attention to detail.
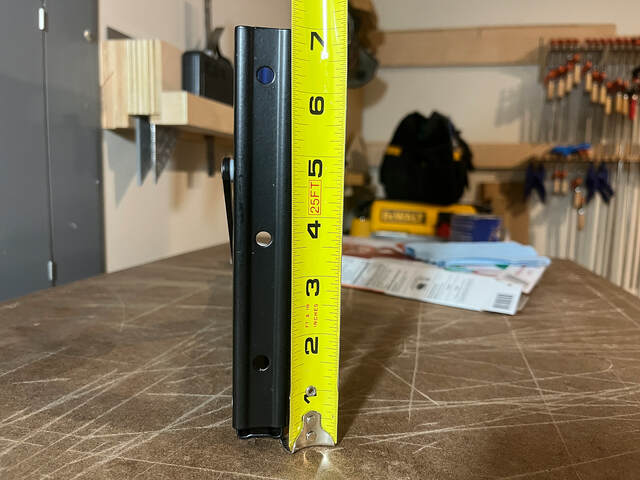
Steve: I put an inverted caster on a cutoff on the floor and measured from the wheel to countertop to determine the leg height.
Eric: what type of file do you use? The edge of a flat file? I usually drag a chisel backward over the ridges (like a tall, thin scraper) to smooth them. (I always fear the chisel police will come after me.) It works okay, but a file might be faster.
Ron, I just use a fine flat file, I have a few that are about 1/2" wide, or a small triangular file works well too. I have also used blocks of wood with sandpaper wrapped around it to fit the grove. If I had a router plane I would use that on the groves. Guess I should make one before too long.
Simple can be complicated! Turned out great. You and your wife are a good team! Her fabric storage containers work nicely with the clean design of the stand.


 - Project by Ron Stewart")


")
")
")
")
")
")