I am not sure what happened here but my nuts seem to have overwritten the construction details Background:
The Dog ramp originated from an SMS message inquiring if I could build.
They supplied a couple of pictures showing the basic design and added their size requirements over a few more SMS prompts for info.
Preamble: I milled the timber from the stock from In Glass and bits I had in Morningside which consisting of the stash of Pine and believe it or not some Masonite offcuts I had stashed away. The quad trim was from Wallys place is son gave me after he died.
Incidentally I got a stash of tools from him whilst he was still alive, clamps wood, Ply and assorted timber off cuts picture frames and the likes, anyway I am digressing.
Materials:
The Ramp assembled
The ramp frame is pine 65 mm x 20 mm finger jointed together overall dimensions 1000 mm x 400mm x 65 mm. The floor or actual ramp is Masonite with anti slip sticks glued onto it the top of the ramp, has four sides of quad and the underside is held in position by screws and blocks and triangular pieces.
There are two folding legs that fold out from inside the under frame to 90 degrees and then held at 90 deg by brace which also acts as a carrying handle.
Apart from the brace carrying handle everything stows flush with the frame when closed.
Over all dimensions are :
1000 mm in length and 450mm in height so you have a hypotenuse of 1000mm the opposite side being 450mm giving angles of 24.2 and 90 degrees at the base
The measurements are taken along the overall length of the ramp and from the underside of the elevated front of the ramp when sitting up from the floor at 90 degrees.
The ramp has a underside section cut at 25 degrees on the bottom of the base to allow it to sit on the floor stably.
The fold out legs
The fold out support legs are 445 mm x 45 mm and cut at the bottom at 25 deg.
The off cuts are then fitted in the underside of the ramp to support the floor and allow the legs to stow neatly.
The fold out legs are set back from the elevated front by 200mm and a cross brace is fitted to the lower edge allowing the frame to be swung out effectively.
Once the legs reach 90 deg from the ramp a stop block/carry handle is fitted to prevent the legs moving any further forward and as they are over 90 degrees to the floor they remain stable.
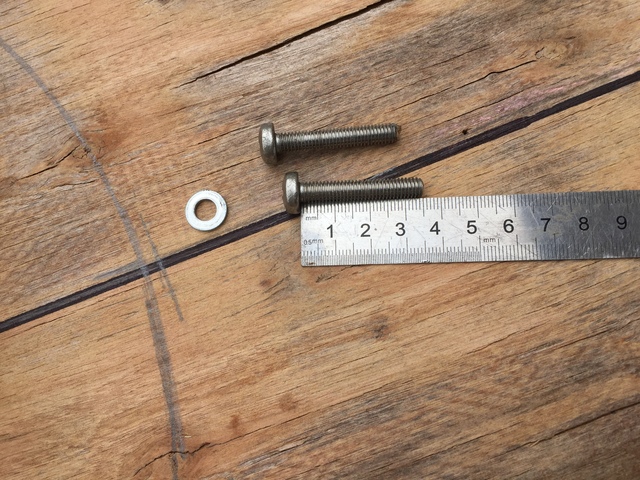
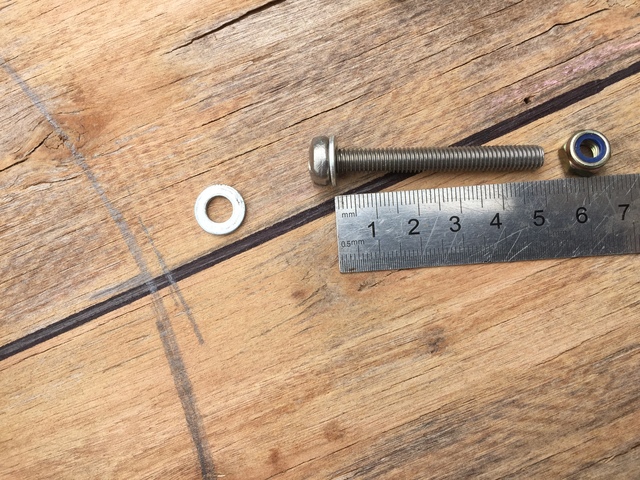
To get the most accurate positioning of the pivot points I used my PARF Gear to precisely drill 3mm holes in both the legs to assist with the positioning of the 6 mm bolts later, it almost worked.
The Stop Block has a sections removed from both edges of the middle to form a convenient carry handle.
The fold out legs are pivoted on a 6 mm threaded bolt/screw and held in place by metal thread inserts in the inside of the legs. To get the inserts positioned correctly counter bores were used first however the insertion of the threaded inserts still produced an axial error of about 2 mm.
The underside of the legs has a radius cut in it to allow rotation within the frame.
I had an issue with the screws winding out as the legs were open and closed, I didn't think thread lock would be the best solution so I changed them from 35 mm to 50 mm and added a second washer and a lock nut.
That seemed to do the trick.
Individual parts
The Quad is 19 mm or ¾ “
The slats are 320 mm x 20 mm x 4 mm the spacing is 35 mm The gap at the each of the ends is approx 2.5 mm.
The cross brace is 324 mm and sits about 25 mm from the bottom.
The legs are 445 mm long and cut at 25 deg,
The base has a triangular block at the end retaining the Masonite and is about 25 mm.
The pivot point is 200 mm in from the top and centralised on the legs and frame.
The handle is 395 mm in length and is 60 mm x 20 mm and is fixed in position positioned with the legs extended at 90 degrees to the base.
The Masonite is 360 mm wide x 995 mm long.
Finishing:-
The ramp was filled with Timbermate sanded and sealed, further surface finishing is up to the customers pleasure.
nice ramp rob. but will it support the weight of my 200lb tibetan mastiff that kills wolves. he loves to sleep with me though 😁 he used to just step up onto the bed but ever since a wolf tore his front leg off he has a problem getting on now ! 😁
working with my hands is a joy,it gives me a sense of fulfillment,somthing so many seek and so few find.-SAM MALOOF.
Apologies RC... must have been looking at JJ's post when drafting the response... Like you use of the Parf jig, though the ruler would have been easier for the 3mm holes.
If your first cut is too short... Take the second cut from the longer end... LBD
I needed to get the most accurate guide holes for the legs, I could have hauled out my radial arm drill but its such a complicated piece of equipment to set up and confirm it is actually set up correctly I really couldn't be bothered for just one hole as a reference. So my trusty PARF system was my choice I needed the drilling block to get the most accurate guide hole in both legs.
I guess I could have popped in a few dog holes as its a dog ramp after all