Those of you who have followed my projects will know that I dabble in clocks. I usually buy a new modern mechanical movement and then make a period case for it. But this one is slightly different.
While on a weekend away, my wife and I called in at a ‘French’ antique shop in Boyanup, in the SW corner of Western Australia. Not actually French, but the owners tend to holiday in France each year, and then search the French Flea markets, and antique shops for suitable items to fill a 40ft container which they ship back to Western Australia.
So ‘French Living’ is full of genuine French ‘junk’! When we visited, they had three old longcase Comtoise clock movements. At around A$150 each, I couldn’t resist!
Once home I thoroughly enjoyed striping it down and restoring it.
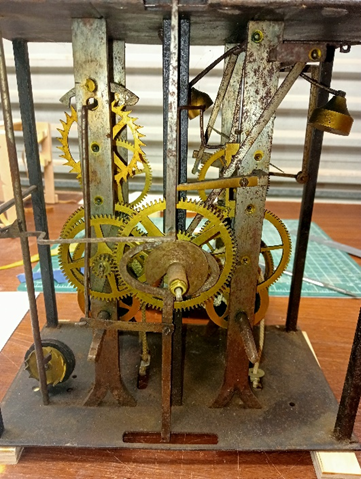
The Comtoise movements were a provincial weight-driven mechanism originally made in the vicinity of Morbier in the Franche-Comté region of France, near the Swiss border. They were made in their thousands from the late 17th century up to the onset of the First World War in 1914.
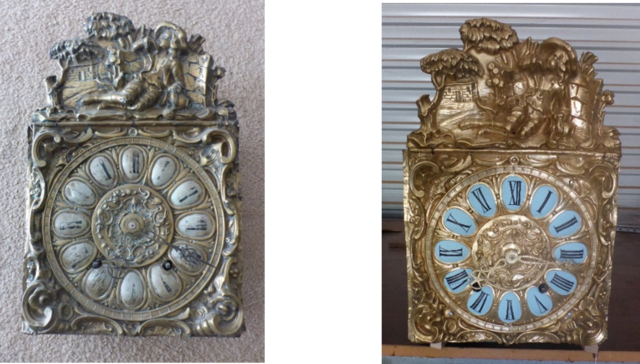
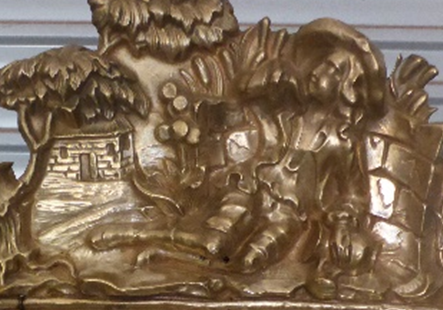
They were sold all over France by traveling salesmen and the new owner would commission a case from a local carpenter/cabinet maker. The mechanism is simple and is extremely over engineered, with large bullet proof gears and pinions fixed in an iron bird cage frame. This has meant that many mechanisms have outlived their cruder basic wooden case. While the movements were all very similar, there was a vast range of brass dial surrounds or Frontons. These changed over the years and give a clue to dating the mechanism. The first of the movements I bought was from round 1850/60 and had the newer verge escapement and a one piecepressed brass dial – Fronton. It shows what looks like a farm hand getting drunk while swigging back jugs of wine!
The first clock before restoration After
Close up of the farm hand with surrounded by wine flagons.
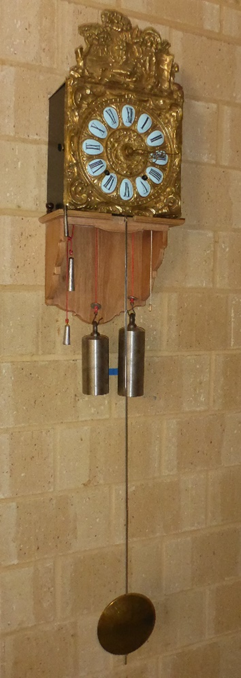
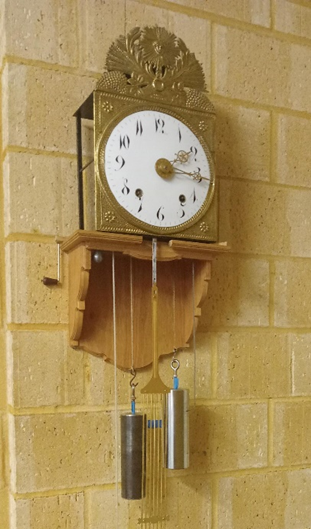
Clock 1 complete on its bracket with basic pendulum and weights.
Clock 2
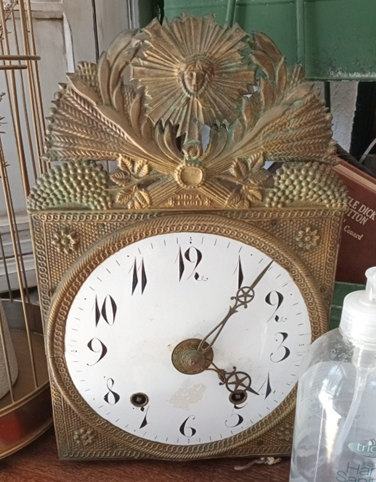
Around 9 months later, on our next visit to French Living, and with one successful restoration under my belt, I just couldn’t resist another movement. This one was an earlier version from around 1830/35. It had an earlier anchor escapement, an earlier two-piece Fronton, and a very nice unchipped enamel dial! It was another bargain at A$175 this time, though no weights or pendulum were available.
As seen in the shop.
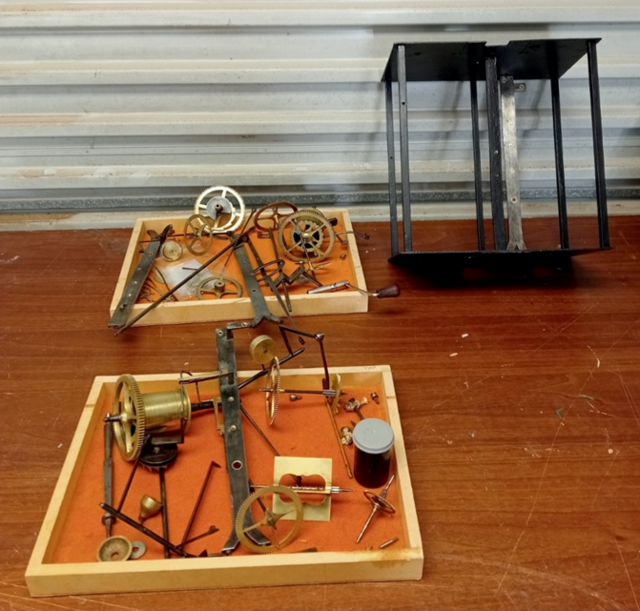
Bird cage frame ready to be dismantled.
Two trays of bits cleaned and ready - hopefully to put back together into the frame!
With my restoration experience from the first one I got this one cleaned and up and running quite easily. I fitted it up onto the first clocks bracket to get it going, work out the pendulum length, and the length of cord for the weights to allow them to fall for 7 to 8 days.
So, another success! But wouldn’t it be great to build a ‘proper’ case for it. Well ……………. I had a friend who was interested in old clocks! He had a few old American mantel clocks and had always said he fancied a grandfather clock! Would he be interested in either of mine? A resounding YES, was his answer.
His preference was for the earlier white enamel dialled movement. So, we needed a design....................................... Coming up with one was an interesting exercise. Comtoise were always very tall clocks at around 2.5 meters or 8 – 9ft tall!! The height was required to enable the weights to fall for at least 7 days – but would this fit his house? Well almost, his ceilings could accommodate a clock 2.4M tall!
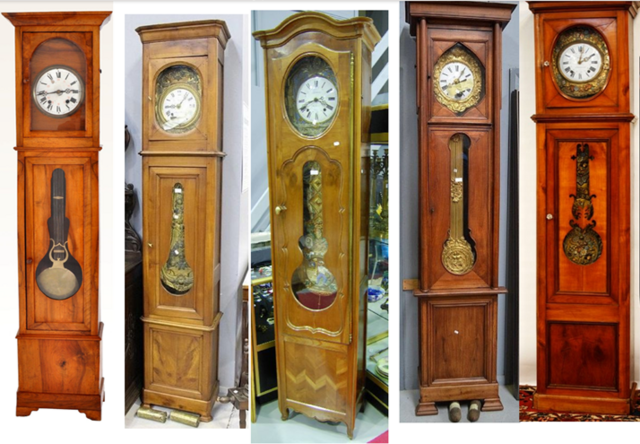
We looked at traditional Comtoise ‘violin’ cases.
These would have been made by the local carpenter and usually from pine, though the much more expensive oak or walnut were sometimes used. Generally, the pine cases were of a quite simple slab construction, nailed and doweled together. The usual ‘violin’ case had a slight taper to the trunk and base and a ‘potbelly’ where the pendulum swings. They were painted, and then grained - ‘sgraffito’ to make them look more like expensive mahogany or walnut. On top of this ‘graining’ there was usually additional paintings of floral bouquets, probably to imitate marquetry - right up my street.
The use of pine is probably the reason why not many cases survived as they would have been susceptible to damp and wood worm.
We also looked at the less common though better made straight sided ones.
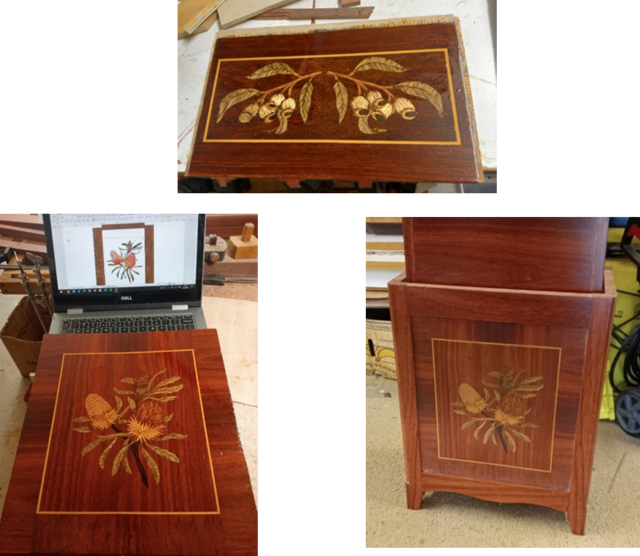
I eventually came up with a few designs influenced by the traditional ‘violin’ case. We decided to make it from the local Jarrah. To match the traditional French painted floral bouquets, I designed a couple of marquetry panels depicting local Banksia flowers and Gum nuts.
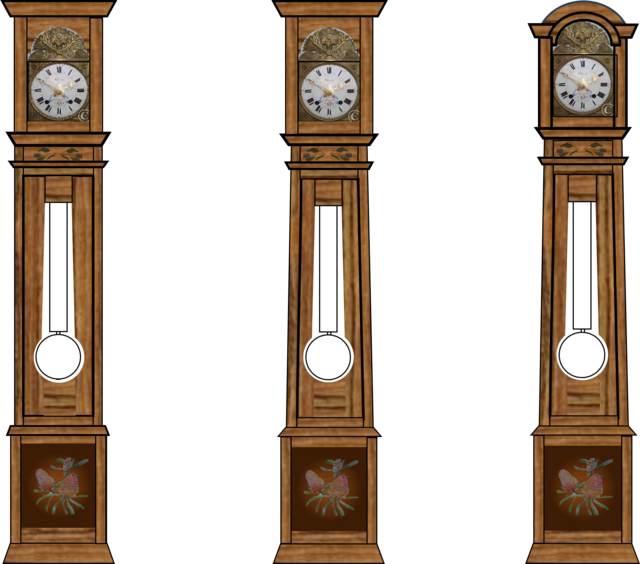
Straight case Flat hood Tapered case Flat hood Tapered case arched hood.
We went from a parallel sided trunk with flat hood, eventually agreeing on a tapered trunk with an arched hood - of course the hardest!
With the overall design and its maximum height agreed I was ready to go. Rather than a ‘slab-sided’ case I decided to use a paneled construction for the three main elements - base, trunk, and hood.
I started with the marquetry panels. The top panel was cut as one stack of 12 veneers, and then assembled as a book matched pair.
Then came the first 'real' woodwork - the base. A mortice and tenoned frame which incorporating the Banksia marquetry panel.
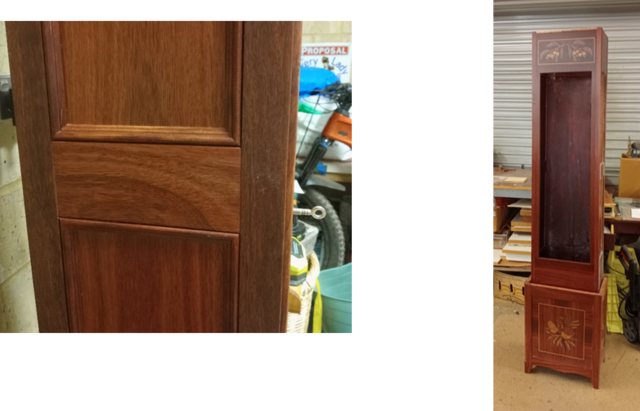
Next was the trunk. To simplify its sides, I decide to use applied moldings rather than work them into the solid jarrah frames. The panels were made from matched jarrah veneered plywood. I purchased ready-made lengths of pine moldings applied Jarrah stain and polyurethane and glued them to the finished frameworks – they worked well.
Next was the trunk door. Originally, I was going to use veneered plywood but settled on solid jarrah. The mouldings on the front and the rebate for the glass were done after the panel had been glued together.
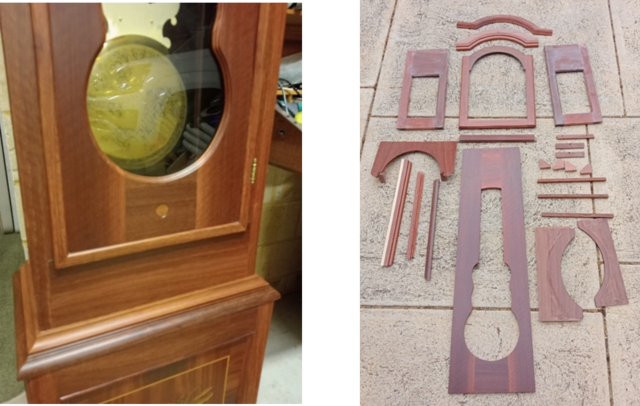
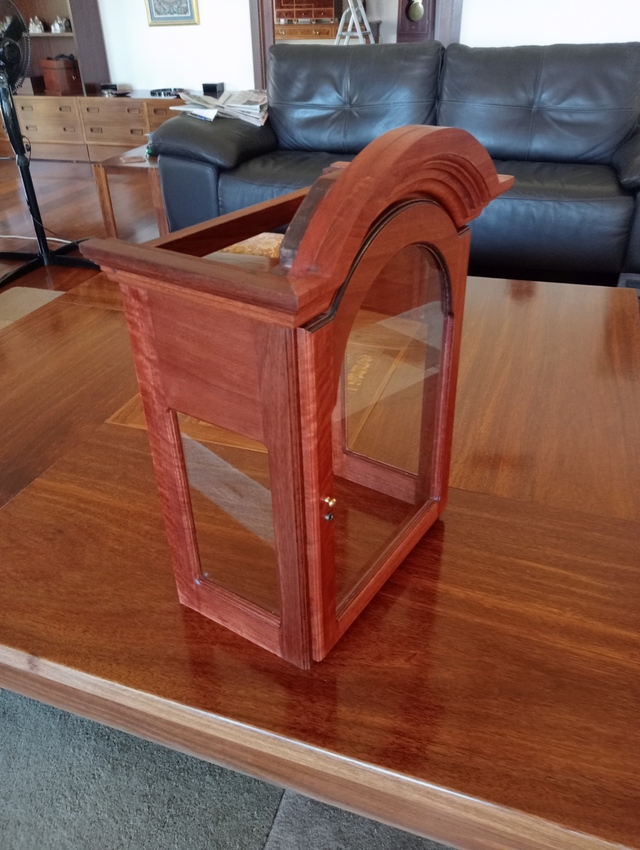
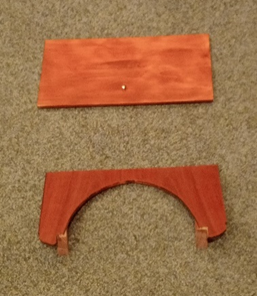
Finally, I came to the hood. This was certainly the most complicated part as sizes were critical, and it had to be removable to give access to the mechanism. Originally it was going to have its own back board intergrated into the structure. The whole hood structure would slot down into grooves on the back of the trunk. But I decided that given the height of the hood there might not be enough room to slide it up completely before it hit the ceiling!! So I decided on a hood frame design that would fit onto the extended backboard from the front. It still needed to be constuctred as a stand alone piece.
Hood back board slotted into the trunk, but before cutting to fit the hood frame.
I started with the hood by making its door which needed to frame the dial ‘just’ enough! I used a mortice and tenon frame with jarrah veneered plywood for the arch top rail and applied moldings and rebates for the glass after it was glued up.
The door size dictated the other dimension of the hood framework. The hood sides were also mortice and tenoned with the wide top rails made from jarrah veneered paulownia to help reduce weight. Finally, to make up the compound arched and straight mouldings for the top cornice, I used multiple routered mouldings glued together. Once made and finished, fitting them together with mitred corners and attaching them to the hood frame was an interesting task.
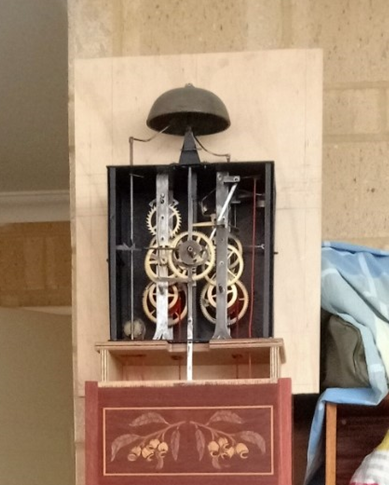
The finished hood – pictures taken from step ladders, which is why you see the movements seat board!
The last two pieces were a top for the hood to keep dust out, and a partial dial mask to block out the void in the top of the hood. This slots in behind the Fronton.
To fix the glass I used thin glazing rails, nailed into the rebates through pre-drilled holes. Some rebates were modified to take straight edged glass – notably the trunk door. For the remaining curves I used 5mm stained cord nailed into the rebates in a similar manner.
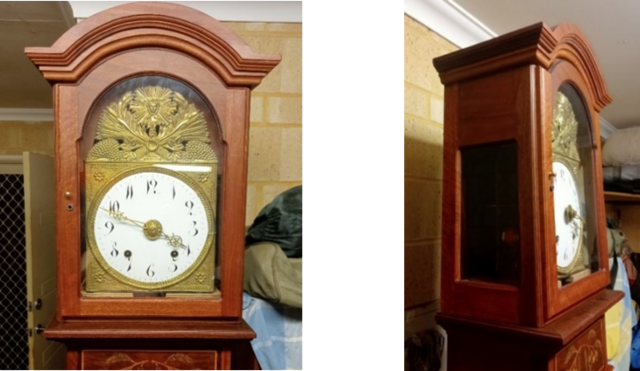
It was a half days job transferring it to its new home. It had run faultlessly for two weeks before we dismantled it and transported. I was apprehensive and worried that it wouldn't run. Old clocks are very sensitive to their verticality. You see above that it had wedges under the feet to get it in-beat. Knowing this I removed some packing from under the seat board when we dismantled it. Fortunately, once transferred to its new home and reassembled with just one small wedge under a foot to stop the case rocking, it ran straight away. Boy oh boy was I pleased!!!
One final point - most antique long case clocks have a 39.14 inch long pendulum which means its ‘tick-tock’ beat is of one second duration. This clock has a very long pendulum 53 inch / 1350mm, so its time keeping, once adjusted, is excellent as the adjustment to its pendulum length is very fine. Behind to the left is my old Marquetry clock for comparison - it looks tiny.
Thanks for looking and getting this far - well done!! Please ask if you have any questions.
Great attention to detail and I think the French craftsmen would be amazed to see what you made of their movement. Definitely a few steps up from what the village carpenter would have knocked together.


.jpg)