So I've at last got round to posting my Curiosity cabinet from that other place. I made it in 2013/14, and it took me around a year. So before you ask, I guess that's around 1500 hours.
There's a lot of pictures to share with you. Hope you enjoy them, and the brief history lesson and description. Just ask if you want to know more.
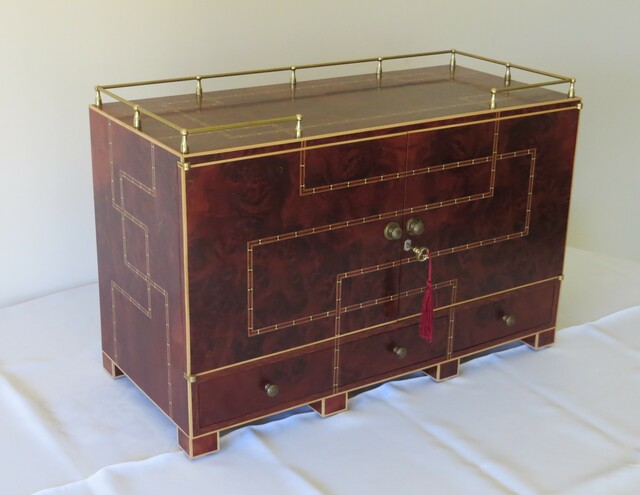
The 'plain' and modern outside that belies what lies inside.
I have always been amazed at the delicate, complicated and intricate work of the old master cabinet makers of the 17th and 18th centuries. Their work provided the inspiration for a number of my projects during the first few years of my retirement. In particular I've marvelled at the table cabinets with their fine marquetry and inlay that was commissioned by the nobility, and wealthy aristocratic and royal family's across Europe during that time. They where often presented as prestigious gifts to visiting statesmen as well. Many were used by their owners as traveling chests, when they would often be fitted into another outer case. They always had secret compartments for smuggling contraband, and for keeping items hidden from servants.
My first foray into this type of marquetry and decoration, was a reproduction of a marquetry long case clock from the 1690's, which you can see in my Projetcs. This was followed by several inlayed wall clocks, and a number of finely veneered and inlayed boxes, each one more complicated than the last. As my confidence in this delicate detailed work grew I wanted a bigger challenge, and designed a 'Bonhur de jour' - a ladies writing desk for my wife. This desk with its numerous drawers, hidden spaces, complex veneering and inlays, gave me just the challenge I wanted, both in the design stage as well as the making. I'll post this some time as well!
Researching my wife's 'Bonhur du jour' led me to the curiosity, table and collectors cabinets of the 16th, 17th and 18th centuries. With their complexity, myriad small drawers, secret compartments, and extensive inlay - I just had to make one!
So the concept of my Ancient and Modern was born. They had different names and slightly different uses in the countries across Europe where they were made: • Escritorio - Spanish writing box/cabinet • Vargueno - Portuguese writing desk • Kabinettschrank - German simple table cabinet • Schreibitisch - German writing box • Wrangelschrank - Cabinet for curiosities, and a work art in their own right • Kunstschrank - Collectors cabinet, or Cabinet of Curiosities, also works of art in their own right
The purpose of these curiosity cabinets, in the days before TV and the internet, was as a place to store your precious objects and curiosities. When visitors came you would open up the cabinet to amaze them, and then show off and discuss your latest acquisitions. The latest usually being displayed in the 'Theatre' behind the middle two doors - more later.
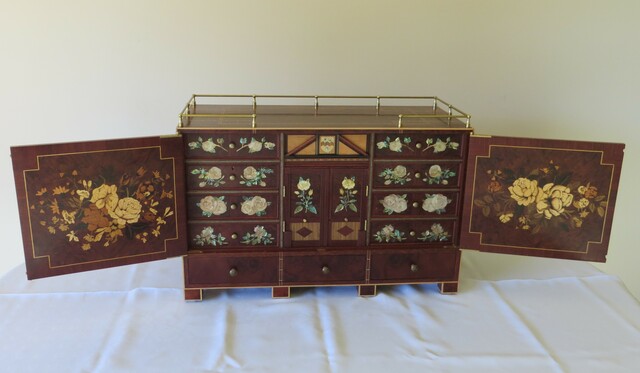
The wow factor when you open the doors
For our house the cabinet had to be relatively small as we were running out of space for the things I had made. We decided it would therefore have to fit on our existing hall table. It would also require a modern yet slightly classical external appearance to blend in with our other hall furniture. I decided a simple external appearance would give the perfect opportunity for some 'wow' factor when its doors were opened. So marquetry panels on the inside of the doors, and shell inlay for the drawer fronts became a key part of the design, and actually dictated the size of the whole cabinet.
The more I researched these old cabinets the more ideas for secret hidden compartments I found. I just had to build some in! Well, Ancient and Modern actually has sixteen hidden spaces and compartments, which in turn hold another twenty eight small drawers! Most of these old cabinets also had a central 'theatre' which was another element I wanted to include in my design. This would provide me with another opportunity for more marquetry, parquetry and inlay.
With twelve main drawers visible when you open the cabinet, I decided that one of the focus for its contents would be to fit some of the drawers out with a range of traditional games - yet another opportunity for some inlay.
The inside
The main cabinet is made from marine plywood veneered with book matched maple burl veneers, and a modern take on applied bandings. The cabinet is 600mm wide x 300mm deep x 390 mm high. I generally make small things as my wife says we've no where to put any thing that's big!
On opening the main cabinet, the marquetry panels can be seen on the inside of the doors. They are different, and are based on designs found on Jean-Henri Riesener furniture of the 1780's. They were cut by hand with a fret saw and sand shaded - I hadn't got into a chevalet at that time!
The interior of the cabinet has a range of drawers together with a traditional central double doored 'Theatre'.
The drawers are made from Jarrah with mother of pearl and abalone shell marquetry inlays. Originally I had thought I could stack cut each pair of book matched fonts (4 for each design) as a packet - I decided no way!!! So I got them specially made for me by a luthier supplier in Vietnam at around US$50 each - I couldn't make them for that!! He sold them as guitar peg head inlays. I asked him to make me paired left and right hand inlays. When they came, and despite each pair of drawers appearing to have identical left and right inlays - they were all slightly different! I had thought I would be able to stack cut the four same backgrounds for each pair of drawers, assemble them as panels and then glue the panels onto the drawer fronts. But as each set of four inlays were all slightly different I had to cut all 18 backgrounds separately!!
Secret compartments
The first secret is the what appears to be the middle two 'drawers' on the left - they are actually a rather complex box! This was the most exacting one I had ever made at the time. Those of you into veneered boxes will know that usually the finished size isn't important, if its a bit bigger or smaller than you originally intended then no problem. But if the veneered box then has to fit into a precise space, like a drawer opening, then there is no room at all for error! You can't sand or plane a bit more off the sides to make it fit, otherwise you'll go through the veneer! But this came out well. When you push the box in, the drawers above and below are 'blown' out - so its a good fit!!
The other interesting problem with the box was hinging the lid. You can't have normal hinge knuckles sticking up or the box wouldn't fit in its hole. So I used barrel hinges - not the most robust of hinges, and quite difficult to line up in the lid and front, but they gave the desired result.
Seen from the back
The interior of the box has a parquetry lid and has my usual hidden compartments. a false floor, plus a Japanese puzzle box in the middle. This I think takes around 15 moves to get open! This part was purchased as a kit, but I decided to veneer it. It needed to be glued up very carefully under pressure to ensure there were no gaps.
Behind the drawers on the left and right hand sides are false backs - in fact every opening has a false back. Behind these false backs are a range of secret compartments and smaller drawers. There are also some other secret compartments - more on those later.
Here the false back behind the box is removed and you see a set of four small drawers. The two 'secret' drawers with their parquetry fronts behind the top and bottom drawers can also be seen,
Removing many of these false backs, and secret drawers is by the use of a special 'magnetic' key. The magnetic key has two rare earth magnets embedded in it which are attracted to magnets embedded in the false backs, and secret rear drawer fronts. This enables them to be removed. However, the two magnets in the key have different polarities, so the key needs to be used the 'right-way-round' to engage correctly with the magnets in the false backs/drawer fronts. The magnets in the false backs are all positioned in different places so it takes quite a while to get the key engaged with them!! Not quite a period feature, but it works well and overcame the need to fit springs and catches etc!!
Magnetic key attracted to one of the rear drawers.
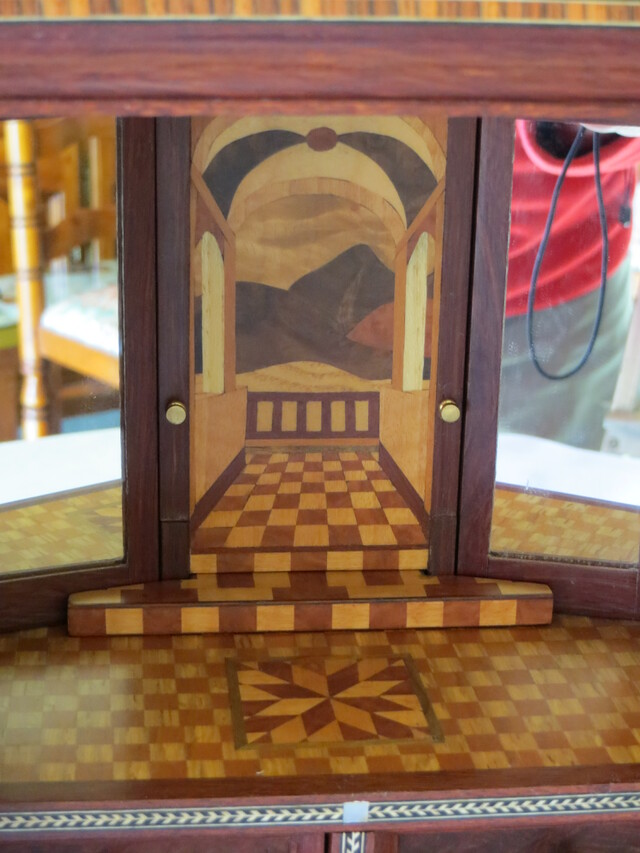
Central Theater
Opening the two central doors with their rose shell inlays reveals the traditional 'theatre' and the traditional mirrored interior found in most antique cabinets of this style. This is where the owners latest curiosity would have been displayed.
And yes, there are more secrets hidden behind the mirrors and the marquetry balcony scene!
But a complex procedure is required to access them. The top pediment which is also a drawer has to be removed. It has my family coat of arms on it (three clam shells), plus what looks like the shelf. With the drawer removed the shelf that it sits on can be removed. This 'shelf' has its own secret compartment - a sliding false back.
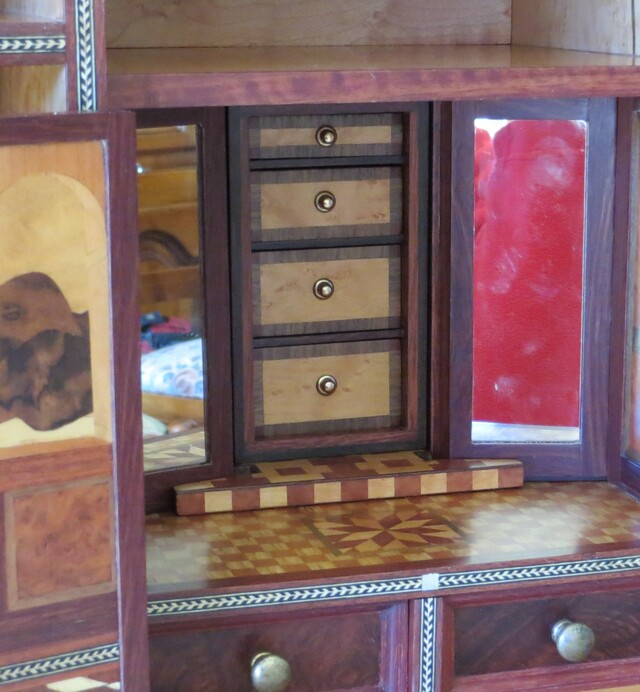
With the shelf in place it prevents the marquetry 'balcony' scene being lifted up and out.
But with it removed the balcony/door can be withdrawn revealing a small four drawer chest. Remove this and you can see that the mirrors are actually the sides of a two more chests with their own set of small drawers.
These are locked in place by the parquetry step.
Lifting and removing the parquetry step enables the two mirror chests to be removed. This now gives access to another false back - also removed by use of the magnetic key.
You can see that the theatre has a parquetry ceiling as well as the floor and wall panelling!
With the false back removed three more secret drawers are accessed.
More secrets
Just below the theater are two small drawers.
Remove these and then by pulling on the divider to two more small secret compartments attached to the divider are accessed.
More secret drawers are hidden behind the four right hand drawers. But these are only accessible by removing the middle shelf and false back. Which sneakily can't be done unless all the middle theatre chests have been removed!! A steel pin holds the middle shelf in place which the magnetic key draws out.
Bottom Drawers
As with other parts of this cabinet, things are not what they seem! You've already seen the box disguised as two of the main drawers on the left had side. With the main doors closed, the cabinet appears to have three drawers across the bottom. In fact what looks like a middle and left hand drawer is actually one wider drawer.
This houses two games boards. A folding backgammon and chess/checkers board, a Nine-Man-Morris/Chinese chess board, and a Cribbage board. Oh and yes, under the cribbage board is another small secret compartment to hold the scoring pegs.
Final secret compartment
With the drawer holding games boards removed access is gained to the last secret compartments, a drawer which is hidden behind the bottom right hand drawer! The magnetic key is again used to withdrawn it a short way, when a finger recess can been seen which enables it to be completely withdrawn.
So there you have it my ….................. Ancient and modern - Curiosity Cabinet.
The cabinet and all its contents!
As I said at the beginning, designing and the research that led up to the design was half the fun. There are no full size working drawings or complicated CAD images for it. Though I did use the basic Microsoft Word drawing elements to trace and print out the marquetry patterns for the main doors. It was all done from detailed pencil sketches in my sketch book!
One day it will go to my niece complete with a set of instructions for finding all the secrets - I hope she never losses them!!
Thanks for taking the time to get this far! I hope you enjoyed it. Please ask if you have any questions.
Loved it then, love it now Martin. I can’t imagine going to that level of detail and I’m kind of a detail guy. Out of the park, hat off, (fill in superlatives here) piece! A couple of dozen thumbs up!
The early bird gets the worm but its the second mouse that gets the cheese.
holey mother of.............................oh sorry i just passed out ,but im back on my feet now ! i dont even have words to describe what im feeling seeing this phenomenal work of wood art ! i cant even envision doing something on this level. mad i bow in your presence sir !!!
working with my hands is a joy,it gives me a sense of fulfillment,somthing so many seek and so few find.-SAM MALOOF.
What an incredible work of art that is, Madburg. It’s like a fractal in cabinet form. Each time you presented a level of detail, and I thought you were done, you dropped to another level. Astounding work!
I remember this one for sure. Not then or since have I ever seen a woodworking project like it. Anyone that hasn't seen all your other stuff at LJ's should go take a look. Incredible.
Wow. I have more to say but I still have to go through all the pictures. Obviously a huge fan of the marquetry and inlay in this project, plus I am a huge fan of your hardware usage. Back to looking at your pictures now, thank you!
Thanks again. Ryan inlays and hardware - I enjoy searching things out. The gallery around the top was very difficult to track down - alas I didn't make it! But I did make the two small catches that hold the left hand main door closed. Heres a link for the shell inlays - there's some amazing pieces which I think are excellent value when compared with trying to make them your self!! Its De Paule luthier supplies and the shell inlays are made in Vietnam (i think). https://www.luthiersupply.com - though they have a store in Spingfield OR. USA. Its worth checking them out. I've purchased a few for inlays on some of my boxes - the tigers are amazing!!
I have waited until I had time to enjoy the entire posting. This is an amazing project and a great write up. Thank you for taking the time to share it with us!