Share your craft projects
Make new craft buddies
Ask craft questions
Blog your craft journey

awsum55
1041 posts
and
24 followers
in about 3 years
in about 3 years
More from awsum55
A Box With Borders
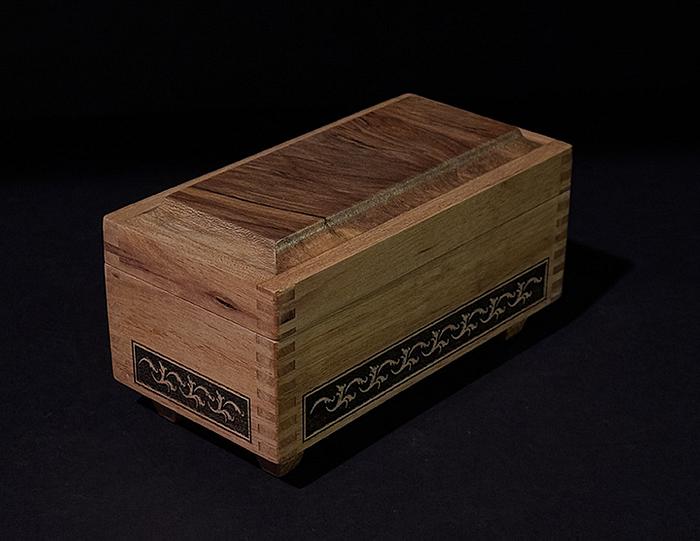
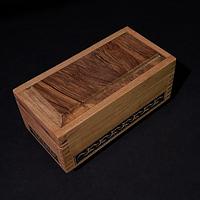
I made this box mostly to test a border pattern, because sometimes that’s reason enough. I drew the design in LightBurn and burned it into the sides with the laser. It felt like the right kind of detail, small, repetitive, and very border-like.
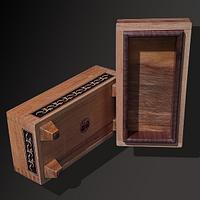
The wood came from the mystery stack. The lid and feet are cut from the same piece of spalted something, so at least they match. The tongue that registers the lid is walnut. It didn’t have to be, but I think it’s rich color adds some impact to the inside.
The box measures 6.25" × 3.125" × 3.375" tall. The joinery is basic box joints, cut on the table saw. Not fussy, just solid. Inside, there’s a removable suede insert, dark green, because a soft interior feels better, even if no one asks for it.
A coat of shellac warmed up the grain, and the topcoat is satin lacquer: durable, and just glossy enough to deepen the color.
If I make another, I’ll probably use a higher line rate (LPI) so the background comes out flatter. When I tested it, I liked the texture, but it does make the pattern a little harder to read. Now that I know the border works, maybe I’ll start finding more opportunities to add them.

.................. John D....................
20 Comments
Another winner John!
Higher LPI can help flatten the background as well as another pass with the "fill" direction changed by 90 degrees.
Those inset feet are cool!
Higher LPI can help flatten the background as well as another pass with the "fill" direction changed by 90 degrees.
Those inset feet are cool!
Real nice box, John!!
Cheers, Jim ........................ Variety is the spice of life...............Learn something new every day
Thanks Bruce. I used crosshatch, but had the angle @ 5º to reduce the amount of times the laser would have to change directions. This looked like it would create diamond a pattern, but the LPI was too close together to work. You know what they say if at first you don't succeed…🙄
.................. John D....................
Thank you Jim.
.................. John D....................
love it john. the pattern works real well. i also agree about using the darker walnut.
working with my hands is a joy,it gives me a sense of fulfillment,somthing so many seek and so few find.-SAM MALOOF.
True Dat!
Looking at your closeup, seems the grain has hard/soft growth rings, This will always leave ridges.
I'd imagine going at 90 would take a lot longer, something I always forget...
Looking at your closeup, seems the grain has hard/soft growth rings, This will always leave ridges.
I'd imagine going at 90 would take a lot longer, something I always forget...
Cool box! I like the pattern on the border, too.
The Other Steven
I like the box alot!
Can the lid fit any way you set it? I usually add an insert of a brass rod to top and bottom the way they where cut apart. So the owner know how to set it back on correctly.
Can the lid fit any way you set it? I usually add an insert of a brass rod to top and bottom the way they where cut apart. So the owner know how to set it back on correctly.
Petey
Nice!
Ryan/// ~sigh~ I blew up another bowl. Moke told me "I made the inside bigger than the outside".
Looks good!
Ron
Nice work John! Beautiful box.
GR8 JOB 😍😎👍
*TONY ** Denver * ALWAYS REMEMBER TO HAVE FUN
A very "Classy" box I must say.
Overal very impressive, I especially like the feet design and fitment.
Some pallet pine and wood stain might be the go for me next.
Limited "nice " tools here as I have no real workshop and work outside.
But would I assure you I would love a workshop, decent timber, a Laser and CNC!
Overal very impressive, I especially like the feet design and fitment.
Some pallet pine and wood stain might be the go for me next.
Limited "nice " tools here as I have no real workshop and work outside.
But would I assure you I would love a workshop, decent timber, a Laser and CNC!
Regards Rob
Nicely done! Really like the many design features.
I don't have a CNC but work with a friend when I want something similar. A ' technique I use is to finish the box FIRST using multiple coats of satin poly sanded to 4000, to get a completely sealed and flat surface. Then we do the engraving. That gives it a crisp edge. Then I usually fill the engraving with black filler or multiple coats of gold paint. I can then sand the excess off and get back to the flat poly surface without the dust contaminating the grain, or scratches left in the poly by only sanding to 600. A few more coats of satin poly sanded down again to 4000, followed by a final application of wax polish.
Beautiful decoration, beautifull box indeed!
...woodicted
Very well done.
Very nice. I especially like the top and the finger joints. That lower, decorative border is a nice touch. Good job...
That looks great!
Thanks to everyone for the nice comments.
Bruce, I found out there was no real difference in time no matter the angle.
Thanks Petey, it fits both ways and there is a slight color difference if put on backwards. A pin is a good idea, thanks.
.................. John D....................


