


Share your craft projects
Make new craft buddies
Ask craft questions
Blog your craft journey

David L. Whitehurst
60 posts
and
8 followers
in about 12 years
in about 12 years
More from David L. Whitehurst


Paul Sellers Bench

I wanted to post my woodworking bench. I built this in February, 2014. I’m building a toolbox now. The bench was important to me because I have an L-shaped bench in my garage now with a metal vise (little Craftsman) and the top is made of 5/4 planks and it’s rough. Also, the planks are not butted against each other and the shelves below are just full of wood shavings and dust. I have a new purpose for that bench, if you want to call it that.
Anyhow, this bench is wonderful. It’s solid and it’s strong. I got myself some Grammercy Tools holdfasts and this bench is a dream when doing chisel work.
My thank you goes out to Paul Sellers for making 11 videos and describing how to make this. I watched them over and over as I was saving my money and planning for my build.
The vise is from Rockler, but I’m not jumping for joy over it. It’s a quick-release that takes forever to spin the handle and get it to catch. Using two hands, you can hold the piece together underneath but overall I’d say it works but that’s about it.
David L. Whitehurst
6 Comments

OK David. You buildt a bench! What kind of wood? How did you put it together? What about the the frame? The vice, ok I can understand that. This is the kind of things that I need to know, to understand what you are doing, and give you the kudos that you deserve.
Tor and Odin are the greatest of gods.

Only one picture? More, please.
Oh sorry LOL. The bench is 6 feet in length. I think I used 58 – 2×4′s from Home Depot. Anyhow, the initial goal is to make 3 planks at 6" using material that’s 1-1/2″ × 3″. I took all of the 2×4′s for the two tops and the well board and chopped them at 6’-2". I gave myself a tad extra to trim off. The tops consist of 7-(2×4′s) ripped at 3". Don’t be too concerned about great accuracy on the ripping. The tops will be about 12″ × 3″ × 6′. The trick is to cut them squarely so that you don’t have too much planing. You will need a no. 4 Stanley bench plane to fair the timbers so that you can make a jointed lamination that will be the top. You will make two of those. The well board is the same thickness but I think it’s 6-studs wide. Be prepared to DISLIKE planing. I would not recommend the cheapest studs. I wish I had hand-picked my lumber. I was going for economy.
The leg assemblies are thru-mortised with haunched tenons at the top. They have a bearer across their top just before the tops are set. The aprons are similar laminations except they use the 3" face, leaving them at 1-1/2" thick. The aprons have huge dados for the leg assemblies but with an angle on the inside with a wedge that tightens itself over time. This gives the bench great stability.
While the well-board is the same thickness as the tops, it’s dado-ed so that it drops over the leg assemblies and it’s also chamfered at 45 degrees on the underside. That hides the thickness some. I made nice sawhorses first and then started on this. I have lots of pictures so if anyone needs any advice, I’ll share what I know. I basically memorized the Paul Sellers videos on YouTube and then just did it.
David L. Whitehurst
Oh, the entire bench is now coated with a single coat of shellac. You can re-plane the tops every year or so. It get’s beat up and messy fast. I put dowels in the front for my saws. I also need a series of 3/4" holes in the apron for holdfast and also dogs for long material. 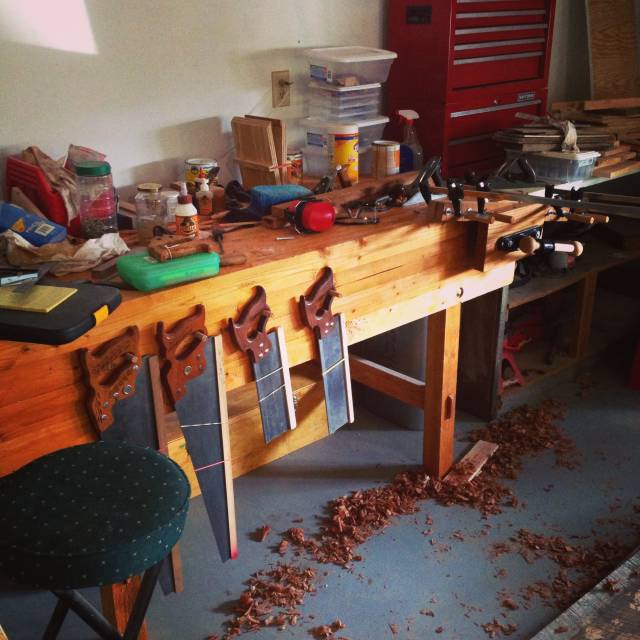
David L. Whitehurst

I watched his video a couple of times and every time I said: “I will get started this weekend”.
fast forward, I am still using the crappy harbor freight that I dislike so much.
I have been wanting to use hard maple and the cost was just too high.
You did well, it looks solid and stable.
Abbas, Castro Valley, CA

Wow that turned out great.
woodworking classes, custom furniture maker
More from David L. Whitehurst