as there is no 3D printing category and I haven’t a metal printer, for metalworking projects.
While I consider mag switches worth a 10* out of 5*, this post is not directed at them, but I’m giving them a worthy mention as they play a staring role in this woodless trist.
Being a gadgets man, sometime in the past I started using these Grip Titemagnetic switches,
Then I went to the woodshow in Melbourne (circa 2008, dated by the creation date of the user manual I scanned on my computer). I discovered and immediately bought these Magswitchfeatherboards,
Unfortunately, the magnets were built into the jig, but at the time I was none the wiser… a trait I carry to the current time.
Then the boffins at Magswitch Colorado USA, either listened to their users, or more probably hired an Aussie graduate, that designed and released this new versions for the bandsaw,
and this one for the tablesaw,
They both had removable magnets that could be repurposed on demand. It turned out that the “tablesaw” jig had detachable feathers
for flipping, to permit bi-directional use,
The removable magnets spurred me onto making my own featherboards out of timber (pine),
that often suffered catastrophically when dropped,
thereby needing surgery with metal implants.
Then I bought a 3D printer (same wood show, years later), and started designing featherboards,
and eventually settled on these for general tablesaw use,
with a collars that permitted use of the 30mm as well as the 40mm mag switches.
Fired up the printer and churned these out for the tablesaw,
I also created some smaller ones for the fence and small thin stock (appart from the thin green one in above picture),
that can also be used with my router table’s fence/tabletop.
All my featherboards are reversable so that they can be used either side of the blade and the choice between the tabletop and fence. I had some customised versions that rode the mitre slot, however, they seem to be hiding with the spiders and mouses.
Thanks for watching.
Keep an eye out for my upcoming Dremel’s 3D printed hits and misses.
Don’t be crafty Craftisians,... SHARE your craft!
If your first cut is too short... Take the second cut from the longer end... LBD
RyanGi ..... Do you have issues with the feathers deforming or snapping?
Time gets lost, but going by the dates of the STL files, I have been using them since 2014/2015... which even surprised me. The white, 13 toothed one in the gallery, green in the SketchUp model, has been used in probably a conservative 20-30% of all my tablesaw cuts since and its the same one without breaking or deforming... it's only injury was kissing the saw blade, and not being a 3D techo, all I ever used was what I believe is/was called ABS+.
Then thin green one in the gallery, blue in the SketchUp, I've used a few time on thin stock and I don't remember using the 26 teeth, pink (SketchUp model) other than trying after printing. WOW, going by that memory/stats, I'm gob smacked.
If I remember correctly, I did have a few amateur's OOPSIES during initial printing, which may account for all those STL files, as I only have a few active 3D printed featherboards.
FAIW, this SketchUp screen dump, was doctored for clarity for presentation.
If your first cut is too short... Take the second cut from the longer end... LBD
I was laying in bed reflection on the above 20-30%... had to get up and reboot the PC to correct that to probably 90-100% (at least the majority) of all my straight through cuts for non sheet goods and where the featherboard would not land on the aluminium part of my tablesaws sliging top where I would use my MIRCOJIG GRR's.
Back to ZZZzzz!
If your first cut is too short... Take the second cut from the longer end... LBD
I like the idea of having feather boards in two directions. A bit of a pain to switch the way the feather is orientated. My magswitch feather board has screws to undu.
I've been tempted to buy one of those for a couple of years now. I don't really need one. I don't know what I would actually do with one, but they are interesting. I tried to send you a message with a couple of pictures, but I wasn't able to send them that way. So seeing that this post doesn't really fit the rules, I'll post it here.
Alex, here is the experiment using the Wunderfil. I posted the pics in order so you could view the progress.
awsum55 ..... I've been tempted to buy one of those for a couple of years now. I don't really need one. I don't know what I would actually do with one, but they are interesting.
They are wort it if only for removable Mag Switches. They have countless uses in the workshop... even if only to pick up spilled screws and a flip of the switch get deposited back in their receptacle.
awsum55 ,,,,, I tried to send you a message with a couple of pictures, but I wasn't able to send them that way. So seeing that this post doesn't really fit the rules, I'll post it here.
I did get your PM and replied.... maybe I got mistook for a =========================================================================== Hi John, Thanks for that…. I rearranged your email so I didn’t have to scroll up and down and trying to remember the previous view… I am 27 err 72 err 77 YO geri.
Unless I missed it, is that black circle in photo #4 Wunderfill and the A was engraved over the backfill of the Wunderfill and subsequently filled with the white?
Basically, were you able to engrave to a depth over the Wunderfill backfilling.
My laser will not penetrate Timbermate backfill to ANY depth, even at the highest setting… at least not enough to hold any filler after leveling with sanding… what I’d like to do is overlay the same backfilled areas with different shapes several times.
Though the Mag switches aren't cheap, tally the cost of all the magnets and time, the saving may not be extravagant... though the filament would be bugga all and 3D printers hourly rate is relatively cheap once the initial outlay for the printer is amortised.
If your first cut is too short... Take the second cut from the longer end... LBD
I have a mag switch feather board, but with my right tilt, the blade cover plate is too wide for it to get positioned where I need it for thin stock. I need to see i I can modify it for a greater reach like that detachable version you have up top.
were you able to engrave to a depth over the Wunderfill backfilling. Yes I engraved the wood and filled it with Wunderfil and sanded it smooth. Then back in the laser to engrave the A and filled it with white DAP.
FWIW, when I said I've been tempted to buy one of those for a couple of years now. I meant a 3D printer. I do have a Mag switch but find I don't use it that often. I have the same problem as splint, right tilt unisaw.
awsum55 FWIW, when I said I've been tempted to buy one of those for a couple of years now. I meant a 3D printer. I do have a Mag switch but find I don't use it that often. I have the same problem as splint, right tilt unisaw.
awsum, if you have a dusty (any dusty) that's not the same brand as all your tools (same brand) you need a 3D printer just for couplings... every 2" and 2.5" dia. hoses are everything but the quoted dimension.. maybe a foible of imperial. Anything else, like these featherboards are a bonus.... you don't need a fancy printer with multi spool/heads, built in camera with coffee warmer and toater oven... just go for one with the larges print bed you can justify... there is a learning curve, however, with what you've created in the past, the software knowledge needed is already there... and personally, that is the biggest hurdle (apart from the shekels, which is dirt cheap nowadays). You can also combine 3D plastic with timber, not just make acrylic pens, like Moke.
If your first cut is too short... Take the second cut from the longer end... LBD
Thanks Alex, I'll have to look into them a little closer. I haven't looked to see what's available for quite a while. That last picture solves a problem I've been trying to solve for a few years, creating threads.
Hey Alex ease up on these feather boards or you going to start to look like this!
A most interesting Post I must say, nice to see so many constructive comments at last.
I will stick to shop bought ones though.
A post flying feather comment:- No doubt a man of your experience knows hidden inside the failed HDDs are really powerful magnets with their own mounts attached.
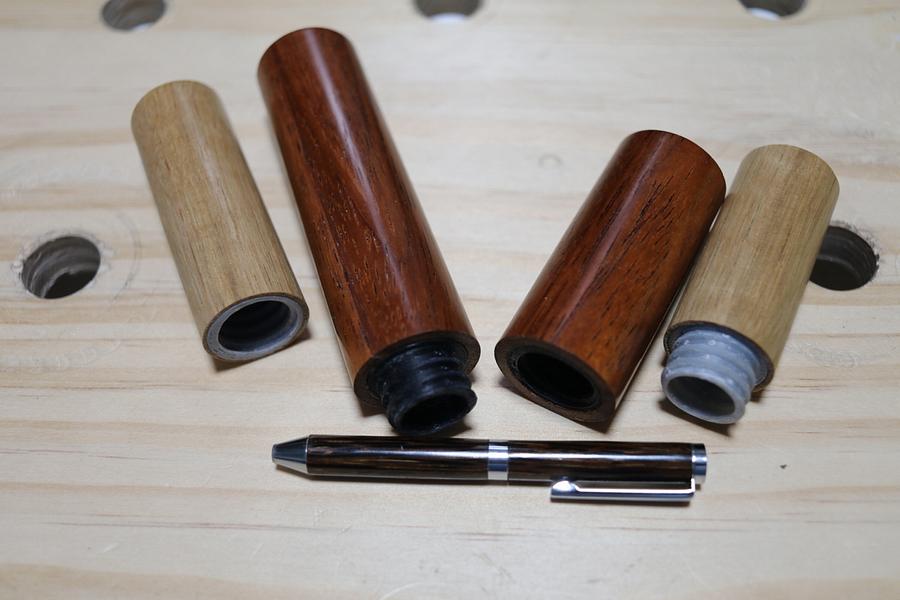
awsum55 ...... That last picture solves a problem I've been trying to solve for a few years, creating threads.
I used to use these "box threaders" in the past, but when I found out about the Beall Wood Threaders (Now sold by Lee Valley), I was converted. Excluding the router/trimmer required, the set cost quite a few shekels less than a full set of the "box" units. The old "box threaders" were reasonable dyes, and while I considered the Beall just margionally better, they required setup and configuring the router bit depth however, the Beall taps left the others for dead (my opinion)... Beall on top
The issue is the Beall 38.1mm diameter limit... unlimited with 3D, though you have to design yourself... though most 3D software have plugins nowadays... you just have to find one for your hardware/software inventory.
With the Beall I did manage this prototype in wood,
Alternatively you could try your hand at thread chasing... I got one of the tools, but not the nous or patience to learn.
RobsCastle ..... I will stick to shop bought ones though...
Which means you've already go the magnets... 3D printers can be built dirt cheap and with your techo ability, you'd probably earn a few shekels for your effort.
If your first cut is too short... Take the second cut from the longer end... LBD


.skp%20-%20SketchUp%20Pro%202018-010543.png)