


Share your craft projects
Make new craft buddies
Ask craft questions
Blog your craft journey

lanwater
2132 posts
and
35 followers
in over 12 years
in over 12 years
Need construction ideas
I am dying to try my hands on a couple of Enrico Konig work. I accumulated pictures of his pieces and have been analyzing it for a while.
I am eyeing this coffee table.
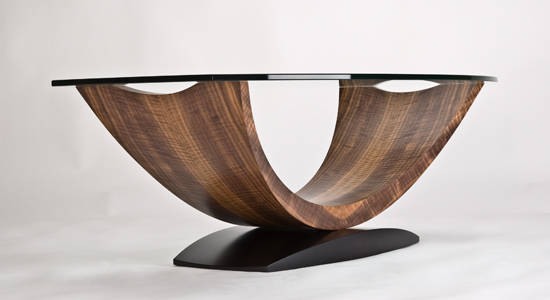
The glass top will obviously be bought.
I am thinking the following:
- Body would be 1/4 inch ply tapered on the drum sander and laminated on a form.
-I will probably try 1/8 tick ply and 1/4 to see which one works best once I build the form.
For that kind of radius I think 1/4 should work fine without much “cracking”
-The middle layer will be ordinary 1/4 or 1/8 ply
-Visible layer will be 1/8 and 1/4 with a good face that is walnut or mahogany. I located those at the lumber yard.
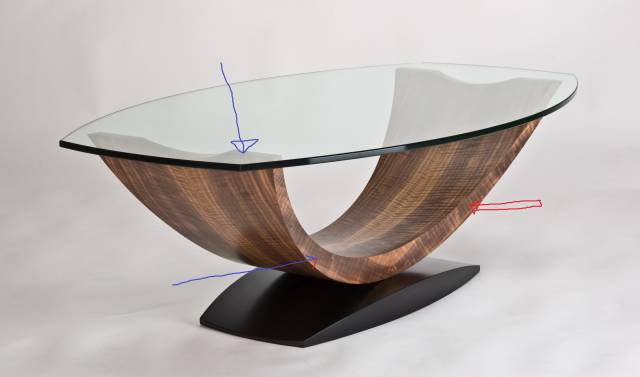
What I am struggling with is the face edges on the main body and the ends towards the top. See arrows below
-I have never done veneer and do not have any tools for it. No bag, no pump etc… And almost zero knowledge.
-If I cut few arcs on the bandsaw and but join them even at angle, it would be visible.
I need your input. keep in mind the taper from the bottom to both ends.
Abbas, Castro Valley, CA
33 Replies

Not 100% clear on what you want, but when cutting and then joining, if the cuits are in line with the grain, then the cut should not show. Can’t advise on veneering, but someone will soon pop up and help.
Love to keep busy in retirement - http://www.getwoodworking.com/albums/member_album.asp?a=33974

You could edge band. I edge banded the inside of a circle once using a curling iron. It was round (tubular actually) so I was able to press it in to transfer the heat where a regular iron wouldn’t go.
Losing fingers since 1969

I’m a rookie when it comes to veneer Abbas so I won’t even try giving you advice on this, but I can tell you that I love the table design and wood, so I’m hoping you will blog the build so we can learn along with you.
Mike, an American living in Norway

Wow this is an ambisious project. When i look at the piece as one piece of wood, it is a carving to me. Just take a large piece of wood and carve away everything that does not look like the table. Lol… But seriously, if it were me i would laminate giant plywood pieces in the shape of a “C”, making 2 of each, laminating 1 at a time moving towards the center. Each pair would be slightly diffrent to give the compound curves of the table. Once all glued up shape it to the actual shape with various power tools then add the veneer to all the surfaces. But thats just me and i have alot of power carving tools. Whatever you decide to do with it i will be following closely as is is an amazing piece. Thanks Ian
CHRIS, Charlottetown PEI Canada. Anytime you can repurpose, reuse, or recycle, everyone wins!
The edges you are concerned with shouldnt give too much trouble using edge banding. The curves do not seem very extreme. I have edge banded a 6" radius curve both convex and concave before using both contact cement and iron on edge. Any tighter than that and i would worry about cracking and delamination.
CHRIS, Charlottetown PEI Canada. Anytime you can repurpose, reuse, or recycle, everyone wins!

I like Thorreain’s idea as it looks like compound curves to me as well.
If it were me from there on I would hammer veneer it. It would be a very difficult vacuum bag job because with compound curves the veneer would have to be several perfectly jointed pieces. That’s not hard when hammer veneering. You just lay on one strip, overlap the next, run a knife on the joint line, remove/peel up and remove the scrap and hammer back down. It would be best to use an “underlay” veneer to help eliminate print through of the substrate.
If you go with a flat lamination, hammer veneering is still the best alternative for edges. That way you can match the exotic veneer that should be used on an exotic design like this. I don’t know what is on the one in the picture but it looks. A little like Pao Ferro to me. Something like that would suit the piece anyway.
This is an ambitious undertaking. I’d be using all my wiles to pull it off and I might not succeed. I applaud your quest.
The early bird gets the worm but its the second mouse that gets the cheese.
Thanks you all for the replies.
Now you got me scared (:-
Edging like this picture I understand:
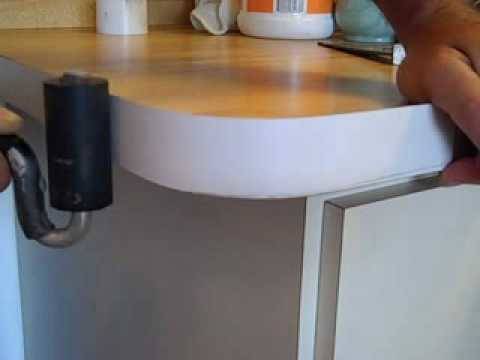
But I think it would have to be edging this way:
That will show a lot of cut lines. I am not delicate when I work.
I have the feeling I am going to have to learn veneering. Even if I do that it will take years to get any experience.
Cutting a large ply “ring” and applying it on the edge is workable but I will have to recess it between the top most layer and the bottom one to hide the ply ring edge since it is not solid wood….
That brings more issues:
1- the big body lamination will have to be flush trimmed with a hand held router. That will mean I would loose any recess I may have created during lamination.
2- Because of the taper it will be hard for me to recreate that recess. I think it’s doable if I make some nice jig to guide the router.
Abbas, Castro Valley, CA
Very tempting Paul…
" That’s not hard when hammer veneering. You just lay on one strip, overlap the next, run a knife on the joint line, remove/peel up and remove the scrap and hammer back down. It would be best to use an “underlay” veneer to help eliminate print through of the substrate."
At least I can practice that see how bad I am.
Abbas, Castro Valley, CA
Malcolm & Mark: I can see the grain idea with strait surface. On vertical edge curve I think I am going to have interruption.
I have seen it done with cutting the edge at 45 degree and but join so you don’t see a straight line.
I can definitely try on a smaller scale to see how best to orient the grain to minimize the interruption.
Mike: When I take the plunge, I t will be in the open. Success and failures.
Abbas, Castro Valley, CA
Brian, Thorreain: I am going to swing by the lumber store and buy some edging to see how it would go.
I am not visualizing it correctly. I have the feeling it would be like the picture below but more pronouced because of the multi-plane edge.

Abbas, Castro Valley, CA
I can’t wait to follow along.
CHRIS, Charlottetown PEI Canada. Anytime you can repurpose, reuse, or recycle, everyone wins!
Bently, I have been thinking all day long between interruptions at work about all the good advise I am receiving.
for the ring, I am leaning to cutting it from the veneered ply.
Flush trim the taper shape with the help of a template.
But now you gave me another idea
So you are saying once I affix that edge put the top and bottom faces next. Well That simple idea will solve one of my dilemmas. Genius.
Actually if I do that I can flush trim the edges against the body before I put the visible faces. No jig needed -:)
Edit: if I do that then the top and bottom face ugly edges would be visible (:-
I don’t think the bottom is flat. I think the mold is an arc. I figured some dimensions already.
I am going to start the form tomorrow; then I can start fooling around a little.
I have that view and another one with koa veneer. Several sites list few version of it. I gleamed the width, height and length from theses site. Assuming it’s an arc, I can calculate the radius and the length of the arc.
The length of the arc will give me me the length of the flat ply I will bend. Of course I need to account for the changing radius with each added layer. to make simple on my self I make each layer about 5 inches longer and just trim the "stair’ on the bend later.
I am just thinking out loud hopping someone will catch any mistake in my reasoning…
Thanks!
Abbas, Castro Valley, CA
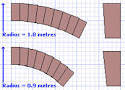
I also forgot to mention that I have to figure out a sled to do the taper on the individual ply on the drum sander. Much safer than the planer as I am using plywood for the body layers.
Similar to the following but the support has to be continuous because the ply is flexible
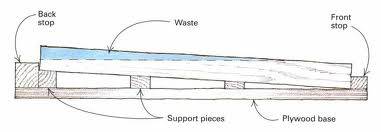
This example is for on side taper.
That sled have to be higher on both ends gradually from center length wise. I have seen a simple sled on a project but did not book mark it.
Any idea for creating that sled would be welcomed
Abbas, Castro Valley, CA
That’s a clean Idea.
I was thinking to use about 8 layer of 1/4 ply to get to 2" thickness then with the 2 veneer faces I would get 2 1/4 to 2 1/2 thickness at the base where the thickest section is. That would give me heft.
Ok. Some more thinking to do.
Abbas, Castro Valley, CA
I like Bentlyj’s approach, as you can use joined short pieces or alternatively bent laminations to make the long ‘rockers’. The final construction would be a very strong torsion box, yet relatively light weight and all the shaping can be done with a bandsaw and finished with a router template. This is starting to look like a very doable project to me Abbas, although the veneer part might still be pretty challenging. It is a beautiful design, so whatever effort you put into it should be very rewarding. I’m really excited about watching you build it!
Mike, an American living in Norway

Certainly an ambitious project! I don’t have any veneering experience so I can’t offer you advice but I do wish you luck and look forward to seeing the results!
Rob, Sault Ste. Marie, Ontario
I like Bently’s idea too. That’s the elegant way to accomplish the shape but once you get the shape, I would still recommend hammer veneering. It would be very easily done and you would not:
1) be limited to commercially available species in hardwood veneered plywood and
2) have to find raw veneer to match the said commercial p/w.
You have the hide glue. Get some cheap veneer and do a little practising. Once you learn the technique doors will open that will allow you to go places you never thought you could go with veneer.
The early bird gets the worm but its the second mouse that gets the cheese.
Thanks Paul. I plan on practicing veneer for sure. It seems to be the best way for this project. I can’t duck and hide forever.
This morning when I went in the shop and thought some more. I decided that Bently’s way is the better way for several reasons:
1- no form to build
2-no tapper jig for the drum sander
3-no plywood lamination and tons of glue to deal with
4- no need to find space to store form from weekends to weekends
I am going to build it with ribs. There is a small change to make to the rib cage :
The width on lowest side of the body is narrower than the top most end se picture below where I have the blue lines:
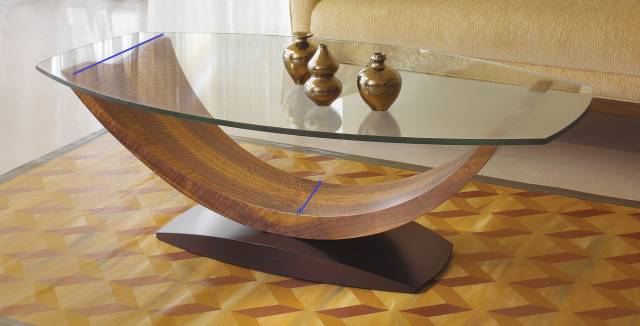
I will need to modify the rib cage towards the outside . I will have to use several solid ribs on both sides. That will allow me to cut a small curve on the outside.
with the rib cage it would not be possible because of the voids in between the ribs.
I am hopping to make a mock up tomorrow to show what I am talking about.
Abbas, Castro Valley, CA
Thanks Mike. I am starting to feel the energy flowing.
I think the hardest part will be the veneer. I have some serious learning to do.
It’s going to be a build with long interruptions in between.
Abbas, Castro Valley, CA
I love the look. If I could find some one inch thick glass I may give it a go. That’s just me tho, I like glass table tops only if they are very thick.
CHRIS, Charlottetown PEI Canada. Anytime you can repurpose, reuse, or recycle, everyone wins!