


Share your craft projects
Make new craft buddies
Ask craft questions
Blog your craft journey

MontyJ
226 posts
and
11 followers
in over 12 years
in over 12 years
Mortise and tenon
Is it possible to make mortise and tenon joints without a mortise machine or drill press? I know I can cut the tenons on the table saw, but what about the mortises? Router table with a straight bit and chisel out the corners? Any tips for this?
Where are the band-aids?---Pro Libertate!
24 Replies

I have not made these, but I am told you can use chisels or a plunge router for mortises. A mortise machine, from what I have seen, is just easier and faster.
-- Chris ** If there must be trouble, let it be in my day, that my child may have peace. — Tom Paine **
I do have a plunge router…after I take it out of the table and put the plunge base back on. Then I could make yet another jig to balance the router to make the mortise. Then I get to chisel out the waste…oh joy. Sounds like I will be able to add some more lessons soon ;)
Where are the band-aids?---Pro Libertate!
Well, some folks might have some ideas on a jig or some other ideas on how to cut your mortises.
-- Chris ** If there must be trouble, let it be in my day, that my child may have peace. — Tom Paine **

You can surely use you router table and plunge the work into the bit. Mark a start and stop line on the fence or table for the length of the mortise. Don’t try to do it in one pass, take multiple passes.
You could then square up the corners with a chisel or just use a file/rasp/sandpaper to round-over the tenon to fit..
-nicky
The router is my favorite mortising tool. I now have a lot of fancy jigs to help, but early on I just used shop built mortising jigs.
"I long for the day when coke was a cola and a joint was a bad place to be" Merle Haggartd
I know of two very popular solutions: plunge router and Drill Press.
The plunge router is an excellent solution, and there are many YouTube demonstrations of freehand and template-/jig-base methods: Marc Spagnuolo (The Wood Whisperer) has an excellent free video on mortising techniques.
The drill press is a relatively hassle-free, low-tech approach; but does require chisels to square-up corners.
The Tenons are where most people get lost – at least that’s what I’ve surmised from reading. It takes a bit of practice, but the TS and router table, used in conjunction with each other, can make short-work of ‘floating’ Tenons. I make my own Domino Tenons, and have it down to a simple process. If you’re interested, please let me know.
MJCD
Router table or just plunge router is one way to go. Another way would be hogging it all out with a pig sticker chisel and just chop it out.
Rule #2: Always wear gloves at a crime scene.

Paul Sellers has a good video showing how:
Excellent video. Thanks for sharing it. I can’t see investing in mortising chisels as it will likely be a fairly rare need. Using my regular chisels will make better use of the tools.
-- Chris ** If there must be trouble, let it be in my day, that my child may have peace. — Tom Paine **
I think I’ll have to pass on the pig sticker method. My first aid kit isn’t that well equipped. MJCD, the Domino tenon sounds intriguing, please share.
Where are the band-aids?---Pro Libertate!

Yeah….share it…a blog maybe…I’d read that….often…
One bit of advice I got was to make the mortises first and fit the tenons. It’s easier to fit the tenons than to adjust the mortises. Seems to work.
-- Alec (Friends call me Wolf, no idea why)
MontyJ:
I’ve included below a write-up on how I make tenons – it sounds much more complicated than it is.
I use the Domino Tool for virtually all of my M&Ts, and routinely make #10 (mm), #8 and #6 – my recent DVD Holder required #4 (mm) tenons, and the following process works for each one. The benefit of the Dominos is they have set width dimensions – and can be sized in normal, wide, and x/wide.
Making Tenons:
My procedure is to start with straight-grain hardwood from the scrap wood pile which is thick enough to fill the mortise –
Typically, I’ll work with a scrap piece 2’ to 3’ long – this is just an economy of scale consideration.
(1) Table Saw – I rip the scrap to rough width and thickness – for a #10, this is approximately 1” by 1/2”.
(2) Router Table –
Using a straight bit, I position the fence to within 12mm (finished width will be 10mm) of the bit; then feed the work between the fence and bit FROM THE REAR of the table, so that the bit acts as a thickness planer – you need to be pressing the work close to the fence near the bit, to avoid chatter (Mark this as a SAFETY CONSIDERATION). Using my Incra fence (Kreg or another top fence with micro-adjust will work fine), I plane-down the work to specification. Normally, three passes will be necessary. One key is to take fine shavings from the work.
(3) Once the work is to the desired thickness, use a similar procedure to fine-tune the width – for a #10 domino, normal width is about 25mm (from memory, so you need to check this).
(4) Use a round-over bit to cut the four shoulders – it’s important to reference from the fence, not the router bit bearing, as cutting the round-over eliminates a reliable reference for the bearing.
(5) Switch to a V-bit, lower the cutter to where it will make a heavy scratch on the piece; then run the faces and edges of the piece across the bit – this provides both glue troughs and an enhanced binding surface for the glue. At this point, I’ll push a razor knife edge in the troughs, to clean-out any wood fuzz left by the V-bit.
(6) During project assembly, I use a Bandsaw to cut to required length.
(7) If necessary, relieve the leading edges with 150-grit sandpaper; also, during dry assembly, the sandpaper can be used to knock-down any slight overage (thickness, width) from the machining process.
This sounds much more complicated than it is; in about an hour, I can make 10’ of dominos.
For commercial shops, it’s a question of whether the time is better spent on higher-value tasks (just about everything would qualify); and for the serious hobbyist, whether it’s simply expedient to buy the Tenons from Festool. For me, I enjoy making things, and one of them happens to be Dominos, when I need them.
YouTube has excellent videos on this – HalfInchShy (Paul Marcel) is a master at this.
For those interested in making your own tenons, this is one process – I’m sure there are many, many more.
Thanks for that…I will read and practice this often. Good stuff.
-- Alec (Friends call me Wolf, no idea why)

If your mortice material is not too thick you can mark out the mortice, drill out some waste and then carefully use a jig saw to remove the additional waste material.
You will still need to use a hand chisel to parallel up the sides and finish/tidy up.
Regards Rob

I have lots of tools that will do the job but just a hand held router and a jig in which the are a lot of designs that will do the job,here’s one design.
woodworking classes, custom furniture maker

I’ve used a number of different methods to cut mortises, all of which were somewhat tedious. The best router jig I’ve seen and used (except for the $$$ Leigh jigs) is the Mortise Pal. Very easy to use and very accurate to set up. You’ll still have to square the corners of the mortise, or you can round the edges of your tenons.
Rob, Sault Ste. Marie, Ontario
This is how I did it for some pretty big mortises on my Roubo-style workbench:
http://molnaropus1.blogspot.com/2016/04/project-update-making-square-holes.html
Darin R. Molnar

I like what a1Jim says about making jigs for a particular job. THAT said, I have found that those DIY jigs have a finite lifetime and DO warp over time and become near useless.
Case in point, I made a great horizontal mortiser and built a nice barristers bookcase using that jig. BUT, checking it recently the base of the main slider has twisted/warped by ~3/8" over less than 10" front to back. Sure, I could replace the warped piece with new, but the point is that DIY jigs are short-term fixes/assistants, and are NOT expected to be around and useful very long.
IMO, better to invest in the more durable professional metal jigs and such… Just my opinion… ;-)
HorizontalMike
Hey Mike
I guess we all have different experiences and budgets,I’ve made a jig very similar to the jig like the one I gave a link for above ,I gave the jig to my local High school woodshop 4 years ago and it’s still in good working order. There’s nothing wrong with factory-made jigs and they have the advantage of furnishing instructions plus if they’re made from metal they may be more durable,but if they are damaged you need to replace them or order the damaged part. With a shop made jig you can just make a replacement part.
woodworking classes, custom furniture maker
Point taken Jim. That is probably what I will do…
HOWEVER, Grizzly just sent me another 10% OFF coupon, and it is trying to burn a hole in my pocket!… … Yeow!…
Thinking about adding the Grizzly Mortising attachment to my Gizzly 20in. DP, and buying their tenoning jig as well:
- https://www.grizzly.com/products/Mortising-Attachment-Kit/H7789
- https://www.grizzly.com/products/Collar-for-G7947-G7948-Quill/G9716
- https://www.grizzly.com/products/Tenoning-Jig/H7583
- and maybe a backup set of chisels https://www.grizzly.com/products/4-Pc-Mortising-Chisels-Set-1-4-5-16-3-8-1-2-/D2845
OR
Just buy the mortising Machine and chisels for ~$380. or roughly the same for the above…
QUESTION: Which would be the preferable direction to go here?
- The attachment saves floor space
- The dedicated machine a better solution?
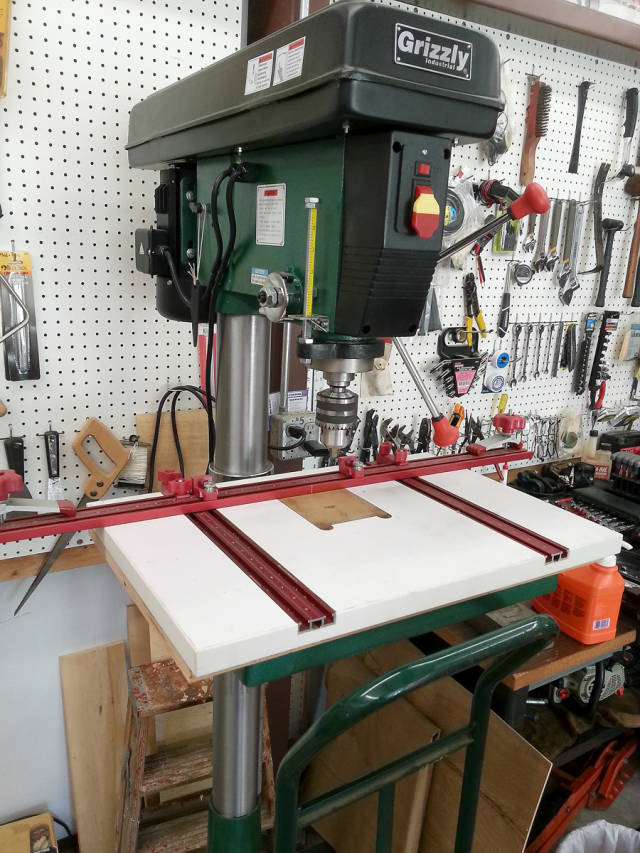
HorizontalMike