


Share your craft projects
Make new craft buddies
Ask craft questions
Blog your craft journey

Thorreain
1907 posts
and
47 followers
in almost 12 years
in almost 12 years
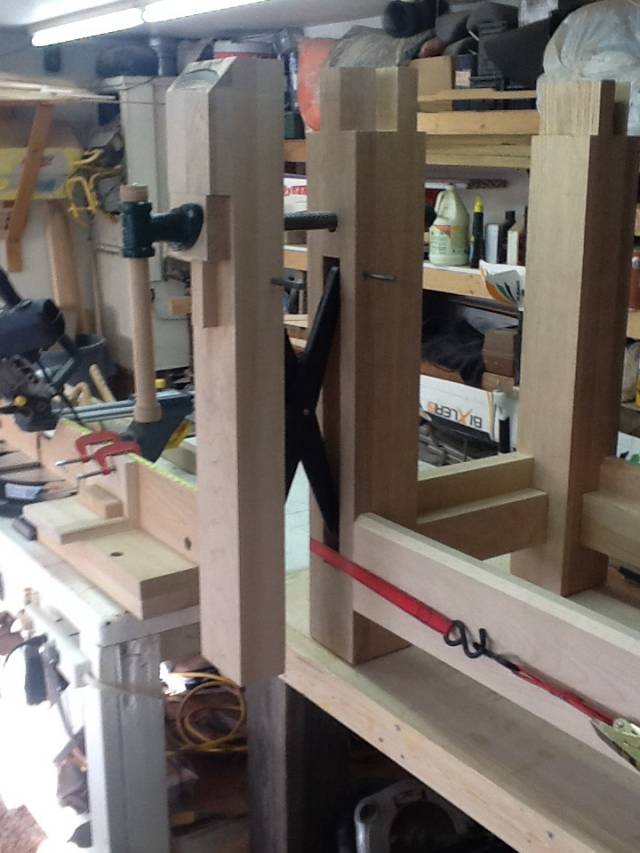
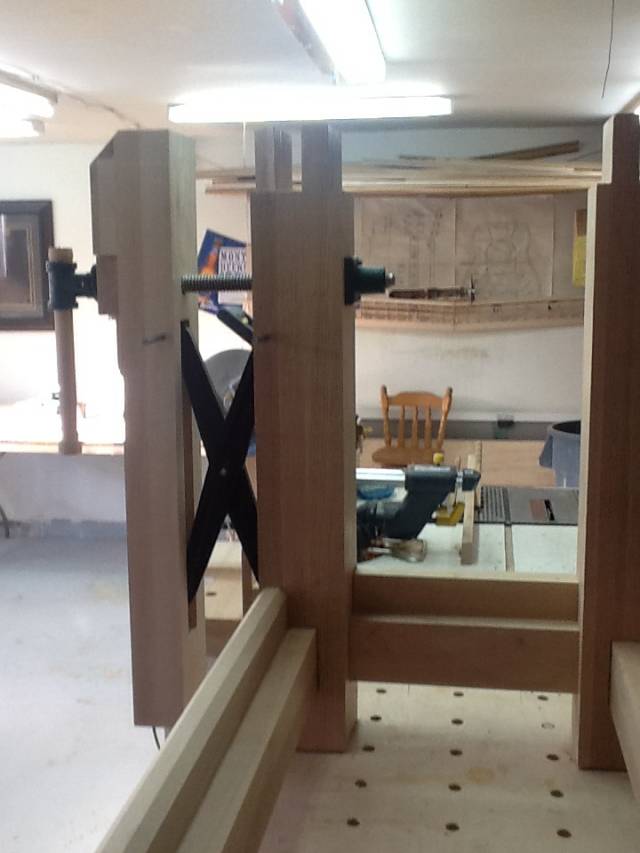
Work Bench Build #11: Leg Vise & Crisscross Install
This is
part 11
in a
16 part
series:
Work Bench Build
...
-
Leg stretcher Mortising and Leg Vise Prep
-
Leg Vise & Crisscross Install
-
Carpenters Vise Install
...
...
- Leg stretcher Mortising and Leg Vise Prep
- Leg Vise & Crisscross Install
- Carpenters Vise Install
...
My health has taken a bad turn lately so progress has been crawling. The recent trips to physio therapy, sports massage, ultrasound, chiropractor, and stretches therapy all did nothing to improve the situation, so ill just have to limit my shop work to as long as I can stand. Looking at my list I have decided to try to do only one small task at a time for the next while. This will mean my posts will be farther apart. So this is the results of the first task, complete the leg Vise chop, mortise the crisscross in and install the hardware to get the Vise finished.
 ,
,
 ,
,
 ,
,
 ,
,
So here’s the updated list, if things go well I should have the top and base glued up this week.
^ ^ equals completed work. ^ ^
^ ^ Clean and dust workshop. ^ ^
^ ^ Research styles and types of workbenches. ^ ^
^ ^ Research building and installing hardware. ^ ^
^ ^ Draw up plans. ^ ^
^ ^ Decide on types of wood. ^ ^
^ ^ Decide on types and number of Vises. ^ ^
^ ^ Purchase wood for bench top. ^ ^
^ ^ Purchase wood for legs. ^ ^
^ ^ Purchase wood dowel for bench dogs. ^ ^
^ ^ Purchase “C” clamps. ^ ^
^ ^ Purchase bar clamps. ^ ^
^ ^ Purchase plane. ^ ^
^ ^ Purchase long shank chisel set. ^ ^
^ ^ Purchase sharpening stone. ^ ^
^ ^ Purchase table top Thickness Planer. ^ ^
^ ^ Purchase hand saws. ^ ^
^ ^ Purchase and install additional lighting. ^ ^
^ ^ Purchase brill bits, brad point. ^ ^
^ ^ Purchase drill bits, table top holes. ^ ^
^ ^ Purchase 1 1/2" router bit for final flattening. ^ ^
^ ^ Purchase tail Vies assembly. ^ ^
^ ^ Purchase Face Vise assembly. ^ ^
^ ^ Purchase Leg Vise Assembly. ^ ^
^ ^ Purchase wood for temporary workbench. ^ ^
^ ^ Purchase respirator for breathing sawdust safety. ^ ^
^ ^ Build bench to build a bench. ^ ^
^ ^ Start a blog on a woodworkers forum for advise on the build. ^ ^
^ ^ Build bench dogs for temp bench. ^ ^
^ ^ Repair and install old leg Vise on temp bench. ^ ^
^ ^ Build crisscross for temp bench leg vise. ^ ^
^ ^ Arrange workshop to allow space for new benches. ^ ^
^ ^ Rack wood for 4 weeks to acclimate. ^ ^
^ ^ Set up mitre saw fence. ^ ^
^ ^ Adjust miter saw. ^ ^
^ ^ Build tool rests for miter saw. ^ ^
^ ^ Build wood stop for miter saw. ^ ^
^ ^ Set up table saw Fence. ^ ^
^ ^ Adjust table saw. ^ ^
^ ^ Build centre marking gauge. ^ ^
^ ^ Repair #7 jointer plane. ^ ^
^ ^ Sharpen all tools. ^ ^
^ ^ Lay out bench top. ^ ^
^ ^ Trim bench top to length. ^ ^
^ ^ Arrange boards crowns and crooks and twists. ^ ^
^ ^ Cut back right bench to allow for face Vise. ^ ^
^ ^ Lay out tail Vise parts and design wagon system. ^ ^
^ ^ Build tail Vise wagon and channel. ^ ^
^ ^ Trim tail Vise in decorative wood. ^ ^
^ ^ Install tail Vise and adjust sizes for smooth operation. ^ ^
^ ^ Trim to size bench top end boards. ^ ^
^ ^ Cut centre boards to create plane stop block holes, split down the centre. ^ ^
^ ^ Mark all boards numbered and orientation. ^ ^
^ ^ Cut boards to create mortises for legs. ^ ^
^ ^ Cut legs mortises. ^ ^
^ ^ Mock up legs and bench top. ^ ^
^ ^ Glue up legs. ^ ^
^ ^ Sand legs. ^ ^
^ ^ Shape and Sand wagon vise chop and adjust for free movement. ^ ^
^ ^ Evaluate progress and adjust timetable. ^ ^
^ ^ Chamfer leg bottoms ^ ^
^ ^ Measure and trim plane stop block holes. ^ ^
^ ^ Locate & Purchase Stretcher wood. ^ ^
^ ^ Plane stretcher surfaces to size. ^ ^
^ ^ Measure & cut stretchers to length. ^ ^
^ ^ Mock up stretchers & legs. ^ ^
^ ^ Router top deadman mortise groove into bottom of left benchtop. ^ ^
^ ^ Router bottom deadman convex “v” groove into bottom of left stretcher. ^ ^
^ ^ Router top deadman mortise groove into bottom of right benchtop. ^ ^
^ ^ Router bottom deadman convex “v” groove into bottom of right stretcher. ^ ^
^ ^ Rabbit edge of stretchers for shelf thickness. ^ ^
^ ^ Purchase crisscross. ^ ^
^ ^ Purchase dowel for draw bore. ^ ^
^ ^ Build plane stop block. ^ ^
^ ^ Install plane stop block. ^ ^
^ ^ Build batten for bench dog holes. ^ ^
^ ^ Build crochet crook. ^ ^
^ ^ Glue up left side first 4 bench top boards. ^ ^
^ ^ Glue up right side first 4 bench top boards. ^ ^
^ ^ Glue mortise grove stops on left side bottom of bench top. ^ ^
^ ^ Glue mortise grove stops on right side bottom of bench top. ^ ^
^ ^ Glue up left side next 3 bench top boards. ^ ^
^ ^ Glue up right side next 3 bench top boards. ^ ^
^ ^ Plane left side benchtop top using planer. ^ ^
^ ^ Plane right side benchtop top using planer. ^ ^
^ ^ Plane left side benchtop bottom using planer. ^ ^
^ ^ Plane right side benchtop bottom using planer. ^ ^
^ ^ Glue benchtop halves together maintain as much level as possible. ^ ^
^ ^ Hand plane bench top bottom surface. ^ ^
^ ^ Purchase carpenters Vise. ^ ^
^ ^ Build carpenters Vise chop. ^ ^
^ ^ Drill pilot dog holes for carpenters Vise in benchtop. ^ ^
^ ^ Glue up stretchers. ^ ^
^ ^ Build and install deadman top groove stops. ^ ^
^ ^ Mortise & tenon stretchers & legs. ^ ^
^ ^ Build leg Vise chop including decoration. ^ ^
^ ^ Router mortise into leg and chop for Leg Vise crisscross. ^ ^
^ ^ Drill holes into Leg and Chop for Leg Vise screw. ^ ^
^ ^ Router mortise into Leg Vise for screw retaining nut. ^ ^
^ ^ Install leg Vise chop and crisscross. ^ ^
Build carpenters Vise chop & install.
Router & Install carpenters Vise from bottom.
Build face Vise chop & install.
Router & Install face Vise from bottom.
Install tail Vise chop retainer under benchtop.
Drill holdfast storage holes in right front leg.
Drill dowel holes in legs for draw bore joint.
Drill dowel holes in stretchers for draw bore joint.
Glue legs & stretchers together.
Install and glue bottom assembly to benchtop in final shop location (major assembly).
Hammer in dowels into draw bore holes.
Install wedges into top mortise & tenon joints.
Plane benchtop side face boards flush with leg faces.
Install Purple Heart accents in square plane block holes.
Install dog holes in Face Vise chop to match bench top dog holes.
Purchase plywood to match stretchers.
Build bottom shelf by laminating plywood.
Trim & install bottom shelf onto stretchers.
Purchase 2 brass bench dogs for tail Vise.
Purchase 2 Gramercy holdfasts for bench dog holes.
Drill all bench dog holes the rest of the way thru the top.
Router top surface flat and level using sled and rail system.
Install crochet crook in front left face to the left of leg vise.
File plane stop block holes inside edges.
Install dowel bench dogs.
Build deadman.
Build deadman seat.
Install deadman.
Install seat.
Router or inlay any decorative Purple Heart accents.
Final sanding.
Apply finish.
Enjoy years of woodworking.
As always thank you for following along, and if you have any questions or suggestions, fire away.
CHRIS, Charlottetown PEI Canada. Anytime you can repurpose, reuse, or recycle, everyone wins!
5 Comments

I feel you pain as I injured my back last week. Pain killers, relaxant, physical therapy and rest for a while.
From the sound of it you are far worse than I am.
I hope You and I get over get over the pain quickly.
Great summary. It allows ready to have a good sense of direct. Impressive work as well.
Be well!
Abbas, Castro Valley, CA
That scissor leg vise is looking solid. Neat idea.
Abbas, Castro Valley, CA

I especially like that last item on your list. Lists are a great way to plan your work progress. My wife and I always make to do lists for all the tasks we want to get accomplished in the outdoor months of the year and I sometimes use lists for projects in my shop, but probably not often enough. It seems that once a list is prepared a person seems compelled to get the work done just so he can get that list off his back. It works!
I hope you get your health issues under control soon so you can start enjoying your amazing new bench.
Mike, an American living in Norway
My list here is like a living document. It has evolved, things have been added, removed, moved up or down dased on a few diffrent ideas popping up. Mostly it’s just a guideline to keep me focused on the prize. Thanks for the comments all
CHRIS, Charlottetown PEI Canada. Anytime you can repurpose, reuse, or recycle, everyone wins!

I hope you’re feeling better soon. I’m interested in how the scissor works out. I’ve looked at so many vise options. I keep finding new ones and each time I’m amazed at the ingenuity.
Losing fingers since 1969