


Share your craft projects
Make new craft buddies
Ask craft questions
Blog your craft journey

MsDebbieP
1395 posts
and
54 followers
in over 12 years
in over 12 years
The Learning Curve #7: Tunisian Corners (afghan)
This is
part 7
in a
9 part
series:
The Learning Curve
...
-
Crochet Rings
-
Tunisian Corners (afghan)
-
Flat Stitch (Tunisian Crochet)
...
- Crochet Rings
- Tunisian Corners (afghan)
- Flat Stitch (Tunisian Crochet)
Disclaimer: this may not be the right way to do #Tunisian corners for “in the round” but it is how I do them and, if I am consistent, it will look okay in the end. (That is my real tutorial lesson)
Let’s begin with a picture of the corner I am working on:
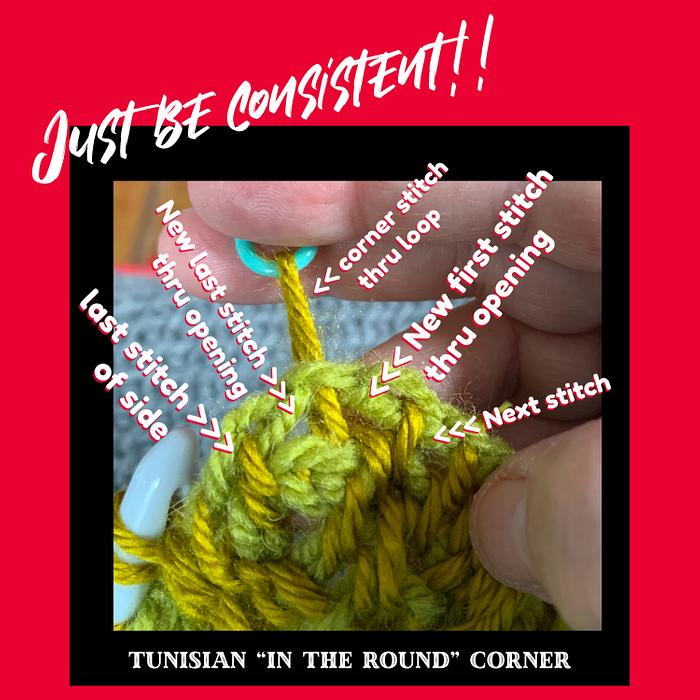
I am left-handed so I am working from the left side.
My next stitch is the last stitch of the side as shown above.
Next is the corner and I begin by increasing the length of the side by creating a new last stitch. I pull the yarn through the opening before my corner stitch.
For the corner, I pull the yarn through the corner loop
Next I increase the next side by creating a new stitch, by pulling the yarn through the opening on the other side of the corner stitch. I then move my stitch marker so that I don’t forget and don’t mark the wrong stitch. The corner stitch is, now, the second to last loop on the hook.
Next, I continue working on this next side by working into the first stitch of the last row and continue on with my #TunisianCrochet
My goal for this tutorial is to make it a lot easier for me, the next time I start a Tunisian #afghan
Crossing my fingers,
Debbie
Debbie
*****
Note: I also NEVER leave my work mid-corner .. my preference is to work through the corner AND start the next side, before putting my work down.
This lets my muscle memory and brain get into the routine again before I get to a corner and I never have to wonder where I am at in my work.
*****
I’d love to learn from you! How do YOU do your Tunisian corners??
JAGO - just a grandma’s opinion