


Share your craft projects
Make new craft buddies
Ask craft questions
Blog your craft journey

Brian
2030 posts
and
31 followers
in over 12 years
in over 12 years
Is it too late for curves?
I got inspired by Ianwater’s curved leg picnic table. My wife wants a table outside the entrance for Amazon packages. The roof extends over the entrance so I’m not to concerned about the weather. I bought some oil based enamel to paint it. It should hold up pretty well.
Anyway, I made the top already and explained that sort of in a forum post about biscuits. Now it’s time to make the legs. I never did this before but I understand the basics of it from Ian’s post. I started by ripping some cutoffs from making doors. Knotty old Douglas fir. The cutoffs were 1-3/8 thick and I ripped a bunch of strips 1/8 × 1-3/8.
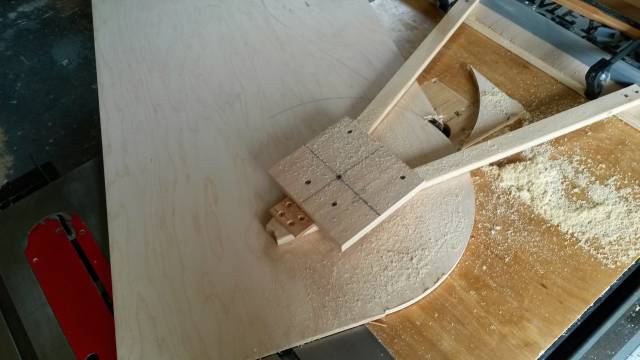
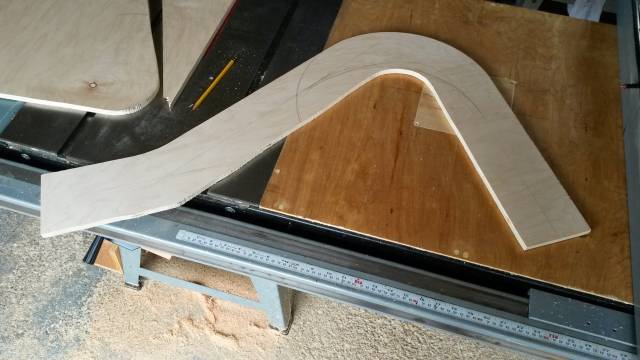
I bent a couple of strips as far as they would go until they broke and I figured an 8" radius would be ok. So I planned out the leg design and started making the form. First I drew the design onto some 1/2" plywood. Then I cut the big curve on my router circle jig.
Then I cut the rest on the bandsaw.
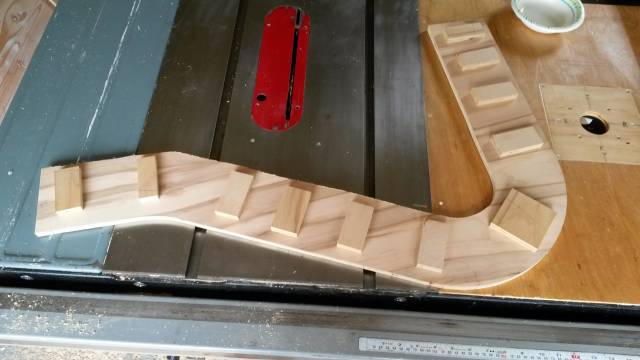
Then I glued some blocks from 1/2" plywood to lift it off the table and help to center the strips.
Last but not least, the glue up. I brought a paper bowl from the kitchen and poured some titebond 3 into it and grabbed a chip brush out of a bag of a bunch of them I picked up cheap specifically so I could make them one time use brushes for various things. I started slopping the glue on with the brush and stacking the strips. I stacked 8 together so it should be a little note than an inch thick. Then I started clamping.
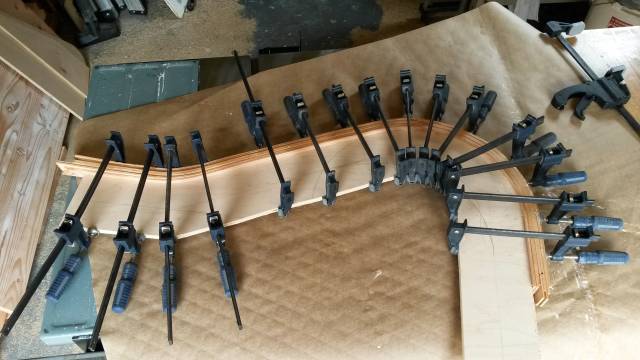
They started off pretty well but by the time I got to the end the pics were sticking out. I’m not sure what I’m going to end up with after I trim then. Maybe less than an inch wide. This is definitely a two man job. I wish I had a second pair of hands to help keep everything together while I was clamping them.
At one of the knots the outside strip broke as I was clamping. I’ll try to be more careful next time. I guess I can patch it with bondo or maybe even Spackle. It’s getting painted so a patch won’t matter.
All in all I’m pleased with the outcome. I took the clamps off after about 2 hours and it’s very study. More than I imagined it would be. And the first one is always the hardest. Now I have done experience to apply to the other 3 legs. Hopefully I get them done by tomorrow at lunch so I can start assembling them to the table top. I still have to prime and paint it. I’m not sure if I’ll make the deadline for the curves project but maybe I’ll get an honorable mention for trying. LOL
Losing fingers since 1969
5 Comments
**
John @The Hufford Furniture Group
Go for it Brian, I like the design so far.
Sorry for the bleep and the double entry. I’m pretty clumsy when it comes to my I pad. lol
John @The Hufford Furniture Group

Thanks for the mention Brian.
I like how you did your form. Very clean.
That’s a nice curve. The table will be nice.
about that knot… They are nasty; I lost several during glue up.
Abbas, Castro Valley, CA

Never too late, Brian. It would be great to have at least 5 entries :)
Martin Sojka, Maker of Craftisian
If I do this again, which I probably will at some point, I’m going to use some kind of clear lumber. But using scraps definitely has its advantages. The glue was more expensive than the lumber, not to mention the paint. And since its going to be painted anyway I can fix practically any screw up with filler. I used plaster for the outs I made in the top while my inexperienced hand was hand planing. Bondo for the legs when I’m done trimming them. Prime with BIN and a luxurious coat of oil enamel should cure all the knotty Douglas fir ills for this thing.
Losing fingers since 1969