


Share your craft projects
Make new craft buddies
Ask craft questions
Blog your craft journey

Brit
594 posts
and
41 followers
in almost 12 years
in almost 12 years
More from Brit
YouTube makes me laugh
Beginner's Guide to Sharpening Western Saws
The Humble Hand Brace - A Beginner's Guide to Restoring, Buying and Using #8: Part 8 - Tips and Tricks on Using a Hand Brace
The Humble Hand Brace - A Beginner's Guide to Restoring, Buying and Using #7: Part 7 - Sharpening an Auger Bit
The Humble Hand Brace - A Beginner's Guide to Restoring, Buying and Using #6: Part 6 - What to Look for when Buying a Secondhand Brace and more
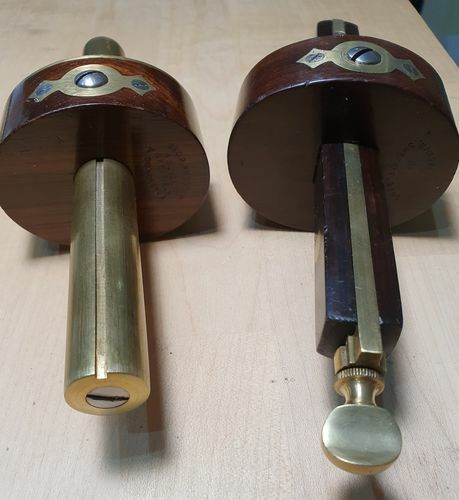
Vintage English Marking/Mortise/Combination/Cutting Gauges
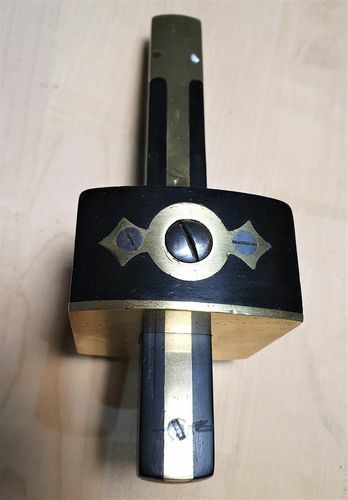
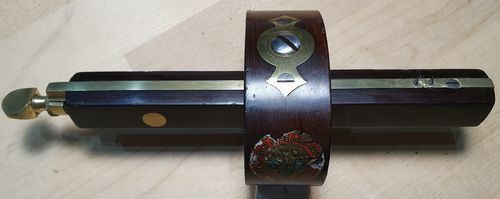
Recently I restored a vintage 6" mortise gauge by I. Sorby.
I mentioned that I had to replace the spurs (points) on it and was asked how I went about it.
Since this procedure can vary from gauge to gauge, I decided to write a blog post showing some of these old English gauges. We're talking late 19th century to mid 20th century. I'll start with some general information and terminology, then describe how to dismantle and change the spurs and finish with what to look out for when buying one of these old gauges. So, put your drool bibs on, strap in and enjoy.
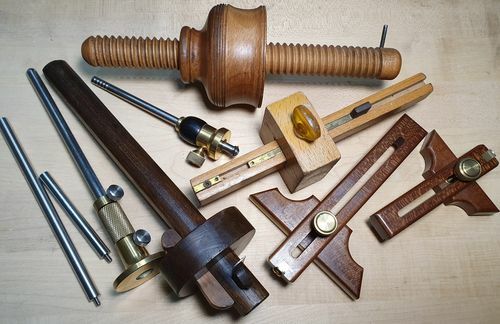
As some of you know, I probably have and use more than my fair share of these remarkable old tools.
To me, they embody all that was good from the glory days of tool making in Sheffield, England. The three primary woods used were either beech, rosewood or ebony with beech generally being the cheapest and ebony the most expensive. The metal components were predominantly made of solid brass, so they have some heft to them and the screws were steel.
Let's start with some basic terminology used to describe the parts of these gauges so we're all on the same page.
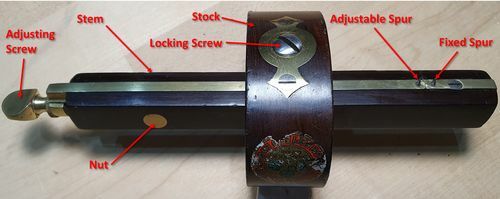
A Marking gauge has one fixed spur.
A Mortice or Mortise gauge (spelling changed to mortise around the end of the 19th century) has two spurs, one fixed and one adjustable.
A Combination gauge has a single fixed spur on one side of the stem and a fixed and adjustable spur on the opposite side, so can be used for both marking and mortising tasks.
A Cutting gauge has a small iron (like a hand plane) instead of a spur, but rather than making a shaving, it is used to scribe a line.
Wooden stocks were referred to as either Plain, Plated, Ring-Plated or Faced. I should explain that the term 'plated' here, does not refer to the fact that this is another type of metal which has been plated with brass. The brass used on English vintage gauges was all solid brass.
Plain - No metal wear components, just wood riding on wood when you scribe a line. This is the least wear resistant.

Plated - Refers to two brass wear strips inset into one face of the stock.
Ring-Plated - The brass wear strip is in the shape of a ring.
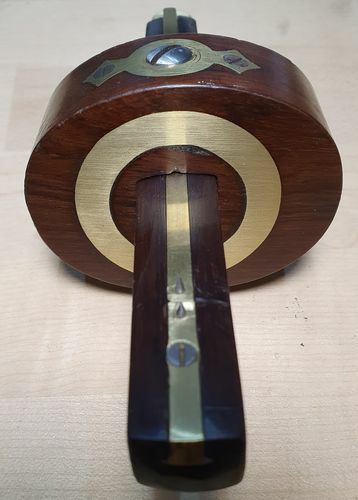
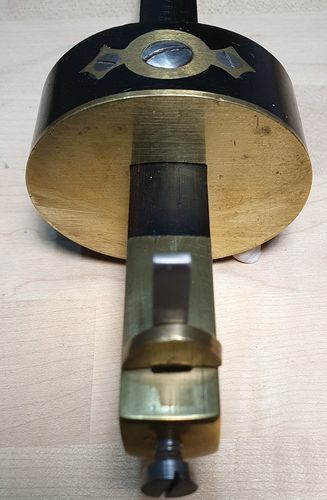
Faced - One entire face of the stock is brass.
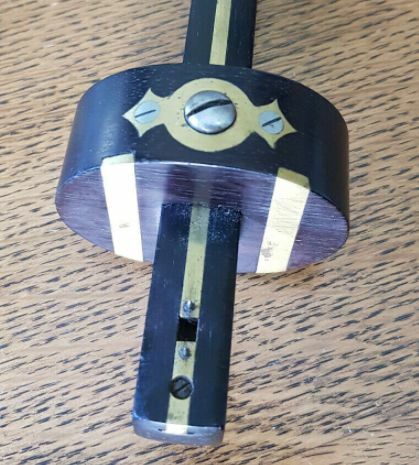
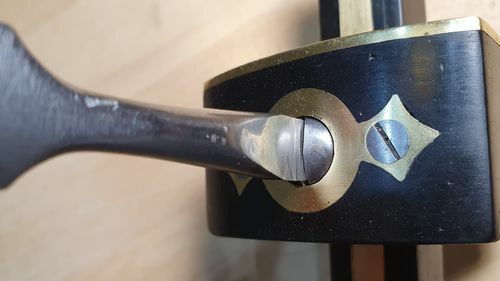
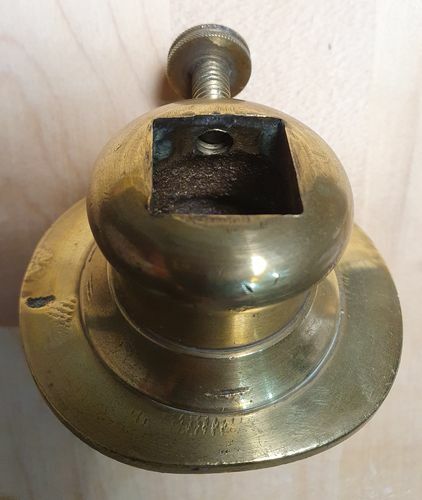
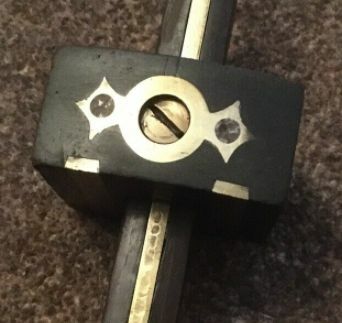
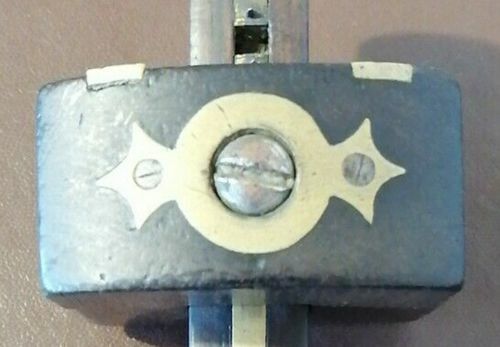
On mortise gauges, the adjustable spur is moved by means of a simple thumb slide or some form of screw mechanism. On thumb slide gauges, the locking screw in the stock serves two purposes. It not only locks the stock in place, but also prevents the adjustable spur from moving once set, since the screw tightens down onto the brass slide.
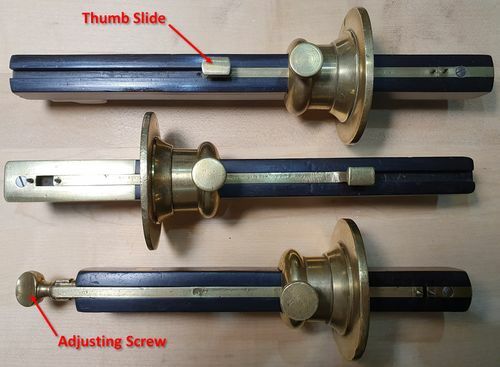
There are several different designs of adjusting screw mechanisms found on vintage mortise gauges. Sometimes they are recessed into the end of the stem and sometimes they stick out the end of the stem. They are either adjusted with a screwdriver (or Turnscrew as they were then known) or fingers in the case of a thumbscrew.
In my experience, all the gauges with a wooden stock lock the stem in place in the same way. The locking screw bears down on a dished circular spacer, which in turn contacts the stem. It is important to realise that this spacer is there if you are going to remove the stock from the stem as it will otherwise fall out on the floor and be lost forever. Thereafter whenever you tighten the screw it will leave an unsightly impression on the stem. Don't let this happen to you. What I do is loosen the locking screw in the stock until the stock slides freely…
…then turn the gauge so that the locking screw is facing the floor and slide the head off. In this way the spacer will stay in place.
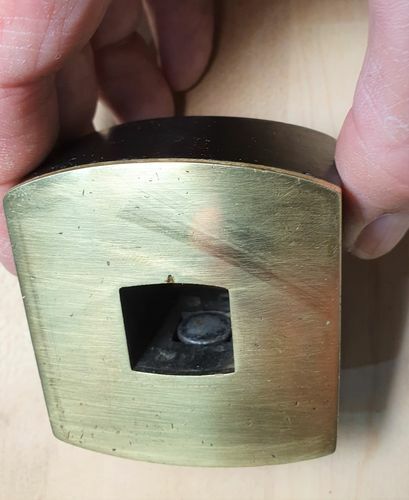
You can then retrieve it by tipping it into your hand. Here you can see the dished spacer more clearly. Note that it is the convex side that should contact the stem, so make sure it goes back in that way if you remove it.
Some gauges were made with a stock cast from brass. These do not have a spacer. Instead the locking screw bears directly on the thumb slide or in the case of a screw-adjusted spur, onto a strip of brass which is part of the screw assembly. I assume the reasoning here was that unlike a steel screw, a brass screw tightening onto a brass strip would not do any major damage to the brass strip.
There were two other ways of locking the stock usually employed on cheaper gauges. They are a thumbscrew and a wedge. Sorry, but I don't have any vintage gauges with these locking mechanisms to show you.
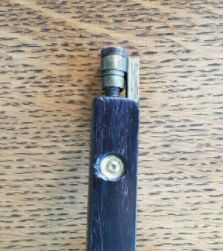
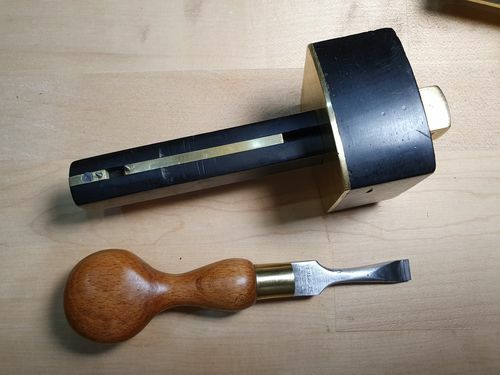
Cutting gauges which employ an iron to scribe a line share many of the same characteristics as marking and mortise gauges. The iron was held in place by either by a small wedge or a screw.
Cutting gauges which employ an iron to scribe a line share many of the same characteristics as marking and mortise gauges. The iron was held in place by either by a small wedge or a screw.
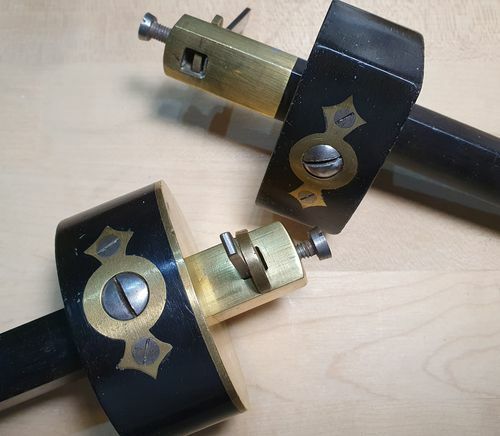
Notice the brass mushroom-shaped component that sits between the screw and the iron. This an extremely effective locking mechanism and I've never experienced any movement in the iron.
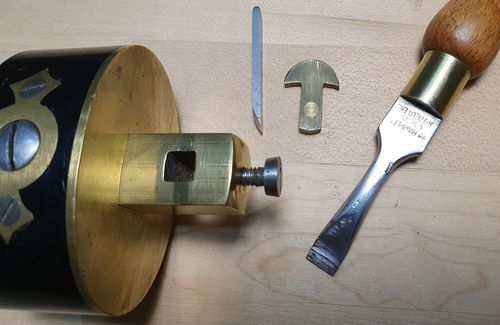
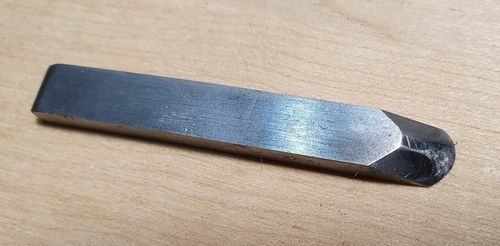
The iron is usually sharpened to a thumbnail shape as shown below. This one needs re-sharpening now as it has been scoring a lot of plastic lately.
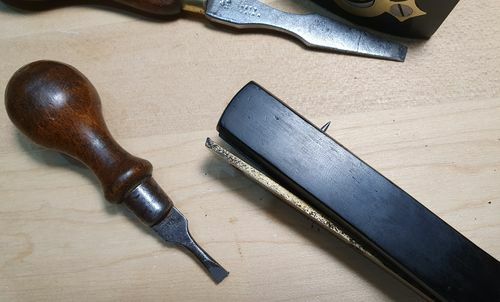
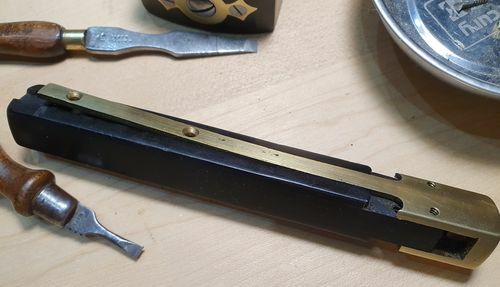
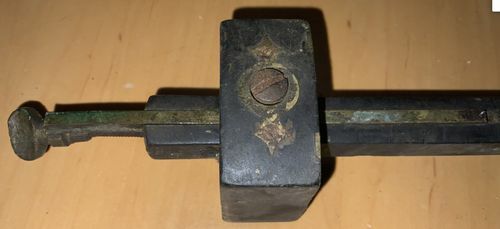
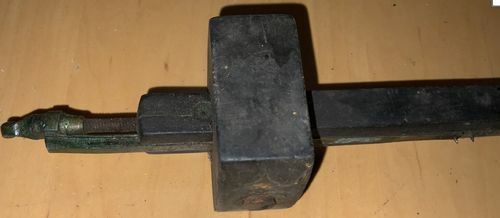
Let's turn now to how you go about replacing the spurs on a vintage mortise gauge, so you don't have to be put off from buying a vintage gauge if the spurs are worn down to a tiny nub. I'll describe the process of changing the spurs on the I. Sorby mortise gauge I showed at the start of this blog post as it is perhaps more involved than many other gauges. Start by loosening the locking screw in the stock and slide it off the stem as detailed above, making sure you retrieve the dished spacer. Notice how well the old turnscrew fits the screw. That's because I restored and shaped this turnscrew specifically to fit the locking screws on my vintage gauges.

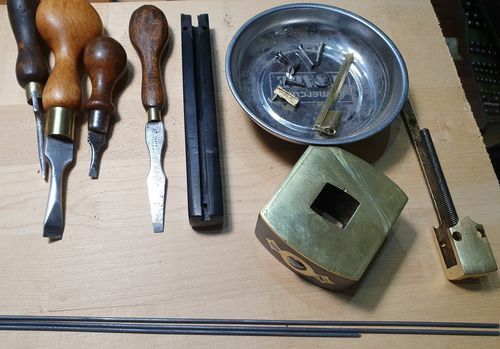
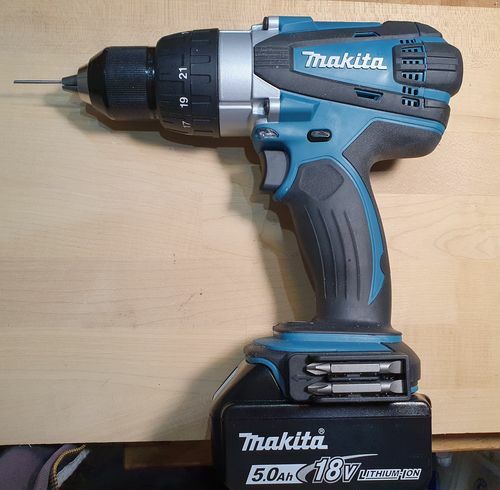
I mention this because modern screws are not like vintage screws. Vintage screws generally require the use of vintage turnscrews if they are to fit correctly. Dismantling a vintage gauge is not the time to reach for the made in China multi-bit screwdriver set you keep under the kitchen sink. Neither is it the time to chuck a modern bit in your cordless screwdriver. We will be using a cordless driver, but not for loosening or tightening screws. If you have one of those magnetic parts trays you might want to use it to keep the parts safe as you remove them. If not, any small jar will do.
Remove the screw that secures the fixed spur to the stem.
Slide the fixed spur assembly out the end of the T-slot.
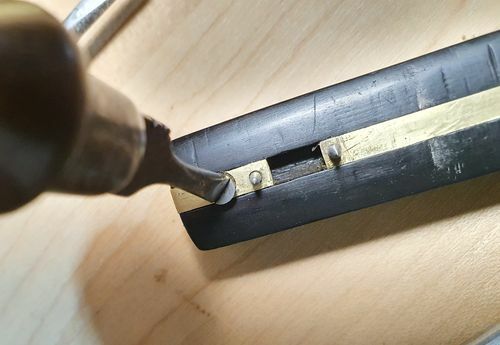
Now it is time to remove the adjusting screw assembly along with the adjustable spur. On this I. Sorby gauge there are four screws securing the assembly. Two of the screws go right through the stem and into the brass casting on the other side.
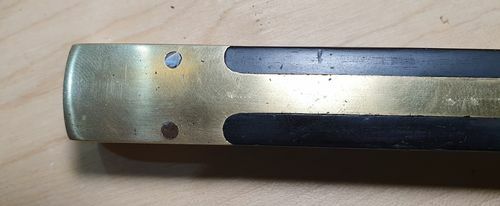
Remove these screws first.
The remaining two screws are on the opposite face to the spurs.
Remove the screw in the middle of the stem first, then remove the screw at the end of the stem. On most gauges of this design, the brass is sprung, and it will lift up as you remove the last screw.

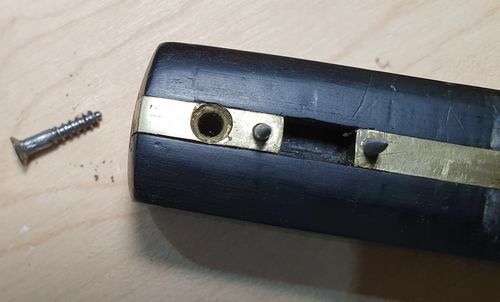
The fact that the brass strip along the back of the gauge is now raised is actually a big advantage. It enables you to push on the end of the strip to slide out the screw assembly. With any luck it will slide out easily just with hand pressure. If not, you can grip the wooden sides of the stem in a vise and tap the end of the brass strip with a hammer until it starts to move.
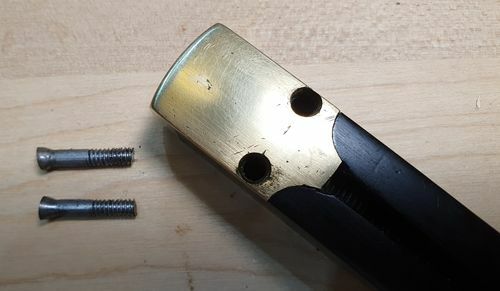
Carefully remove the screw assembly from the stem.
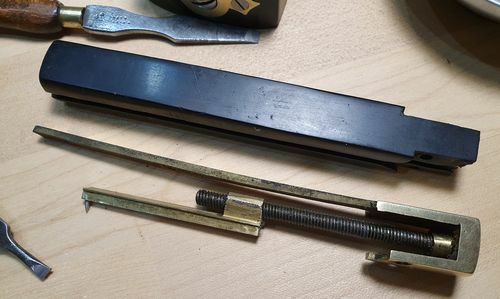
Next turn the adjusting screw whilst holding the adjustable spur until the spur becomes detached from the thread.
That completes the dismantling stage.
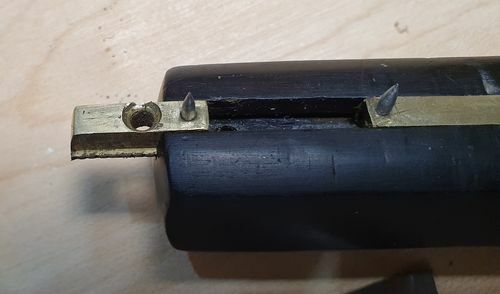
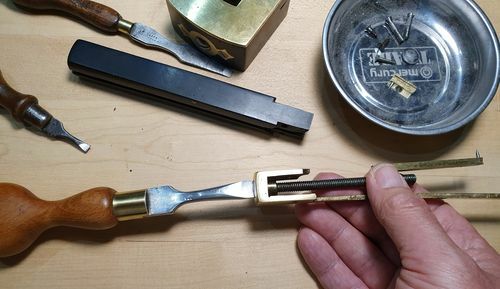
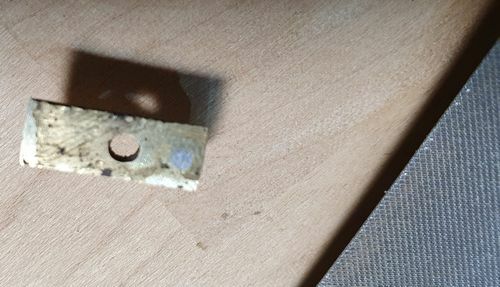
Now you can focus on removing the two spurs from their brass housings. Obviously in the photo below, I have already removed and replaced the spurs, so I won't be removing them again, but I'll show you how.
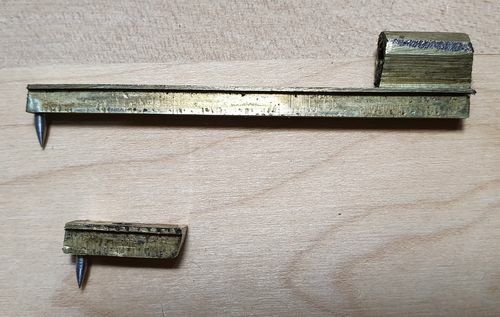
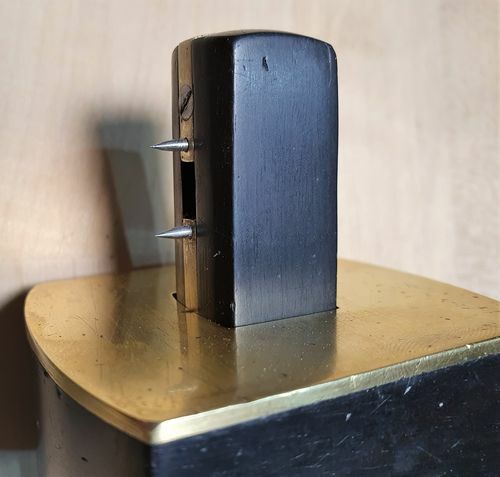
The spurs are driven out from the rear, so grip the housing in a vise and find a suitable nail to give the spur a nudge. The diameter of the nail does not need to be small enough to fit through the spur hole as you are only knocking the spur further out until there is enough of it showing on the other side to grab with a pair of pliers.
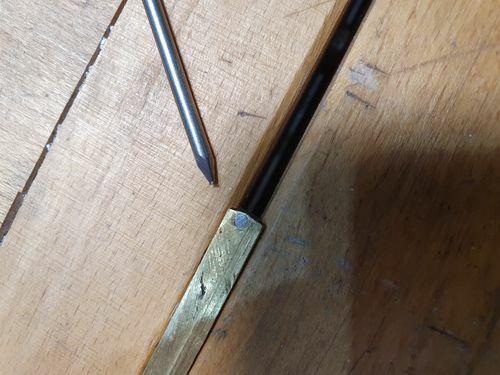
Tap the nail with a hammer and the spur will begin to move.
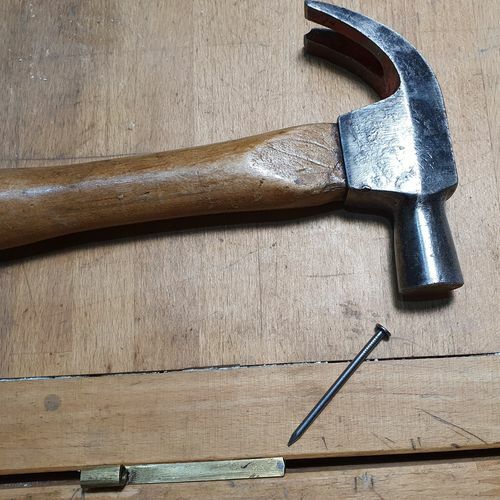
There should now be enough of the spur poking out to grip the spur with some pliers and extract it by gently twisting and pulling. Take care not to drop the spurs as you haven't finished with them yet.

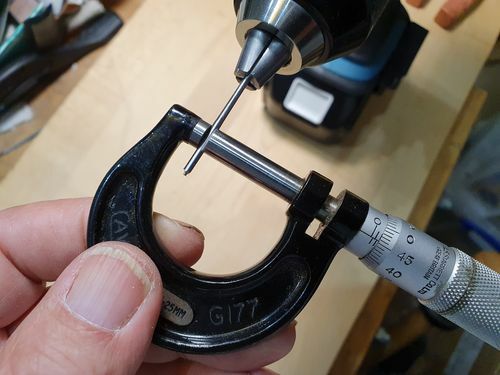
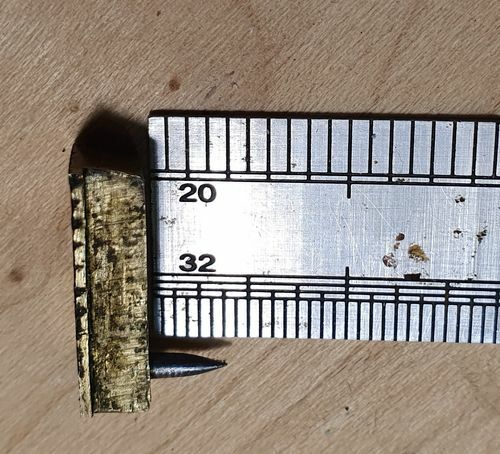
Now it won't do you any good to go to your local big box store and ask if they have any replacement spurs for an I. Sorby mortise gauge made over 100 years ago. No, I'm afraid you are on your own. Don't worry though, it isn't difficult. Start by accurately measuring the diameter of both spurs. For this you will need some vernier callipers or a micrometer.
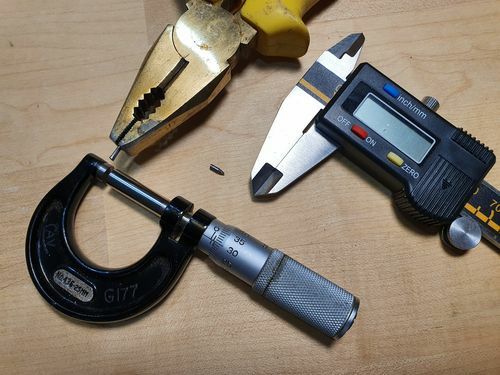
Once you know the diameter (mine measured 1.81mm), you need to go on-line and search for piano wire. Piano wire is cheap as chips and readily available. Apparently it is used a lot by model makers. The closest I could find was 2mm, so that's what I bought. You can buy piano wire in coils or straight strips in 3ft lengths. My advice is to buy the strips for this purpose. Some people will tell you that you can use old phonograph needles. Whilst these would be great if you were making your own gauge, they are not really useful when restoring vintage gauges as most of them are a larger diameter than the spurs found on vintage gauges. A lot of them also have a longer taper to the point. Since they tend to be around 15mm in length, there isn't enough to get hold of if you need to reduce the diameter slightly.
You can see the piano wire I bought at the bottom of the photo below. I have enough for about 20 lifetimes.
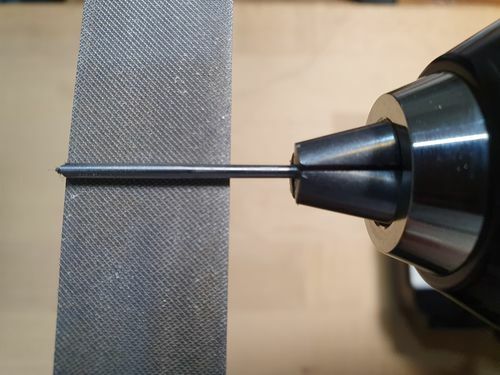
If you need to reduce the diameter slightly, now is the time to reach for your cordless drill. Cut off about 2" of wire and secure it in the chuck with about 1 ¼" exposed.
There are a number of ways to do this, but I just grabbed a file and set the rotation of the drill so it rotated into the teeth of the file. Hold the file with one hand and depress the trigger with your other hand. Move the file over the wire, stopping every so often to check your progress with vernier callipers or a micrometer. You need to reduce the diameter evenly over about a 1" length. That should be enough for two spurs.
In the following photo, the micrometer reads 1.95mm so I still have a way to go.
Once you reach the required diameter, angle the file slightly to produce your first point. Keep going until it's as sharp as my wit. Next polish the wire with sandpaper starting at P240 and going up to the highest grit you have. I believe I finished with P1000, but P400 is good enough.

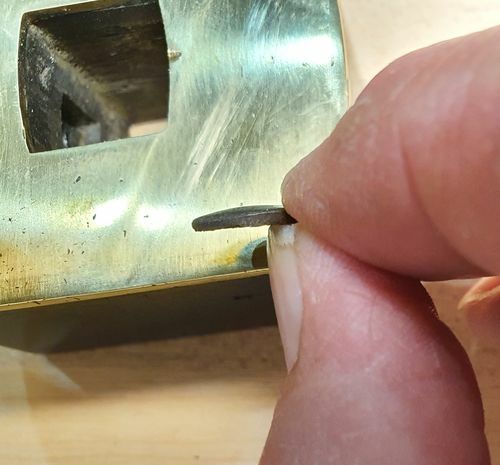
Before you cut off your first point, grab the brass housing and check that the point goes into the hole from the back and that the straight section of the spur feels like it will go into the hole. It should be a friction fit, so if it is too loose, you'll have to start again. Once you are happy it will go in, you are ready to cut off your first spur. You should aim for the point to protrude 3/16" from the brass housing, so in my case the length I needed was 3/16" protrusion + 3/16" (the thickness of the brass housing) + 1/16" wiggle room. 7/16" in total. I used a hacksaw to cut my spurs to length, but you could also use a Dremel with a disc cutter if you have one.
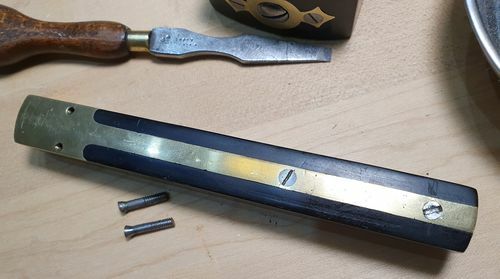
Grip the brass housing in a vise and tap the point into position from the back until the protrusion is correct. It is important to sneak up on it because if your protrusion goes over 3/16", you will have to hit your freshly sharpened point to knock it back a bit. Once the protrusion is correct, file any excess flush with the back of the housing.
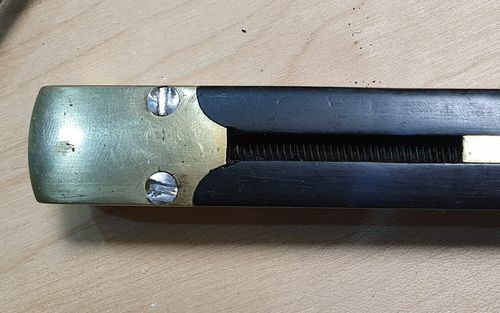
Repeat this procedure for the second spur. It is important that both spurs protrude by the same amount otherwise you will find it difficult to scribe a mortise as one of your marks will be deeper than the other. Before you re-assemble the gauge, it is a good idea to check over the rest of the components, clean and polish the brass and the wooden stem, clean and oil the screw, etc. Resist the temptation to sand the stem though, as this will adversely affect the sliding fit between the stem and the stock. That's all there is to it.
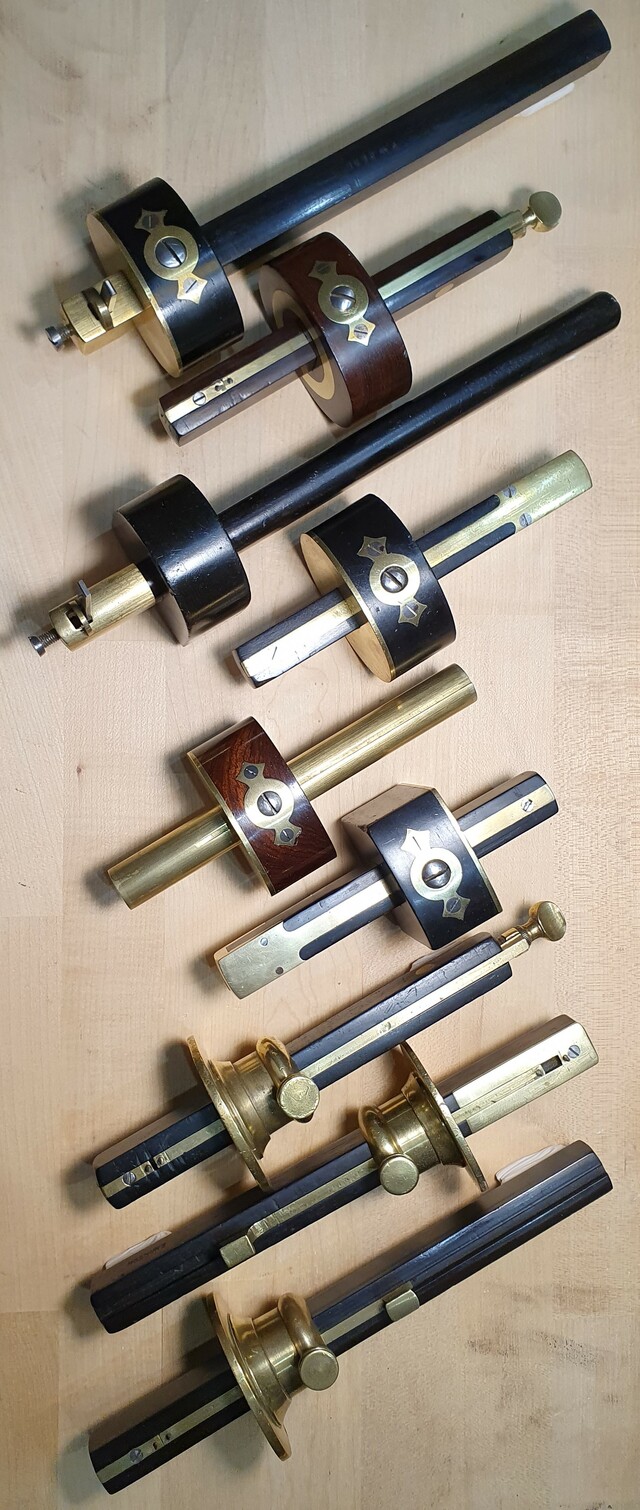
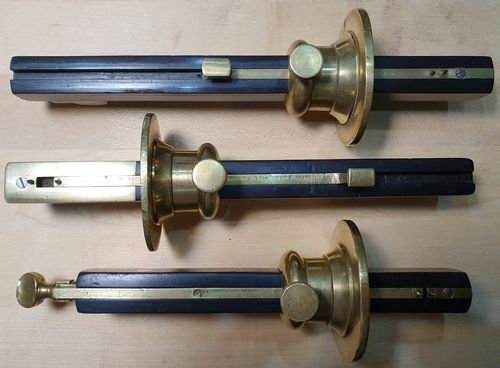
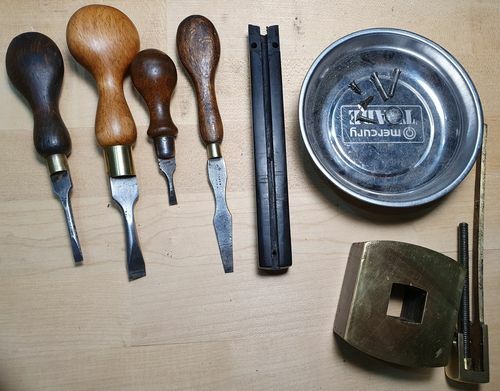
The good news is that the I. Sorby gauge used in the above demonstration is more challenging than most to disassemble. Most gauges are far easier than this and to prove it, here are some photos of some of my other gauges that I'll use to point out the differences.
Here you can see that the adjustable spur also has a screw, so you can remove both spurs simply by removing both screws and sliding them out.
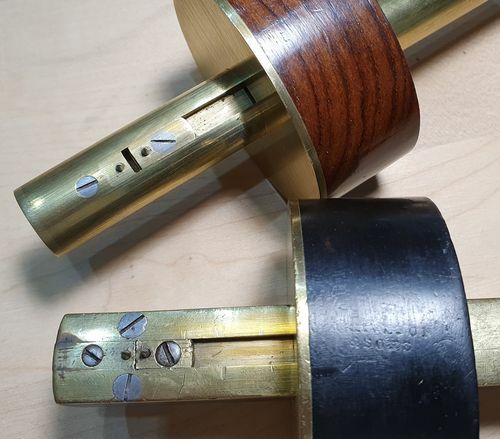
On the following gauge, the adjustable spur is removed simply by sliding the stock off over the thumbscrew, then turning the thumbscrew until the thread disengages from the nut that goes through the stem.
Now you are probably itching to jump on ebay and find one of these lovely gauges to call your own. Wait!!! Let me go there first so that I can point out some potential issues for you to avoid.
Ok, I'm back. Check these bad boys out!
1. Poor overall condition. Too much work. Mourn the gauge, curse its previous owners and move on.
2. Notice that the stock locking screw sits below the surface of stock. That tells me that the dished spacer is missing. This is usually accompanied by dings in the stem where the screw itself has contacted the brass. Move on.
3. Notice how the brass wear strip on the left is lifting from the stock. This might be fixable, or it might not. Personally, I'd move on.
4. I don't think I need to tell you what is wrong with this listing, except to say that the most I have paid for a vintage gauge in very good condition is £60 and it was much older than these examples. This seller needs to go away and sharpen his pencil. Chuckle and move on.
5. Cracked head, missing spacer, rust, dinged stem, face plate lifting from stock, needs new spurs. Life's too short. Move on.

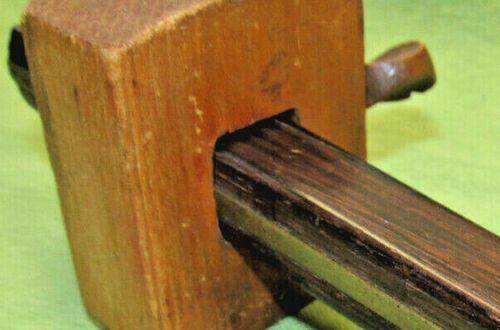
6. This is what is known in the motor trade as a cut and shunt. The stock does not belong with the stem. Just look at the gap between them. The seller should be made to write out I must not bull**** the paying public 1000 times whilst hanging by their ankles over a crocodile infested river.
7. This one looks good at first glance, but closer inspection reveals that this gauge has been sanded to within an inch of its life. Notice the gap between the stock and the stem and the slightly rounded corners. To be frank, they've ruined it. Don't let shiny brass and pretty wood tempt you to part with your hard-earned cash without first looking for any potential issues.

In addition to the above issues, you wouldn't believe how many gauges being sold on ebay are put together incorrectly. So many of the stocks are back to front or upside down. On cutting gauges, some have the screw bearing down on the iron and the brass mushroom thingy is behind the iron. These things are not necessarily reasons not to buy a certain gauge, just something to be aware of.
The fact is, there are more gauges out there that should be binned or used for spares than there are good vintage gauges. Unfortunately, we can't save them all (although my wife would tell you I should take my own medicine). However, if you're patient, you can still find decent gauges for a reasonable price that will be an absolute pleasure to own and use. With a gentle polish every year, a drop of oil and a new set of spurs, there is no reason why these lovely vintage gauges shouldn't last another 100 years. I think of myself as a custodian of these historical treasures. I feel honoured to own and use them. I pick them up and put them down carefully and treat them with respect so that one day, the next generation of woodworkers will be able to experience the same thrill I do every time I reach for one. If we don't take care of them, they will begin to become scarce and scarce means higher prices. None of us want that now do we?
Of course, you don't have to buy vintage. There are thankfully, a lot of modern gauges being made today that also perform well and are built to a high standard.
If you want more information on vintage gauges and lots of other vintage tools besides, do yourself a favour and visit this excellent site: https://williammarplesandsons.com/marking-out-tools/gauges/
Thanks for looking!
Andy -- Old Chinese proverb say: If you think something can't be done, don't interrupt man who is doing it.
4 Comments

This blog posted at just the right time for me, I was looking at my gauges earlier today wondering how I could improve the pins for an upcoming project.
I have had trouble with pins that sometimes follow the grain, some with conical shapes, some with knife shape. I experimented on one with a solid wood beam, easy pin removal, and used a drill as you describe in the blog. Came out fine in my opinion, went down the board without mishap. It was really sharp though. Problem is, it was a common nail, soft material.
Thinking about it later, it occurred to me that I could use either hand sewing needles, or machine needles. What is your opinion about this?
Read the blog, found it helpful, thanks for posting. Also, thanks for the Marples link.

A very informative write up - thanks for taking the time.
Thanks for taking a look everyone.
@Oldtool - I know that a lot of people do sharpen pin gauges to a knife profile because it can help prevent the point from wandering when marking with the grain. Personally, I don't do that although I'm not knocking anyone who does. I've found that concentrating on technique is important when using pins though. The trick when running a pin gauge with the grain is to make the first pass really light and not try to push the pins into the grain too much. Instead, focus on keeping the stock pressed against the wood. On subsequent passes, the pins will then tend to follow the track created on the first pass.
Regarding using needles, I'm not sure they would leave a very visible track. I don't know about you, but I find as I get older I need the scribed line to be a bit wider and I often make it a bit more visible by running over the track with a pencil.
Andy -- Old Chinese proverb say: If you think something can't be done, don't interrupt man who is doing it.
More from Brit
YouTube makes me laugh
Beginner's Guide to Sharpening Western Saws
The Humble Hand Brace - A Beginner's Guide to Restoring, Buying and Using #8: Part 8 - Tips and Tricks on Using a Hand Brace
The Humble Hand Brace - A Beginner's Guide to Restoring, Buying and Using #7: Part 7 - Sharpening an Auger Bit
The Humble Hand Brace - A Beginner's Guide to Restoring, Buying and Using #6: Part 6 - What to Look for when Buying a Secondhand Brace and more