


Share your craft projects
Make new craft buddies
Ask craft questions
Blog your craft journey

Brit
594 posts
and
41 followers
in almost 12 years
in almost 12 years
More from Brit
YouTube makes me laugh
Beginner's Guide to Sharpening Western Saws
The Humble Hand Brace - A Beginner's Guide to Restoring, Buying and Using #8: Part 8 - Tips and Tricks on Using a Hand Brace
The Humble Hand Brace - A Beginner's Guide to Restoring, Buying and Using #7: Part 7 - Sharpening an Auger Bit
The Humble Hand Brace - A Beginner's Guide to Restoring, Buying and Using #6: Part 6 - What to Look for when Buying a Secondhand Brace and more
The Humble Hand Brace - A Beginner's Guide to Restoring, Buying and Using #4: Part 4 - Cleaning and Restoring a Brace to 'Like New' Condition
This is
part 4
in a
8 part
series:
The Humble Hand Brace - A Beginner's Guide to Restoring, Buying and Using
...
-
Part 3 - Cleaning and Restoring a Brace to 'Like New' Condition
-
Part 4 - Cleaning and Restoring a Brace to 'Like New' Condition
-
Part 5 - Tuning a Brace
...
...
- Part 3 - Cleaning and Restoring a Brace to 'Like New' Condition
- Part 4 - Cleaning and Restoring a Brace to 'Like New' Condition
- Part 5 - Tuning a Brace
...
Well here we are at the finale of this brace restoration (DON'T YOU DARE SCROLL TO THE BOTTOM YET!).
At the end of Part 3 I wiped the Head and the Sweep handle over with methylated spirit to get rid of some of the grease and grime that had accumulated. Now its time to rub the wood down prior to re-finishing. I start with P120, then P180, P240, finishing with P320. I know some people would frown at this and say I'm destroying the patina that has built up over the years. Sometimes that's a valid argument, but not in this case. All that this brace has built up is a lot of resentment against its previous owner for abusing it and letting it get in the state it was in when we started this restoration.
At the end of Part 3 I wiped the Head and the Sweep handle over with methylated spirit to get rid of some of the grease and grime that had accumulated. Now its time to rub the wood down prior to re-finishing. I start with P120, then P180, P240, finishing with P320. I know some people would frown at this and say I'm destroying the patina that has built up over the years. Sometimes that's a valid argument, but not in this case. All that this brace has built up is a lot of resentment against its previous owner for abusing it and letting it get in the state it was in when we started this restoration.
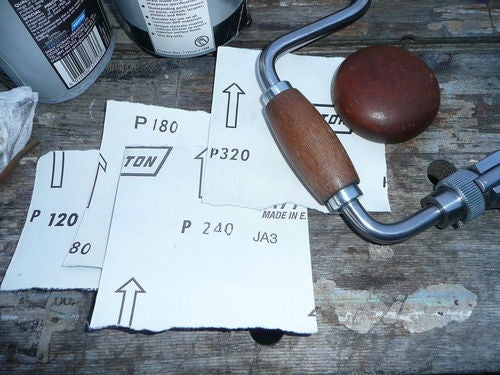
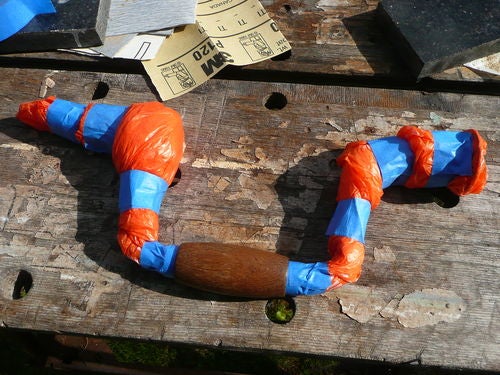
Before I started sanding, I wrapped up both ends of the brace to prevent the saw dust getting into places it has no business being.
Then starting with P120, I rubbed back and forth along the length of the sweep handle (not around it), rotating the handle slowly as I went. Once the original finish had disappeared and I'd evened out any minor dents and scratches, I brushed off the dust and moved on to the next grit size. The photo below shows the sweep handle sanded up to P320.
Next I rubbed down the Head in the same manner. To keep the underside of the head flat, I put the sandpaper on a flat surface and rubbed the head along it in the direction of the grain.

At this point, let's take time out to talk about finishes. There are many, many finishes that you could use for this application and if you have one that you're comfortable with, by all means use it. However if you'd like a bit of help, here are three finishes that will work in this situation. Whenever you put a brace down on a flat surface such as your workbench, there are three points of contact namely, the Head, the sweep handle and the chuck. Therefore the finish you apply to the wood should be able to withstand the constant picking up and putting down. It needs to be durable or at least easily renewable.
FINISH No.1 - Multiple Coats of Boiled Linseed Oil
Process
1. Wipe on a liberal coat of BLO using a rag or a paper towel.
2. Wait 15 minutes, then wipe off any residue left on the surface with a paper towel.
3. After a couple of hours, repeat steps 1 and 2.
4. Leave to dry for a minimum of 24 hours.
5. Repeat steps 1 and 2.
6. Repeat steps 4 and 5 until you are happy with the way it looks.
Although BLO doesn't offer much in the way of protection from knocks, it gives the wood a wonderful patina that will only improve with age and you can easily wipe on another coat whenever you think it needs it. Its cheap and virtually full-proof as long as you follow the directions above. There is an old saying with respect to BLO which says:
One coat a day for a week
One coat a week for a month
One coat a month for a year
One coat a year for life.
Personally, I've never got past the one coat a day for a week stage.
WARNING - Rags soaked with Boiled Linseed Oil will spontaneously combust if left bunched up. Immediately after use, soak the rag in water and spread it outside in the sun to thoroughly dry. Once dry it can be disposed of without risk of fire.
FINISH No.2 - Traditional Beeswax Finish
You can either buy it ready made or make it yourself using the following ingredients:
3 ½ oz (90g) white or yellow beeswax
½ oz (10g) carnauba wax
4 fl oz (100ml) pure turpentine
How to make it:
1. Melt the wax in a double boiler, over an electric heat to reduce the risk of fire.
2. Once the wax has completely melted, carefully and slowly pour in the turpentine. The wax will solidify immediately, so maintain the heat and stir until the wax has dissolved completely in the solvent.
3. Remove from the heat and pour the hot liquid into a sealable, non-plastic and wide-necked container (something you can get to the bottom of with a rag). Seal it with the lid immediately and put it aside until it has completely cooled and solidified.
Process
1. Wipe it onto the wood using a clean, lint-free cotton rag. Multiple thin coats are better than one or two thick coats.
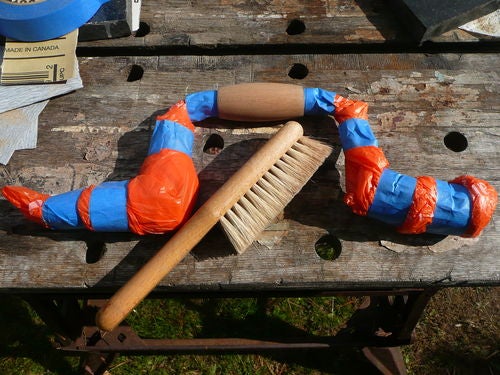
2. Leave it for at least an hour (longer if possible, then buff it up with a polishing brush or another clean cotton rag.
3. Repeat steps 1 and 2 until you're satisfied with the finish. The more you buff, the more it shines.
Whilst a traditional Beeswax finish isn't very durable, it does have the advantage that it is easily renewable, smells great and feels great in you hands.
FINISH No.3 - Boiled Linseed Oil followed by a Wipe-on Oil-based Varnish (I prefer a Satin or Semi-gloss)
1. Wipe on a liberal coat of BLO using a rag or a paper towel.
2. Wait 15 minutes, then wipe off any residue left on the surface with a clean paper towel.
3. After a couple of hours, repeat steps 1 and 2.
4. Leave to dry for a minimum of 24 hours.
5. Either use a proprietary wipe-on varnish or mix your own using a brush on varnish thinned with Pure Turpentine (3 parts varnish to 1 part turpentine). Wipe it on in the direction of the grain using a clean rag or paper towel.
6. When dry (approx. 6 hours), wipe-on a further coat.
7. Repeat step 6 until you are happy with the finish.
8. This step is optional, but I personally think it makes the wood more tactile and leaves the surface silky smooth. I also love the smell of wax. After the last coat of varnish has fully hardened (minimum 24 hours), apply a thin coat of clear paste wax using 0000 steel wool in the direction of the grain.
9. After at least 20 minutes (longer if possible), buff the surface with a clean lint-free rag.
10. Apply another coat of paste wax with a cloth, wait 20 minutes and buff again.
WARNING - Rags soaked with Boiled Linseed Oil will spontaneously combust if left bunched up. Immediately after use, soak the rag in water and spread it outside in the sun to thoroughly dry. Once dry it can be disposed of without risk of fire.
I hope you find the above finishes and processes useful. There are many others and you'll eventually find what works for you. For this brace, I'm going to use Finish No.3. Here's how the sweep handle looks after the first coat of BLO.
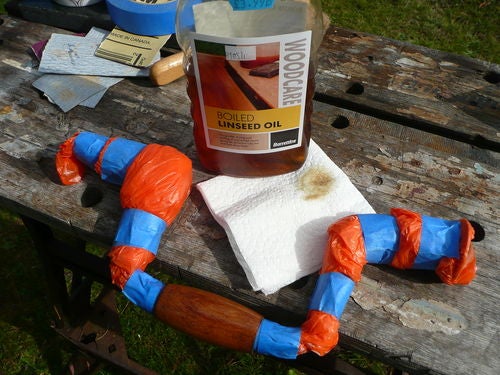
Its worth pointing out that if your brace has been subjected to oil and grease as this one had, you are unlikely to remove all of the evidence by sanding it down. It might look like you have, but once you apply the first coat of finish, some of the marks will re-appear. There isn't much you can do about it, as both the Head and the Sweep handle are shaped in such a way that end grain is exposed. End grain will suck up any grease and dirty oil like a straw and draw it deep into the wood. Don't beat yourself up over it, it adds character and hints at the tool's history. The following photo taken after the first coat of BLO illustrates what I mean.
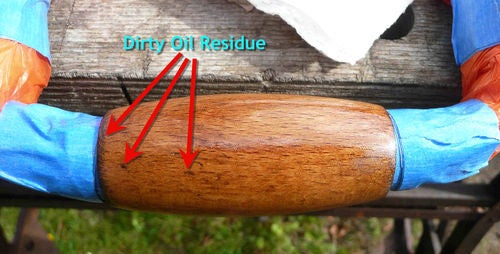
To hold the Head whilst applying the finish, I mounted it on a piece of dowel. If the dowel is a little smaller in diameter than the hole in the Head, wrap masking tape around it to increase the diameter until its a nice snug fit and won't fall off. Notice how the BLO has put back some of that 'patina' we sanded out? It will get even better with age.

NOW SOAK THOSE RAGS IN WATER AND SPREAD THEM OUTSIDE TO DRY!

This is how they look after applying the second coat of BLO and wiping off any excess.

I'm shooting for a nice golden brown colour. The varnish will add a bit more colour, but more importantly it will add depth, some sheen and a lot of protection from knocks and scratches once it has fully hardened.
While I'm waiting for the BLO to dry, there are three parts of this brace that I have yet to clean, namely the screws that secure the Head to the body. To de-rust them, I slapped a bit of gel in the top of an aerosol can and dropped them in.

After 20 minutes, I rubbed them with a scouring pad and wiped them with a paper towel.

24 hours after I applied the second coat of BLO, I mixed up my wipe-on varnish. I used a teaspoon as my measure (3 varnish, 1 pure turpentine). Experience tells me this is enough for a hand brace.

I wiped it on with a paper towel and applied 6 thin coats over 2 ½ days, with each coat taking about a minute to apply. You could do three coats in a day if you time it right. I left about 5-6 hours between coats. There is no need to sand between coats as long as you don't apply too much and end up with runs in the finish. After applying all the coats, I still had about 1 ½ teaspoonfuls of the varnish/turpentine mixture left. 24 hours later, I lightly rubbed the surface with 0000 steel wool dipped in clear paste wax taking care not to rub too hard at the edges. The steel wool removed any dust nibs and left the surface silky smooth with a subtle sheen. After 20-30 minutes, I buffed it out with a rag. Then I applied another coat of paste wax using a rag, waited 20 minutes and buffed it out again.

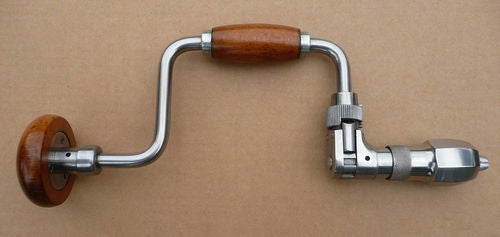
Reassembly speaks for itself really. Wiggle the jaws back into the chuck and screw the chuck onto the ratchet mechanism making sure the jaws line up with the slot in the ratchet mechanism. To screw the Head back on to the body, start the screws with fingers only to avoid stripping the wooden thread, then snug them up with a screwdriver. Don't over-tighten them. Before I show you the finished brace, let's remind ourselves what it was like at the start.

After restoration, with a drop of oil and a wipe over every few months, she's good for another 50 years at least. Ladies and gentlemen, once again I give you RUSTY…


I hope you've enjoyed this restoration as much as I have. I've tried to show that with a little patience and a few simple tools, you can get some great results. The only tool I used that had a plug on it was a hair dryer.
Although this brace is back from the dead, its not the end of this blog series. Still to come we have:
• Part 5 - Tuning - Common problems and how to fix them.
• Part 6 - VIDEO - Showing variations in design and what to look for when buying a brace.
• Part 7 - VIDEO - Uses for a hand brace in today's workshop.
• Part 8 - Auger bits and how to sharpen them.
So stay tuned and thanks for looking!
Andy -- Old Chinese proverb say: If you think something can't be done, don't interrupt man who is doing it.
4 Comments

Thanks for the "how to". Have an old brace that was my Grandfathers. He gave it to me about 70 years ago. It was no where near new then. Hated the thing, trying to drill holes as a kid. Bits were probably extremely worn out and really dull.
Need to follow your instructions and get it spruced up. Maybe.
Need to follow your instructions and get it spruced up. Maybe.
Ron

Nice write up Andy, it sure turned out Pretty.
Main Street to the Mountains

Very nice, Andy! Thanks for walking through that!
May you have the day you deserve!

Excellent write-up!
More from Brit
YouTube makes me laugh
Beginner's Guide to Sharpening Western Saws
The Humble Hand Brace - A Beginner's Guide to Restoring, Buying and Using #8: Part 8 - Tips and Tricks on Using a Hand Brace
The Humble Hand Brace - A Beginner's Guide to Restoring, Buying and Using #7: Part 7 - Sharpening an Auger Bit
The Humble Hand Brace - A Beginner's Guide to Restoring, Buying and Using #6: Part 6 - What to Look for when Buying a Secondhand Brace and more