


Share your craft projects
Make new craft buddies
Ask craft questions
Blog your craft journey
Craftisian Blogs
view blog series
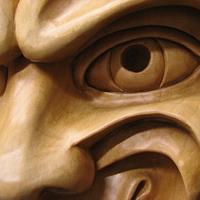
Here are a few pictures of the marquetry and routing in the inlays. By only using two veneers for the marquetry, Gaboon Ebony & Holly with the back...

Sorry I missed last Wednesdays update, we were camping on the coast with family.
I got all but one of the mortises cut when I reinstalled the beam...


As I mentioned in part 1, I based my cart design around a a Sketchup model I found on their 3D Marketplace. Once the Supercell arrived and before...

Quiet week for us. I finished cutting the scarf joints and fitted them up. Unfortunately the beam twisted so things went a bit slow.
[IMG_2540.jpeg...

I’ve almost finished making the first replacement for the intermediate sill. We chose a splice used in shipbuilding. I am not opposed to using trai...


I've done a previous blog on a similar item, but this time I'm including the design process for those of you who are interested.
Making another pa...


Our front gate, which is now 4 years old, started sagging enough recently that it wouldn’t latch any more. I was a little disappointed by the compa...


[13.03 Fixes - Base Weight Rebar in Base.jpg]
When I brought the assembled rack inside, I was pleased to see that it was quite stable when the...

Background:
A couple of years ago, I found a basic Delta 1 HP dust collector that someone was throwing away. It was in good condition and had t...

[12.13 - Finish and Assembly - Finished Rack.jpg]
With the brace finished, the rack was almost ready to assemble. I started by adding the top cap...


Haven't had a chance to get back to carving tools but I had a couple pocket knives that needed a refresh this weekend so I thought it would be wort...

Before I started working on the cart, I decided it was time to address a problem I had been deferring. The racks pivot on 3/8” dowels, with a washe...