Share your craft projects
Make new craft buddies
Ask craft questions
Blog your craft journey

MsDebbieP
1435 posts
and
55 followers
in almost 12 years
in almost 12 years
More from MsDebbieP
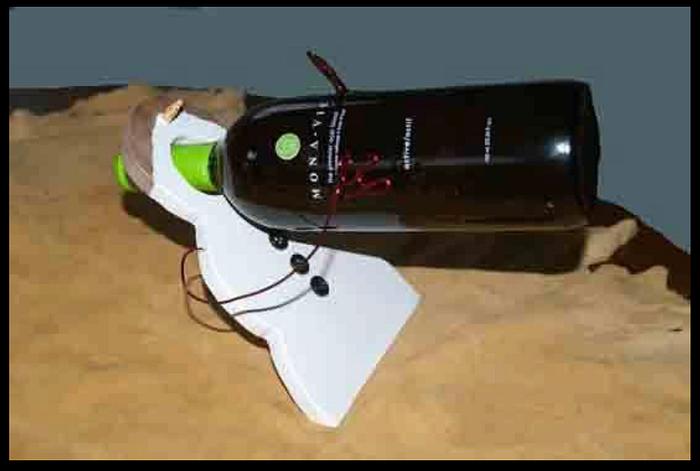
Snowman from 2007
Wow … that is a long time ago - 15 years. My goodness, I was just a youngster then.
I had forgotten about this bottle holder- but I haven’t forgotten the flack I got for painting walnut!! They never let me forget the error of my ways.
Nov. 16, 2007
I had forgotten about this bottle holder- but I haven’t forgotten the flack I got for painting walnut!! They never let me forget the error of my ways.
Nov. 16, 2007
(Copy/paste.. I certainly don’t remember any of these details)
Process
1. I printed the pattern and glued it to the piece of walnut that I found.
(yes, I know - you shouldn't paint walnut) but that's what I had that was "almost" the right size. I had to trim the sides of the pattern down a bit and I think it could have been thicker to provide a better balancing edge. But it works
2. I tried using the scrollsaw but the wood is just too hard for my scrollsaw skills. Back up plan was the bandsaw sitting beside me - that I had never used before. I managed to make it work.
3. Using the hole-making thingy I drilled the mouth opening and then a little hole to fit a 1/4" dowel into, for the nose.
4. I sanded the surface.
5. Cut the angle onto the bottom with the mitre saw and then finished the angle using the sander to get the "balance" to take place. That was tricky - and just don't sneeze!
6. Cut some jewelry wire and formed the hands. Drilled holes in the side of the snowman and glued the wires in (the one is being stubborn and won't remain tight… I think I'll just say that he's a little tipsy and afraid of falling so he keeps putting his arm down on the ground to catch himself).
8. Used the sander to form the nose, using a short piece of dowel.
7. Painted the nose using a marker and the body of snowman with some white paint.
8. Glued on 3 buttons and let it all dry.
- - - - - -
Those were the days.. all I wanted to do was to make a box. That’s how I found the woodworking site, connected with Martin about some ideas, .. and rest is history!!
:)
Here we are 15 years later and I’m still helping Martin with his woodworking site!
- Debbie
Those were the days.. all I wanted to do was to make a box. That’s how I found the woodworking site, connected with Martin about some ideas, .. and rest is history!!
:)
Here we are 15 years later and I’m still helping Martin with his woodworking site!
- Debbie
JAGO - just a grandma’s opinion
7 Comments
Great story behind the project (so painting the walnut can be overlooked 😉).
That is cute, well done. It's amazing to look back and see where we started in our woodworking journey.
Main Street to the Mountains
ill take one !
working with my hands is a joy,it gives me a sense of fulfillment,somthing so many seek and so few find.-SAM MALOOF.
Cute MsDP... do the come in cask holders?
If your first cut is too short... Take the second cut from the longer end... LBD
Thanks, everyone.
Overlooking the painting - you are too kind!
I’m picturing the size of the snowman carrying a big barrel … it’s a cute idea. You should do it !!!
Overlooking the painting - you are too kind!
I’m picturing the size of the snowman carrying a big barrel … it’s a cute idea. You should do it !!!
JAGO - just a grandma’s opinion
What a fun project and a cool story to go with it.
Thanks, Steve
JAGO - just a grandma’s opinion


