


Share your craft projects
Make new craft buddies
Ask craft questions
Blog your craft journey

SplinterGroup
9126 posts
and
68 followers
in over 3 years
in over 3 years
More from SplinterGroup


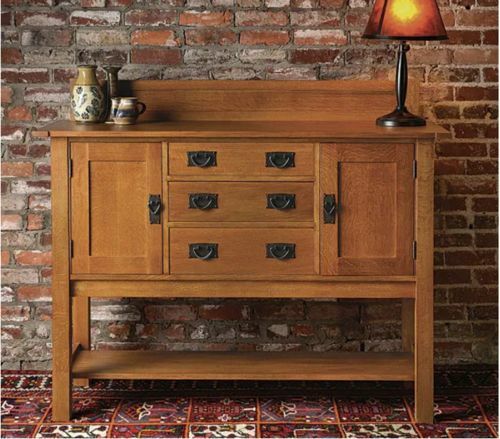
QS White Oak Sideboard


Originally posted in spring of 2021.
The gallery photos really succumbed to the woods chatoyance, everything is the same tone/color (really!)
This project was begun several years ago and then left to fester. I resurrected it last summer and completed it before fall, but couldn't bring it into the house until now because of The Cat.
The spousal unit wanted a sideboard for the dining room and was ready to press the button on a Wayfare brand MDF shrine with the vinyl woodgrain finish (gak!).
She also knows how to press my buttons so of course I had to quickly commit to building a "better" sideboard.
I started to design my own but was feeling less than motivated and started looking through web images and magazine back issues. I liked the lines of a sideboard by Gregory Paolini described in FWW, May 2015. The article was fairly brief, but the exploded diagram had all the dimensions I needed to make it work.
If you look at my main photo and compare it with the Paolini version you can see where I made some changes where I added some styles to the backstop and caps on the rear legs.:
The Paolini sideboard from FWW May, 2015:
Being there were several things I wanted to change and FWW was having a sale on plans, I went ahead and bought them for this project. Getting it done fast was more of a priority to me then versus doing something totally unique.
Normally I don' t work from plans (my own or others 8^), but what the heck. The digital downloaded FWW plans were basically detailed measured drawings, cut list, and a Sketchup model. No "instructions" which I didn't want since the magazine article describes the process. The plan helped as a check list for things, but in a pinch the magazine article would have been sufficient. I don't yet have the patience to learn Sketchup so the included SU file was not used.
The Details
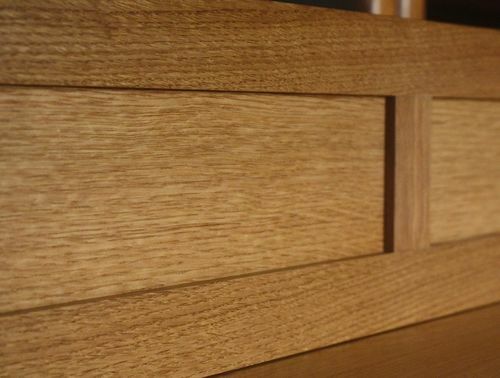
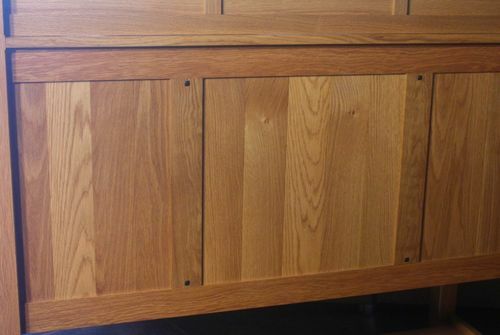
Built from quarter and rift sawn white oak, simple finish of natural Watco danish oil and satin Mohawk pre-cat lacquer. The drawer boxes are solid maple. Door and side panels are QSWO veneered plywood.
I wish I had gone a tad darker, but again, had to git 'er done and didn't want to play with dyes.
Dimensions:
Body is 51" wide x 18" deep"
Height to table top is 40"
The build is mostly frame/panel with some nice features to make assembly easier (or harder 8^)
Dive in head first and then hit some road blocks
I build a number of the sub assemblies with the intention of pre-finishing since it would be a royal pain to do this all after assembly. The article had the unit fully assembled before finishing and left out any finishing details.
The way the project is assembled required a lot of masking so I could pre-finish and leave areas unfinished for good glue bond. This was complex so I just left it for a while and "pondered" it. This ended up going on for a year as I moved on to other things (so much for "git 'er done 8^)
The sideboard was "rediscovered" during my semi-decadal cleaning (sweep the floor and put tools away) so I got back to it.
Design Changes
The legs are made with 1/8" thick veneers applied to a core of stacked layers. This allows for the legs to have great grain on all faces without any outward signs of how it was done. I have used this method on several of my past project tables with great success.
From and earlier table:
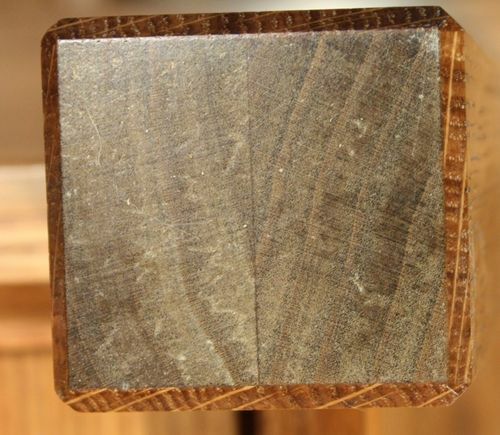
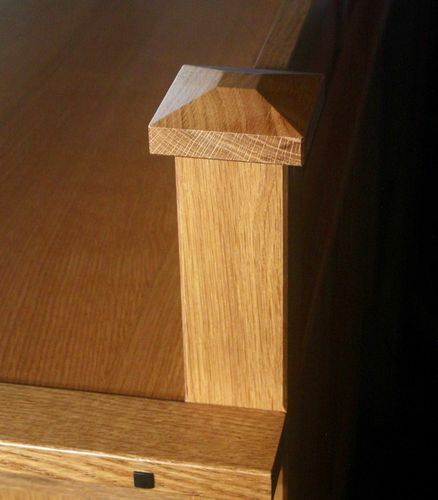
Oddly, the Paolini version of this sideboard leaves these unsightly leg cores exposed at the top of the rear legs.
Simple enough to hide with some caps and add some pizzaz:
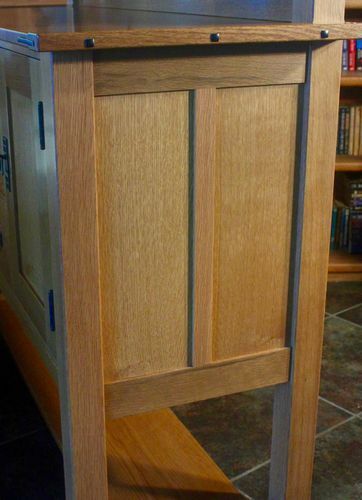
Paolini also used single panels in the sides. I didn't have any veneer that wide and I didn't want to mess with seams so I split the panels.
I also went with a more Greene & Greene style in the top with raised breadboard ends (versus flush) and the obligatory ebony plugs and splines.

The backstop is redesigned to use shorter panels for better stability.
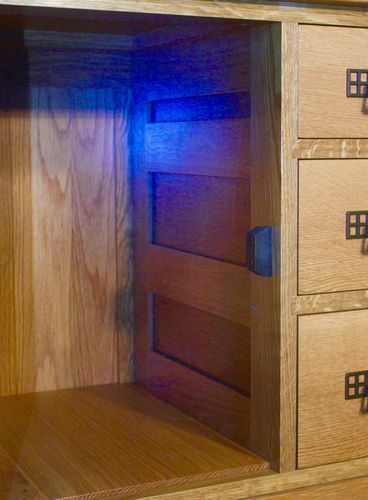
For the door catches, I was at a loss as to what would work and what would be in the way. I finally opted for using magnets embedded in the door and a stop block in the carcass.
I also added a few holes for adjustable shelves (still to be made).
You can see the 1/4" thick oak board at the bottom is set in place to naturally expand to the side. The original design specified to just drop it in without any attachment (inviting warping). There was also the problem that the plans had this board expanding front to back. Since it also serves (per the plans) as the only door stop, the expansion/contraction would seasonally mess up keeping the door flush when closed.
The drawers have solid maple boxes with HB dovetail faces (Leigh D4R)

The hardware is from House of Antique Hardware (Mackintosh).
The rear panels are solid (1/4") ship lapped boards. Unfortunately the plans sized them without any consideration for expansion and I glued up the center section before realizing this 8^(
Hopefully it will not explode!
The end sections have enough room since I cut the leg mortises a bit deeper.
The plan has some mix ups (errors) in what they list as rails and styles. The biggest error is where diagram and cut list have the lower shelf 1" shorter that is required. I wasted a 4'+ piece of nice oak because of this and had to use a less attractive piece with the made up 1".
I notified FWW about these errors but I doubt they will change anything.
It's these small details that can make or break a project, fortunately I figured out all but one and the humid season will tell me if that was a killer mistake.
The Cat
Can't forget to explain this.
We are holding onto the kids cat while he gets settled, This cat likes to get on top of counters and hork up hair balls and this sideboard would certainly turn into a favorite horkorium. I can't find any info on how pre-cat lacquer and cat vomit interact so better safe than sorry.
Well, the kid finally took back his cat so I have the all clear to bring this sideboard into the house.
Enough rambling, questions and comments always welcome!
19 Comments

Fantastic! Did you soften the edges of those splines before fitting them? They have that awesome ‘worn’ look…hardware is awesome too. Well done!
Ryan/// ~sigh~ I blew up another bowl. Moke told me "I made the inside bigger than the outside".

beautiful side board splint. i like yours better than the original.cant go wrong with G&G embellishments. nice work.
working with my hands is a joy,it gives me a sense of fulfillment,somthing so many seek and so few find.-SAM MALOOF.

Splinter, beautiful craftsmanship, many details from the G&G splines and the hardware. Well Done.
Main Street to the Mountains
Thanks guys!
Ryan, the plugs and splines are all rounded on the edges.
Ebony plugs are a pain, but I've made a number of jigs and tools to crank them out faster. They need to go to 1500 grit and McGuires #7 to get rid of the scratches and get the "look".
Since the plugs are either 3/8" or 1/4" square, I make some sized square sticks that I then round over the ends and cut them to length.
T'would be easy on a lathe (the rounding) but since I don't have one, I searched long for a 4-jaw chuck that would fit my drill press. They go pretty fast that way, but still "ugh"!
Cool. Great info. Thanks!
Ryan/// ~sigh~ I blew up another bowl. Moke told me "I made the inside bigger than the outside".

Really like the sideboard. Wonderful workmanship and design. The White Oak, finish and hardware along with the accents make for a great piece.
Ron

Lovely!
Glad the horking cat went back home so you can enjoy this wonderful piece.
Glad the horking cat went back home so you can enjoy this wonderful piece.

A well crafted piece, with an amazing story, which made me smile. I think you super Paolinied it, and I like your details better.
"Horkorium" wins it though for word of the day. :-)
Nice build.
"Horkorium" wins it though for word of the day. :-)
Nice build.
Liked it then still like it now. An heirloom in the making.
I’m selling reverse mortgages with my bro from a different mo. Tom. Need one?
I’m selling reverse mortgages with my bro from a different mo. Tom. Need one?
James McIntyre

Well done and great hardware.
Thanks '49!
The hardware was $$, but I really like the Mackintosh style and just "had to do it"
The hardware was $$, but I really like the Mackintosh style and just "had to do it"

I believe I raved over this project already when you last opened the blast-gates of your skill.
So I will comment in Spanglish: is very beauty fornitures.
So I will comment in Spanglish: is very beauty fornitures.
No Bees. No Honey. Bees Lives Matter

Masterful job. Should last for generations of use.

Not sure how I missed this posting. Your added features really work well. Good call on the hardware as well!
Thanks guys!
I bought double the hardware and QSWO to make two sideboards, I'm was demented and will be suitably punished for that mistake...
I bought double the hardware and QSWO to make two sideboards, I'm was demented and will be suitably punished for that mistake...

Great job Splinter, it's amazing. QS white oak is beautiful but the fine details speak to me more!
I should joke more often if that improved your woodworking skill to this high level...
I should joke more often if that improved your woodworking skill to this high level...
No name noobie here
Thanks YRT,
a sense of humor helps when things get screwed up in the shop. Saves a lot of wasted effort throwing stuff at the walls 8^)
a sense of humor helps when things get screwed up in the shop. Saves a lot of wasted effort throwing stuff at the walls 8^)

Great build Splinter... and I greatly appreciate those interim happy snaps... thx +1...
But blaming the pussy (cat for one eyed ex-pat LJ'ers)... is heartless.
But blaming the pussy (cat for one eyed ex-pat LJ'ers)... is heartless.
If your first cut is too short... Take the second cut from the longer end... LBD
Split
You have talent.
That is beautiful piece of work.
You have talent.
That is beautiful piece of work.
Petey
More from SplinterGroup