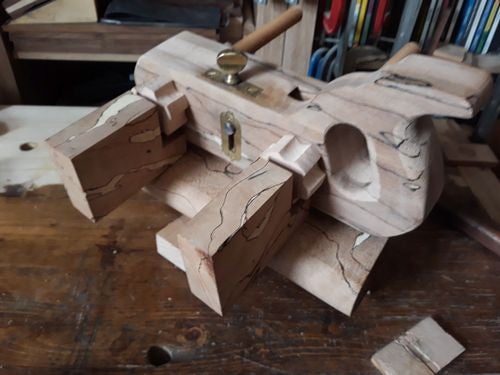
Screw stem plough plane made out of beech & spalted beech
Somewhat bigger and curvier than the traditional ones.
Main body is a sandwich of spalted beech with a beech core, screws are birch and the strike points and wedge are bubinga.
Made with hand tools only, feel free to give advice, abuse and criticism.
More of a step-by-step ramble than a project but here we go.
Lay out the shape for the main body and cut to rough size.
Drill a couple of holes as the starter for the handle.
Chisel out the bed for the irons & test fit.
Flatten the board, testing out the £6 Aldi plane, works surprisingly well as a smoother, tight mouth, needed some reshaping of the handles but a lot better than I expected.
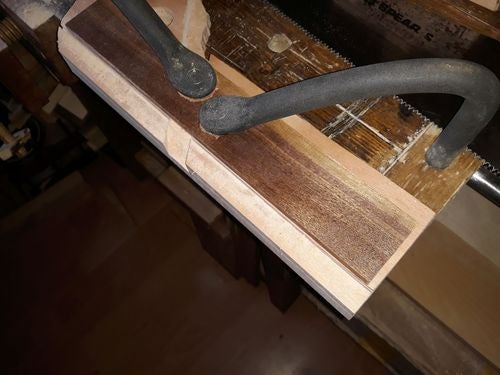
Cut the rebate for the skate, scrap of walnut clamped as a hi-tech saw guide.
Clean up the router plane I made a bit back, didn't seem to take a picture of this.
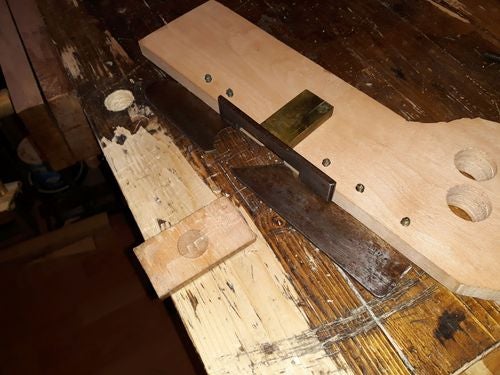
Fit the skate.
Layout where the depth stop is going.
And saw and chisel out the channel.
So far I've been working with solid beech, time to bring in the spalted beech. Smooth & square it up.
Resaw it to width.
And smooth and square again.
Mark up where it's going, not tall enough for the handle, so glue some up.
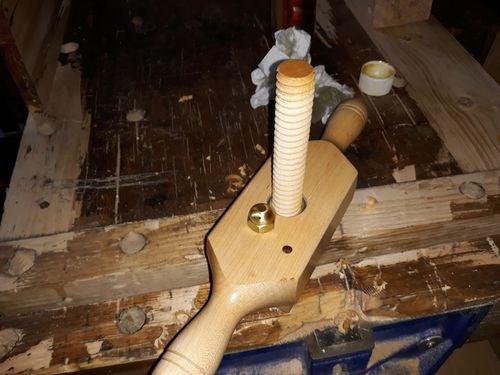
Make the screw threads while it's gluing. Dip the birch dowels in BLO.
And thread the screws, always want to keep going and make loads of these when I start, very moreish.
Glue up a spalted beech panel to the main body of the plane, just doing the one side so it's simpler to shape. These are my favourite type of clamp.
And cut the channel in the spalted beech for the depth stop.
Shape the handle with rasps.
Chisel out the waste to connect the two handle holes.
Layout where the screw stems will go.
Drill out the holes for the screw stem and the handle.
Starting to look a bit like a plane.
Glue on the other panel, no glue behind the handle as that bit is going to be removed.
Break out the moulding planes for some shaping.
Fit the depth stop adjuster.
Fit the plate for the depth stop locking screw, had to improvise with a chisel and knife, never tried to do an inlay before, turned out OK, could have been a bit tighter. I can fill a bit later if it looks obvious. I think I'll get away without filling it.
Fit the skate, shouldn't need to come off again now.
Cut out the nuts, not sure if a hand brace is a bad choice to use with a hole saw or I've just got a really cheap hole saw (probably the cheap blade), but it doesn't cut smooth, easy enough to straighten up later I guess.
Tap the nuts.
On to the front of the plane, just shape it to match the front skate.
Make the bits (no clue of the name) that attach the stems to the fence. Just square them up, cut a space for the nuts and tap a hole.
Onto the fence, not decided what shape this is going to be yet, so just keep removing wood until I like the feel of it, didn't seem to take any pictures of this.
Drill the holes and inlay the brass for the attachment screws.
Starting to look like a plough plane.
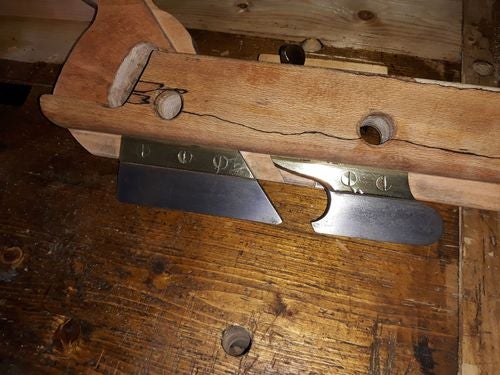
Fit the strike points for microadjustments, chisel out a slot at the front.
The (probably) bubinga I had was a pen blank so I need to glue up some cut offs to make wide enough endgrain plugs for the strike points.
And fit to the slot. Then shape to match teh front of the plane with a rasp.
Thats the one on the front to advance the iron done. And repeat on the top to retract the iron.
Cut out a slot in the fence to allow the depth stop to work in rebates.
And that's it, oil it up and good to go. I think I'll probably re-do the nuts in bubinga when I get around to it.
Should probably have split this into a few different blogs, and I think I've skipped a few steps but couldn't post as I went along because of the plane swap that was going on at the time.
I still haven't got around to redoing the nuts in bubinga.
Lots of work but a beautiful plane! I’m impressed. 👌 The write up was enjoyable too but it are me tired just watching.🙄 I hope you get lots of use out of it and that it brings a smile every time you pick it up.
The early bird gets the worm but its the second mouse that gets the cheese.
Fantastic looking plough plane, well done. The beauty in the tools of old was in the exacting craftsmanship by their creators and you've matched that here. Out of curiosity, what did the original look like?, the one where those beautiful brass fittings and the skate were salvaged from. Do you save original metal components from badly damaged wooden planes? If so, great idea.
That’s a pretty one, Mike! I’ve been thinking of making my own plough plane because the Veritas Combo Plane, plus the Luban 043, plus the old wooden plough plane aren’t enough. I think the major impediment is going to be the screws. Guess I should just try making some of those again one of these days.
Thanks Bently, Yeah, it's heavier than most so mostly get's used for plowing through knotty pine
shipwright Lots of work but a beautiful plane! I’m impressed. 👌 The write up was enjoyable too but it are me tired just watching.🙄 I hope you get lots of use out of it and that it brings a smile every time you pick it up.
Thanks Paul, less a write up and more a general stream of gibberish I think.
LIttleBlackDuck Looks complex B_UK... can I add it to my Puzzle collection?
And thread the screws, always want to keep going and make loads of these when I start, very moreish.
The BLO or the screws?
If you want to chow down on it, use walnut or sesame oil I reckon Duck.
Oldtool Fantastic looking plough plane, well done. The beauty in the tools of old was in the exacting craftsmanship by their creators and you've matched that here. Out of curiosity, what did the original look like?, the one where those beautiful brass fittings and the skate were salvaged from. Do you save original metal components from badly damaged wooden planes? If so, great idea.
Thanks Tom, the brass was salvaged from one that had been heavily chomped on by woodworm, only cost a couple of quid and seemed simpler than trying to make the metal bits myself.
Dave Polaschek That’s a pretty one, Mike! I’ve been thinking of making my own plough plane because the Veritas Combo Plane, plus the Luban 043, plus the old wooden plough plane aren’t enough. I think the major impediment is going to be the screws. Guess I should just try making some of those again one of these days.
Thanks Dave, you could always go with the wedged stem or any of the many other designs instead of screws. You need enough plough planes so you don't need to change the irons right??
Steve Rasmussen That's a beautiful piece and a very informative write up - thanks for sharing!
I do like the look of spalted beech, which reminds me a beech tree came down a few years back in the woods and it should be about right to swipe bits off it now.
Wow! That's one heckuva writeup Mike! I very much enjoyed it. Almost as much work as making the plane. Good on ya! Beautiful plane. Love the Spalted grain... just awesome! I really like the wooden screws. That's something I've always wanted to do but haven't yet. Whose threader did you use?
Rounding plane to make the dowels (First one I got was a Ray Iles one, but I've since made my own).
For the threads I use the cheap screw boxes sold everywhere, they used to be wood bodied, but the new ones are plastic, still work as well, but I preferred the wood.
Which reminds me, I need to get around to trying to make a screw box.