


Share your craft projects
Make new craft buddies
Ask craft questions
Blog your craft journey

HokieKen
8749 posts
and
55 followers
in over 3 years
in over 3 years
More from HokieKen


Carver's Mallet Pair


This project was posted in 2018 on another site so there may be some discontinuity.
This is my entry for the 2018 Lumberjock's Mallet Swap.
My inspiration was this picture:
This is my entry for the 2018 Lumberjock's Mallet Swap.
My inspiration was this picture:

Unfortunately, there was no source information for the picture so I don't know who made it or who to credit.
I really liked the way the different woods converged to create a continuity and I liked the overall shape of the design. What I REALLY liked though was the carved embellishment. Since I couldn't carve that if there was a gun to my head, especially in a wood hard enough for a mallet head, I decided to go a different way.
Instead of attempting to carve into the head, I decided to do a Celtic Knot lamination. I started with Greenheart for the head. This wood is incredibly hard but also very strong and not brittle. Initially I was just going to use some Hard Maple and laminate the knot into the Greenheart blank. But then I thought I would like to see a little more contrast. So, I used some Greenheart and made the lamination in a piece of Hard Maple. Then I cut the Greenheart blank and turned a tenon onto both pieces, drilled out the Maple with the knot lamination and glued it all up.
And don't get me wrong. I'm writing this as if I just glued some stuff up and turned it and shipped it. I think I glued up a total of 6 laminations for the knots and turned 4 complete mallets. One turned out terribly and went to the trash and one was ugly as sin but functional so it resides in my shop as a nice user

So after getting the head blank glued up, I turned it to shape and drilled it out for the handle tenon. I didn't think a through tenon would look good for this design so instead I used a blind wedged tenon that JayT brought to my attention early on in the swap. It's a rock solid joint that required no glue and I can't imagine it ever loosening. The handle was made from a spalted Maple blank with a piece of Greenheart joined to the end as a "pommel".
After I finally got a good one that I was happy with, I was contemplating what to make to go with it. So the idea of a second one with the woods inverted would make a really nice yin/yang pair of whackers. This idea filled me with dread because I really hate doing all the glue-ups :-( But, nevertheless, I knew that was what I wanted so the second mallet with the Maple head and Greenheart handle was born!
The Greenheart is so dense compared to the Maple that I thought the difference was sufficient to give a nice difference in the weights of the two mallets to make it a more useful pair. They ended up weighing in at 8 oz and 11 oz. Not as much difference as I was hoping for but enough to give them a different feel in the hand and make them ideally suited to different tasks.
Comments and questions welcomed as always. Thanks for looking!
22 Comments
Nice! I’d hate to bang that up.
Knowing how to use a tool is more important than the tool in and of itself. - Ron Aylor

Oooh, those are pretty!
The early bird gets the worm but its the second mouse that gets the cheese.

beautiful mallets kenny, not sure which one i like the most. oh hell ill take em both 😁
working with my hands is a joy,it gives me a sense of fulfillment,somthing so many seek and so few find.-SAM MALOOF.
Thanks fellas. I still have some of that Greenheart. I should put it to use and turn a few more of these. It's a useful size and design IMO.
Wow Ken.... very well done!
Mike

Awesome work Kenny. I love all these carving mallets that I've seen people make. I have a few myself, but I still prefer my Wood is Good urethane mallets in use. They are quieter and they don't damage the tool handles on my chisels and gouges like lignum vitae and other hard woods do.
Andy -- Old Chinese proverb say: If you think something can't be done, don't interrupt man who is doing it.

A great pair of Mallets there, both look wonderful. Well done.
Main Street to the Mountains

Great looking mallets. really wonderful.
Ron

Very purdy!
I didn't realize GH was so dark. You could also hollow them out and make Maracas for entertainment.
Nice set of adjusters 🙂
I didn't realize GH was so dark. You could also hollow them out and make Maracas for entertainment.
Nice set of adjusters 🙂

Really nice!
Ryan/// ~sigh~ I blew up another bowl. Moke told me "I made the inside bigger than the outside".
Not sure how you did it Ken but they came out great. I do wish you showed some of your work process photos. They might help me to figure it out. I hope you got something as nice from the swap.
James McIntyre

Those are gorgeous!
James McIntyre
...Not sure how you did it Ken but they came out great. I do wish you showed some of your work process photos.
Sorry James, I don't have any process pics on these. I do have this sketch I did to show how it's all glued up:
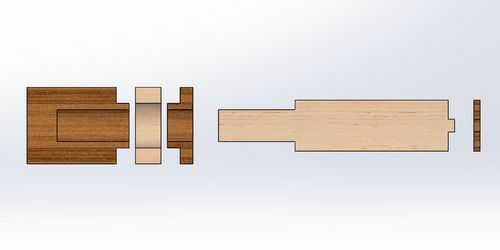
The center piece of the head is where I did the Celtic Knot. You can google how to make a Celtic Knot turning blank if you haven't done it before. There are lots of better explanations out there than I could provide. The handle is attached to the head using a wedged blind tenon. Basically I cut a kerf in the tenon on the handle and made a mating wedge. The wedge is just started in the kerf and then inserted into the head. When the handle is driven into the head, the wedge bottoms out in the bore and then it begins to expand the tenon. Once the handle is fully driven in, it's locked rock solid.
Hope some of that helps!
Brit
Awesome work Kenny. I love all these carving mallets that I've seen people make. I have a few myself, but I still prefer my Wood is Good urethane mallets in use. They are quieter and they don't damage the tool handles on my chisels and gouges like lignum vitae and other hard woods do.
These probably are a little hard and heavy for carving Andy so I agree with you. I don't use a mallet for carving though, I prefer more cooperative wood types 😉, but I use this on my bench chisels and it works well for those. It's even beefy enough for chopping mortises in Oak and so far, no damage to chisels nor mallet.
Thanks for the info Ken.
James McIntyre
Thanks for the info
Ryan/// ~sigh~ I blew up another bowl. Moke told me "I made the inside bigger than the outside".

Whoaaaaaaaaaaaaaa..............Those are super mallets!!!!!!!!!!!
Cheers, Jim
Cheers, Jim
Cheers, Jim ........................ Variety is the spice of life...............Learn something new every day
Wow Ken those are awesome! Flat celtic knot, how'd the frig did you do that?
Petey

Wow!
Those sure are great looking, no way would I ever use them.
These would go on a shelf to be admired.
Those sure are great looking, no way would I ever use them.
These would go on a shelf to be admired.
.................. John D....................
Sorry Petey. I know I'm 8 months late but I do try to never leave unanswered questions about any of my projects and somehow this one slipped by me....
The answer is simply in the angle you do your blank glue up at. Something around 25 degrees will give you a nice wide knot that's more what you would typically see. But if you set your miter at 10 degrees instead, you get the same pattern but in a short, squat look. At this point I couldn't tell you what angle I did my knot glue ups at but I'm gonna guess somewhere in the 10-15 degree range.
The answer is simply in the angle you do your blank glue up at. Something around 25 degrees will give you a nice wide knot that's more what you would typically see. But if you set your miter at 10 degrees instead, you get the same pattern but in a short, squat look. At this point I couldn't tell you what angle I did my knot glue ups at but I'm gonna guess somewhere in the 10-15 degree range.
More from HokieKen