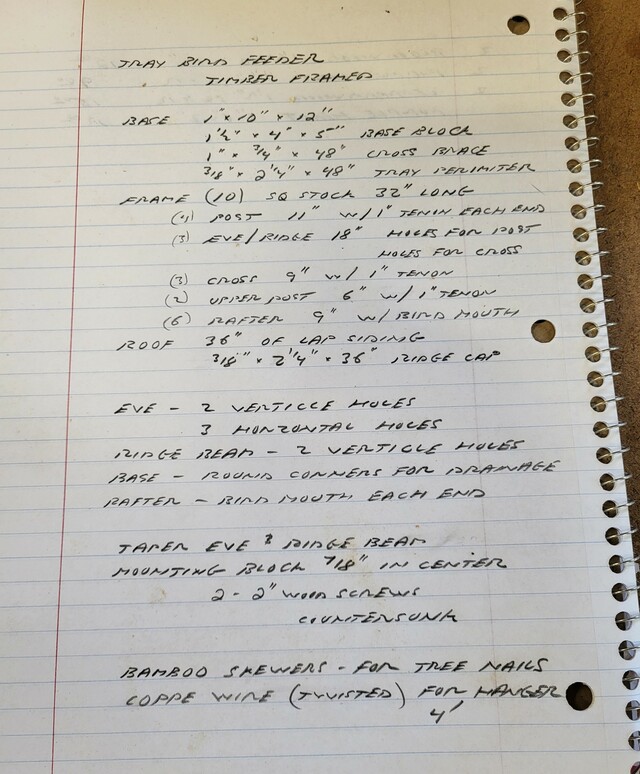
I have noticed a lot of Cardinals in the area, and they like to use tray feeders. So I designed a feeder for them by fiddling with the scrap drops to see what I could come up with. Starting with a base from a 11" 1x10 and 2 18" siding panels, figured out the angle and height and went from there.
Tray Feeder specs: Made with Cedar (drops) Base measures 10" x 12", with the roof being 17" long, standing at 19" high. Finish is Howard's Feed n Wax
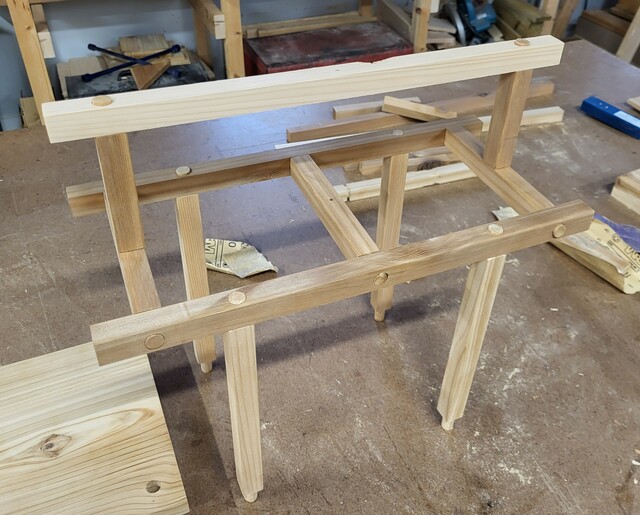
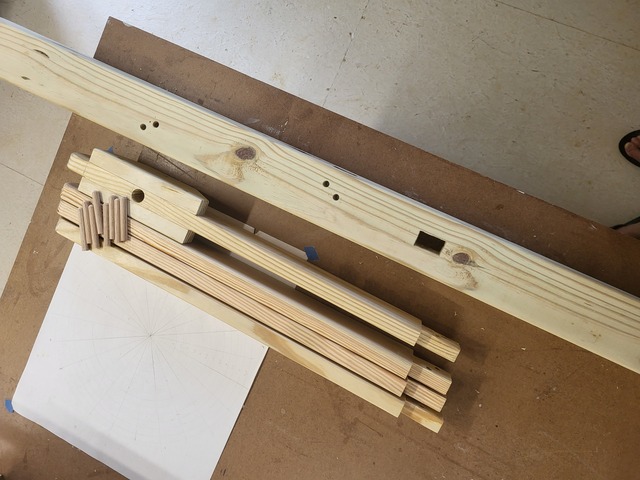
The base has a frame which was ship lapped and includes a 2x block 4" x 5" with a hole for a 3/4" pipe, the cross pieces on the bottom also gave me a little more to secure the banding too. I milled up a bunch of sticks 3/4" square for the timbers. The post were cut to length plus 2" for a tenon on each end. Next up was to cut the eve and ridge beams to length, and the cross beams between the eve beams (plus 2" again), and a vertical ridge post (plus 2" again). Once those were cut to length, I did the layout for all of the mortise joints (1/2" diameter). 4 on the base, 5 on each eve beam, 2 on the cross beams, and 2 on the ridge beam. Set and up the drill press and a fostner bit for all of the mortise joints.
Next up was to go to the lathe, (since I had a bunch of tenons to cut) I made the tenons 1" so I had a little bit to trim. After all tenons were made, I sanded the pieces and slightly rounded over the edges, and the corners of the base are rounded to create a drain hole after the banding is installed.
Dry fit
Next up was to figure out the rafters. I did use the hand plane to bevel the edge of the eve beams and the ridge beam first. then cut out a extra rafter piece and figured out the bird mouth, and the angles that needed to be cut, cut a sample and it fit just a tad bit short on the length. So I added some length and cut the rafters, laid out and cut all the bird mouths. Also cut the roof panels to length.
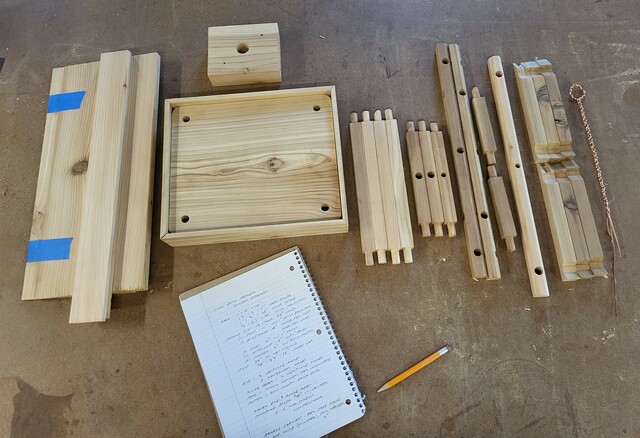
All of the parts and pieces before assembly.
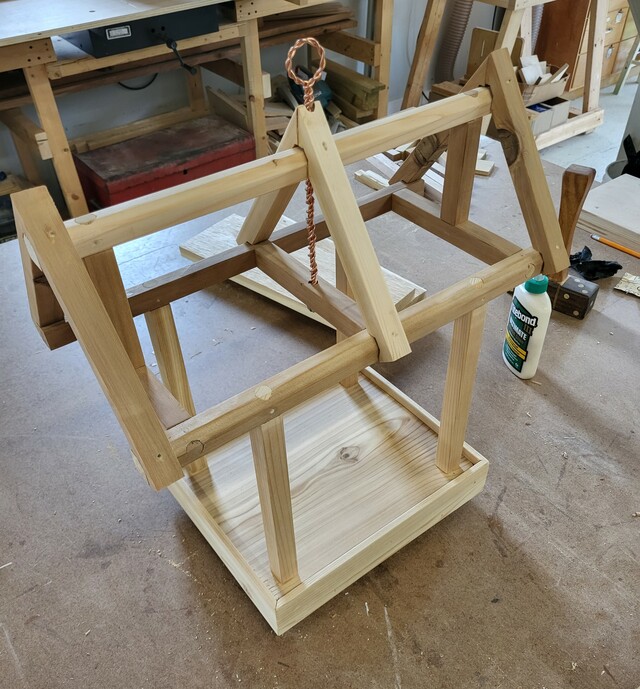
Assembly was a bit of a reverse, due to all of the tenons that need to be fitted, trimmed and pined. (Pins are Bamboo Skewers, through the tenon). Started with the eve beams and cross beams, then the ridge post and ridge beam. after that was assembled with glue (TB III) and pined, and sanded flush. It was on to gluing the post in place, repeat with the pins. After that it was back to the roof and gluing the rafters, those were also pined (tree nails). then the banding was glued to the base again with tree nails.
Framed up.
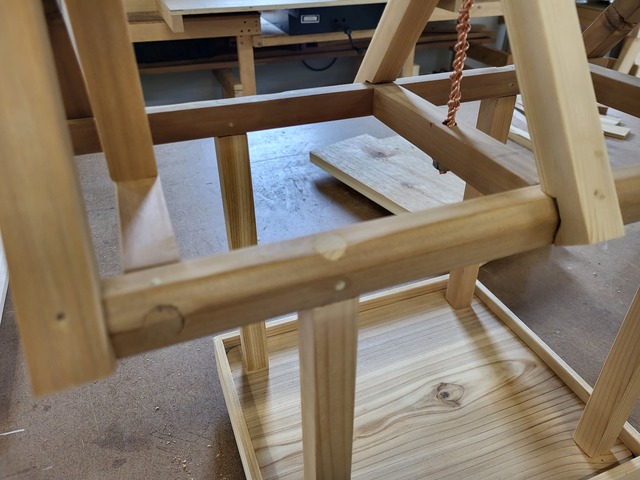
Close up of M&T with the pins.
I needed a hanger for this, so it was off to the copper wire scrap. I took a few feet of #12 and twisted it together, then wrapped around a pipe and twisted again. I was going to wrap the wore around the cross beam at first. Then it hit me, use a 5/16-18 nut to hold it in place, then a drop of epoxy into the nut.
The roof panels were up next. easy to install and used tree nails with glue to secure to the rafters. I have to notch the ridge cap for the hanger, and bevel one edge. Again, glue and tree nails to secure. I need to put a few drops of epoxy in the notch yet to keep the rainwater out.
I let this sit overnight and finished with a coat of Howard's Feed n Wax. That really brought the grain and color out in the Cedar, and it will give some protection for the rainwater.
Thanks for looking and comments are always welcome and appreciated.
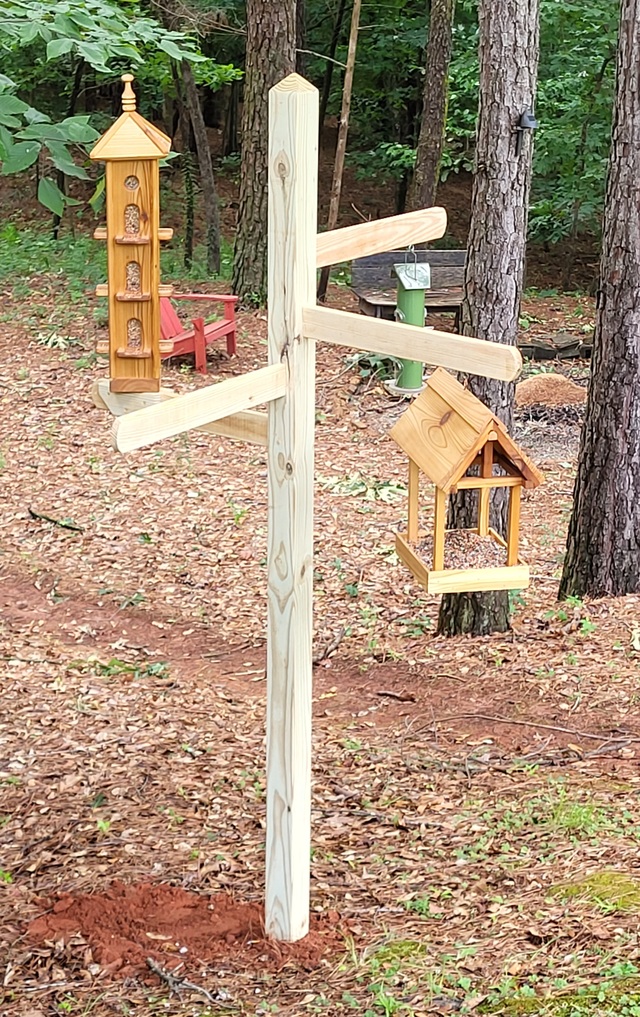
Started a post to hang these past couple of feeders on, had a 10" 4x4 under the shop, adding some arms to hang feeders off of. I'll add a photo after its finished and in the ground.
Ryan, thanks. I use those skewers quite a bit, strong and easy to cut with a razor saw in the small miter box. I keep a drill bit upside down in the index so I know what one to use.
Steve, thanks. Solid it is, and I am happy with the results.
OldTool, thanks. The joinery added the strength I wanted, just made it easier using the lathe.
David, thanks. Always trying to prefect my joinery skills. Practice for an upcoming project.
Another over the top build Eric. That looks like it would survive even being thrown out of a car window on the highway. I see you are someone that knows exactly what you want to build, before you start making dust. I'm always amazed by you guys that can take a picture like this. I need to put or glue everything together piece by piece, so I can figure out what the size of the next piece is. I can never lay all the pieces out like this.
Splinter, thanks. I always liked the timber frame style. Wanted to build the shop like that but it would have cost too much. Hopefully I don't get any squarters, Bear maybe.
ScrapPile, thanks. Yep, the birds moved up a bit.
Dave G, thanks. We have a bunch of them around here, had a couple build a nest in the bush next to the porch in the spring.
Dave P, thanks. I can understand that, the only rats we have around here are what some folks call Tree Rats.
WoodGuy, thanks. The Cedar drops came of a job site a while back, still a bit left over for now. The doweled ends were turned on the lathe, and I used Bamboo Skewers too pin them in place with a bit of glue.
Gary G, thanks. Appreciate the comment of adding it to your build list.
John, thanks. I laid everything out and made some notes so I can build another one down the road. I did not have any plans for this one, I knew how I wanted it to look and just fiddled with a few blocks to get some overall measurements. Then worked my way up with the actual lay-out, until I got to the rafters.


 - Project by Eric - the \"Loft\"")
")
")
")
")
")
")