Share your craft projects
Make new craft buddies
Ask craft questions
Blog your craft journey

SplinterGroup
8581 posts
and
67 followers
in over 3 years
in over 3 years
More from SplinterGroup
Yet another veneering test
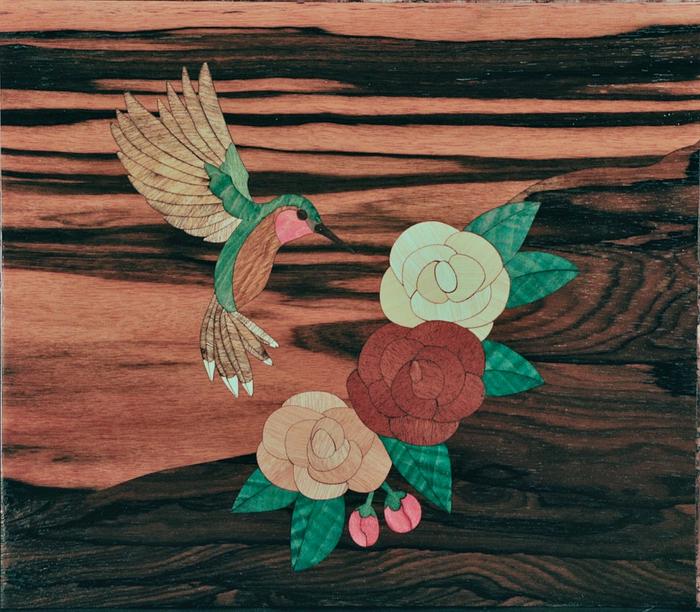
Geometric laser cut parquetry is now quite easy to pull off. The more free-form stuff is where I'm a complete noob.
Working from a mix of drawings I really want to do more natural scenery. Problems (challenges) are getting the details right, such as colors, textures, and all that fun stuff.
With this test, my first of a bird, I wanted to figure out how to start getting small scale details from the wood to work for me versus having to cut everything. No attempts to get clean fits as that is another dimension with veneers all burning differently leaving the shapes slightly altered. Normally it is cut, check shape, then compensate. I'll worry about that later.
This was more of a test with getting colors, I think the green leaves with dying curly sycamore are almost there, the rest is still washed out and "dull".
Has a post-apocalypse vibe!
The feathers were a wood with straight grain, colored with India ink, then final sanded to leave the rays. My painting skills are latex and a foam roller so I won't go the brush route until I get more "autistic" 🤠. I can see sand burning in my future as well, I can burn stuff real good!
51 Comments
looks pretty damn good to me splint. you nailed the leaves and the feathers are looking good to.
working with my hands is a joy,it gives me a sense of fulfillment,somthing so many seek and so few find.-SAM MALOOF.
I'd say you passed the test!
That looks really cool.
That looks really cool.
Thanks guys!
Someday there will be a tool that does all the thinking and work, and I'll be the only one who has it, bwahahahaha!
Someday there will be a tool that does all the thinking and work, and I'll be the only one who has it, bwahahahaha!
Wow! I've done lots of inlay and intarsia but never tried parquetry. It looks very nice indeed!!
Nice job Bruce. I’ve messed with doing this a little and I find it to be very tedious for me. I’ve lost some sensation in my fingers due to spinal stenosis, so I have a hard time picking up tiny things with my meat hooks. I have to use tweezers, so it is a little bit of a pain in the butt.
As you say, the know the real trick to making these things look realistic is the hot sand. It’s the final detail and without it I’m not sure it will ever reach your standards. As you continue your experimentation with parquetry I know you will be warming up sand in your future.
.................. John D....................
Thank you Mr. Rick!
John, thanks!
My issues with the dye and shading is getting past the final sanding, I'm afraid all the hot sand shading would get sanded away, but of course people like Paul can do it just fine (dang experts!)
With the feathers here, I am getting a bit more comfortable with the sanding and control, but my OCD still wants it all smooth and flat. I just need to determine the amount of over-burning so it is just right after sanding. Certainly the 3D shading it provides is an excellent effect.
Paul says he uses veneers all the same thickness, mine are not, but by doing it up side down, the veneering glue tends to shim up the thinner pieces.
I use tweezers exclusively, no way my sausage fingers can get in there!
Wow- looks amazing!
You said a noob, I disagree, very well done, excellent
Ron
It is beautiful work!
Ryan/// ~sigh~ I blew up another bowl. Moke told me "I made the inside bigger than the outside".
Thank you two!
Another "test panel" for that special pile in my shop 🙄
Actually, the flowers (shapes) came out fairly well. Just some better colors and they would make for a good design by them selves, maybe a thorny branch added in for support
Another "test panel" for that special pile in my shop 🙄
Actually, the flowers (shapes) came out fairly well. Just some better colors and they would make for a good design by them selves, maybe a thorny branch added in for support
That is truly amazing Splint!!!! Very well done.
Mike
That is beautiful splint. Probably asking a question you answered in earlier post, but what do you have for a laser?
Thanks Mike, Dan.
I have an Ortur Laser Master 3. 10 Watts optical power.
Really though you only need 5Watts to cut veneer, even less if you go slower
I have an Ortur Laser Master 3. 10 Watts optical power.
Really though you only need 5Watts to cut veneer, even less if you go slower
you are deff to hard on your self this is excellent magnificent and simply wow GR8 JOB 😍😎👍
*TONY ** Denver * ALWAYS REMEMBER TO HAVE FUN
Looks pretty darn good to me. Sand shading is the next step. It will make a big difference.
Good work so far!
Good work so far!
The early bird gets the worm but its the second mouse that gets the cheese.
Nice marquetry project , Bruce. I was going to suggest you pick Paul Miller's brain on the subject but I see he is here and has responded!!
Cheers, Jim ........................ Variety is the spice of life...............Learn something new every day
Big tip o' the hat to y'all!
Yeah, Paul is my closet mentor, I zoom in on his creations all the time. I'm now 100% into trying out the sand shading, get rid of these sudden transitions between shapes and add shadows. The wife says I should use other materials for inlay, hence my Qs about abalone shell and such.
Great to have a few masters here to aspire too!
I still have a variety of cloth dyes and will get to some more dying ala Paul's method.
Would be nice to rig up the laser with a few more degrees of freedom (pitch and yaw) to get tapered cuts for press fits.
If course that comes for "free" with a good scroll saw setup, but not yet ready to take the plunge since that is needed in the bathroom for those times....
This is great work and interesting. I have the LM3 and think this would be something to try. What speed and power did you use cutting the veneer?
I find it fascinating, really see what may have motivated Paul to master it.
Typically I'll use 70% at 10mm/s. Air assist with about 10 LPM to keep the soot from the lens.
Glass plate under the veneer to reduce bottom side burning. My glass is fluted so the smoke can escape but I'd imagine a screen or bed of nails type base would work as well.
Some softer woods can use a lot less power (50% or less) and harder/thicker stuff needs more (75%). The Zircote and Macassar ebony are tough!
Thanks for the parameters!


