


Share your craft projects
Make new craft buddies
Ask craft questions
Blog your craft journey

MsDebbieP
1395 posts
and
54 followers
in over 12 years
in over 12 years
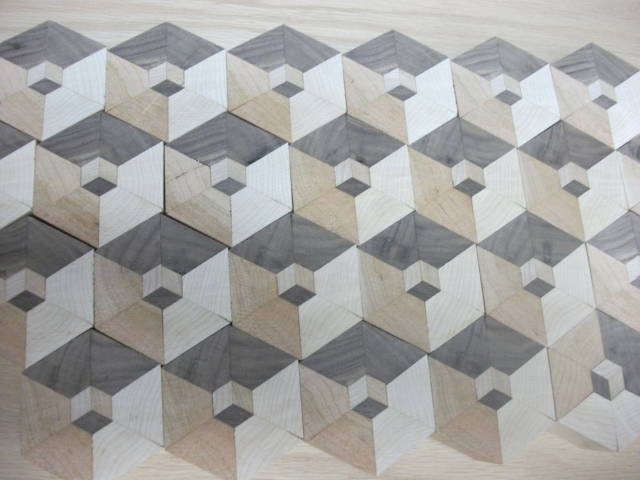
Tips: Cutting Boards
At this time, we have our Quarterly Awards and the subject is “cutting boards”.
What are your tips re: making a cutting board?
JAGO - just a grandma’s opinion
18 Replies

I can attest to that, unfortunately.
Losing fingers since 1969

Guesstimate your material correctly. Err on the “more” side.
once you change your tools setup small errors creep in if you need more material.
These errors adds up during glue up.
Abbas, Castro Valley, CA
Sometimes it pays off to divide your glue up into section so you do not rush and make mistakes.
if you have to glue all at the same time on a complex glue up, get help.
It is very easy to flip or misplace pieces when we are racing against glue setting up.
Abbas, Castro Valley, CA
One more:
Clamping pressure tend to shift pieces around. especially on angled pieces.
Chevron boards are prone to slippage during clamping.
a little pressure at the time helps.
make sure all pieces stay flat. it will save you from extra sanding and thinner than intended cutting board.
Abbas, Castro Valley, CA
Yes, triple check your setup and measure twice:)
it save you a lot of frustration.
notice the gaps:
it wasn’t much on the right hand side but it adds up rather quickly.
another one:
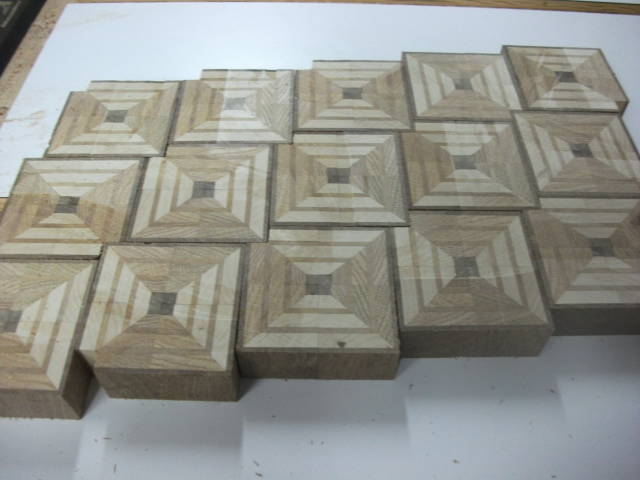
what a let down on both. The cube went to recycle the other was completed and never left my bench. It serves as a reminder.
Abbas, Castro Valley, CA
If you are in a hurry and don’t want to wait for tite bond 3 to dry overnight I use gorilla glue and only have to wait 2 hours for it to be workable again. Not the wood gorilla glue but the yellow stuff that you need to wet the wood to activate it.
Pauls Bored
Cleaning off there excess is fun too! ;-)
Losing fingers since 1969
True that, disposable gloves are great, excess of the boards I use a card scraper to flatten one side then run thru the thickness planer
Pauls Bored

Making these things is very addictive.
BBM
Don’t be cheap with the non-hardening oil.
Over and over again, I see people talk about wiping oil onto a wood surface, then wiping off the excess. This is a total waste of time and material.
Slather the oil on and walk away. You spent a lot of time getting to this point, don’t be cheap with your time now. Let the oil soak in.
I’ve taken thick butcher blocks I acquired, cheap, and drowned them in mineral oil. As long as they’d take the oil, I kept adding. When it slowed down, I doused it again and walked away. In one instance, for a few weeks. When I came back, all the splits, cracks and separations had disappeared.
It takes time for oil to wick from cell to cell. When it disappears, it’s not evaporating. It’s wicking deeper into the wood.
The oil we retard moisture loss or gain too, because it has to get past the oil. Of course, to really be effective, you “have to be sincere about your oiling process.”
I’ve done people’s fences with non-hardening oil and the difference between them and the ones next to them is night and day. If the oil replaces moisture, the wood doesn’t shrink and crack or split. Same with cedar shakes and shingles. Too, they’ll remain more resilient, even in the hot summer.
I wish this video had been about cooking up a cutting board … but we can use our imagination :)
(the video was made after seeing many (similar) cooking videos on Facebook).
Made me chuckle.
JAGO - just a grandma’s opinion

Cool Video Debbie,lots of fun and a beautiful box at the end.
woodworking classes, custom furniture maker
yes, I was holding my breath as it came out — beautiful.
JAGO - just a grandma’s opinion
This is Photoshopped. I tried it and all I got was a cigar box.
ha!! :)
but was it a LOVELY cigar box?
JAGO - just a grandma’s opinion
It was cardboard!
But it might be worth taking to Antiques road show. It looks like it might be hard to tell it from the originals.

Apart form the glue issue what one treats a chopping board will make or break the project. If you are doing these for yourself, that is one thing but for friends or paying customers one would need to be extra careful. If at all possible use a certified food safe product then you can be assured there are no health aspects.
Many non hardening oils are OK but being non hardening, they wear and wash off too easily. Yes, saturation is necessary but no build up should occur as that will hinder any touch ups later on.
The Livos Lady
Livos Lady, what is a certified product, regarding treatment for cutting boards? I am only aware of certifications from private labs, many of them owned by the people getting their product certified. For example, I have associates who own products that were “certified” by official sounding associations like the Washington Dentists Association, which their business owned.
What is a food safe finish is a long running argument on woodworking forums. In the end, it’s pretty much accepted any common finish can be used as food safe, once hardened or dried, if applicable.
In many instances, non hardened are superior to hardening finishes. Not because they wear better, but because they are easy to maintain and remain pliable. Mineral oil is the commonly accepted finish for butcher blocks for that reason.
As previously discussed, a hardening oil, like pure tung oil or linseed oil, once hardened, just as with a poly finish, isn’t easy to “touch up” or maintain. They seal the wood, so future applications are just surface building and fill only the new cuts.
A cutting board can be used immediately after applying a non-hardening oil, though it’s always a good idea to allow it time to soak in, rather wasting it by wiping it off. The oil will swell the wood grain, which is why mineral oil can make cracks and splits in dried cutting boards disappear.