


Share your craft projects
Make new craft buddies
Ask craft questions
Blog your craft journey

MsDebbieP
1395 posts
and
54 followers
in almost 12 years
in almost 12 years
WoodworkingWeb Theme: INLAY
Want to take your woodworking creations to another level? Maybe it’s time add a little something using inlays!
What is INLAY?
Basically, it is creating a hole/gouge in the wood and gluing something inside it. Although the goal is simple, the process is all in the precision and the details.
Where to begin? After you have the vision of what you want the end product to look like, the first step is creating the pattern. Next step is creating the hole for the inlay – using a router, chisels, power tools such as a Dremel, CNC machine, lasers .. or whatever technique you prefer.
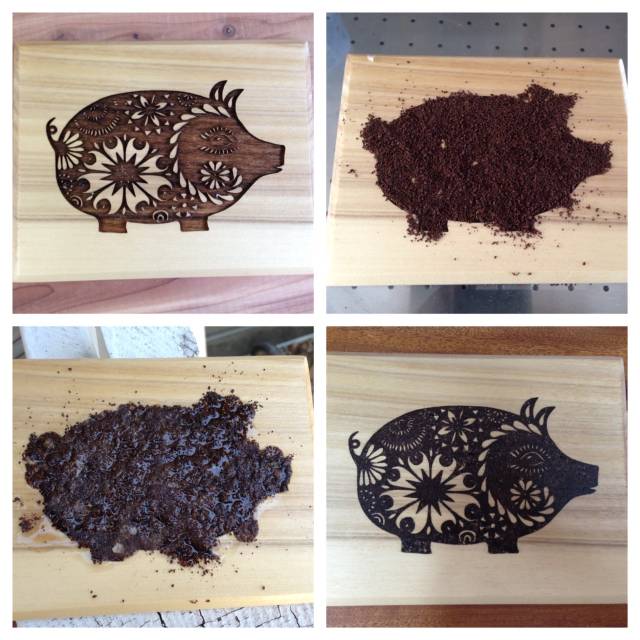
What can you put in the hole? Well, pretty much anything, really. You can use the same wood, but rotate the direction of the grain; you can use a different type of wood, creating a contrast in colour or grain; you can use pebbles, gemstones, or rhinestones; you can even use coffee, like Terry did in this project.
Now what?
Making it stick: add the glue, let it dry and sand. Ok, that’s pretty basic, but I’ll let the experts share their tips, cautions, and strategies!
WoodworkingWeb INLAY Creations (tagged as INLAY)
Your Turn
- Share your tips/strategies for doing inlay in the comments below.
- Post your inlay creations and be sure to tag them as INLAY and embed them in the comments below
-——————————————————————————————————————————————————————————————-
REMEMBER TO TAG YOUR CREATIONS … so that they are shown in the THEME galleries!
-——————————————————————————————————————————————————————————————-
JAGO - just a grandma’s opinion
4 Comments

I love to inlay! It’s a really fun way to color with wood, create something fun or very traditional!
You can use it in furniture, jewelry or wall art…
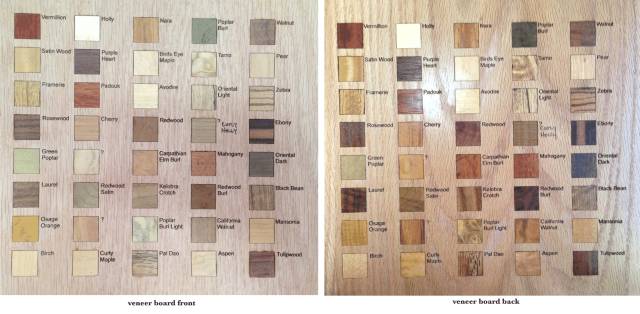
I prefer to use plain wood veneers and just the natural colors (I very seldom use dyed veneer – personal choice). When I first started doing veneer inlay, I made myself a veneer sample board. On one side it is the natural raw veneer and on the back side is the same veneers but with a finish on them so I could see them in all their glory. This made it easier for me to pick veneers for a certain look or feeling.
oh wow.. that’s impressive!
JAGO - just a grandma’s opinion
We have long had a debate with one of our friends (that does finishing and restoration finishes for a living) on ‘How to do an inlay and then stain the wood without staining the inlay’. He told me it would be nearly impossible unless I found a way to mask off only the inlay areas really well so there would be no bleed from the stain. It would be very difficult at best because with inlay there is a lot of sanding involved and you don’t want to sand the finish off the board…
I took this on as a challenge – I love challenges! For me, it’s finding out what works or doesn’t – learning a new skill or quit wasting my time!
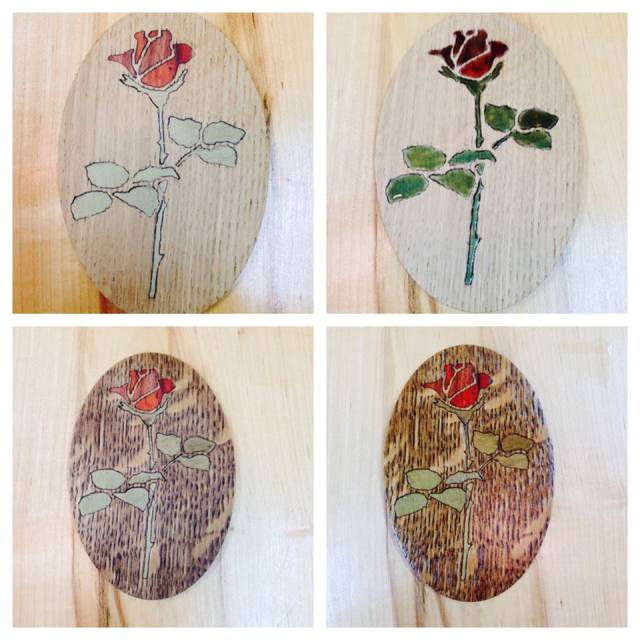
This was my experiment:
Top left is quarter-sawn Oak with a rose inlay, top right I hand painted a water based liquid mask over the unfinished inlay. Bottom left we stained the Oak with a walnut stain (which was too dark for my liking, but great for my sample). Now I had to get the masking stuff off my bare wood which was a task all on it’s own. I used a damp scrubby sided sponge to get it all off. Once it dried, I lightly sanded and sprayed the sample with a clear enamel. Finished sample is the bottom right. It worked, though I do not think I would try this on a large project – but great for a small one.
I love people who love a challenge — and we all get to learn from the experiment!!!
Well done.
JAGO - just a grandma’s opinion