


Share your craft projects
Make new craft buddies
Ask craft questions
Blog your craft journey

shipwright
2073 posts
and
113 followers
in over 12 years
in over 12 years
Watercolour Dye Technique #1: General Concept
This is
part 1
in a
7 part
series:
Watercolour Dye Technique
This is the blog that I promised detailing my experiments in what I call "watercolor style" aniline dying. My sincere hope is that it will encourage some of you to jump in and help develop what I think is a huge potential of which I've only scratched the surface.
The idea of hand dyeing pieces of inlay or marquetry came to me because I was frustrated by the limited array of colors available to me in the veneer and solid wood supply to which I have access. I was enjoying the idea of inlay and contemplating more complex marquetry, but as you can see in the examples of my pieces below, I clearly could have created a much better representation if I had more colors in my palate. Colors particularly difficult to come by in wood are greens and blues. These would make oceans, skies, trees, leaves and many other things more lifelike and more vibrant. I know that convention in marquetry is that you use a wide variety of woods and make do with what nature gave you, but I'm not really all that good with rules and besides, I don't have access to a supplier of veneers where I can go and pick through samples looking for the right colors.
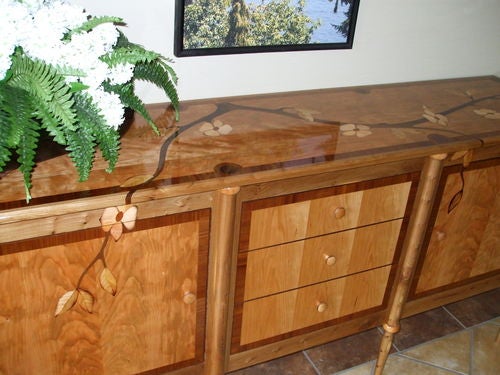
These are two of my earliest inlay pieces, done with a router inlay set. They're nice enough but lack, in my mind anyway, an "edge".

I started by searching the internet for dyeing techniques in marquetry, aniline dyeing techniques, dying inlay etc. and only came up with a couple of suppliers who would sell me pieces of plain light colored wood that had been pressure saturated with some color. That wasn't what I was looking for. Next I bought a set of 12×2 oz. bottles of liquid aniline dye http://www.woodessence.com/ColorFX-Dye-Trial-12-Color-Kits-P51C12.aspx and started experimenting.
After some fooling around I decided to give it a go on my "Cabinetree" project. The tree trunk was dyed in a fairly conventional way, blending a few colors with sanding in between.

When it came time to do the fall representation of Big Leaf Maple leaves, I cut the marquetry with the grains running the way that the leaf 's veins would run, more or less, but all out of maple, almost. I did use a few pieces of Walnut where the leaf curled up and was in shade, but other than that the whole marquetry was the same color. Not too impressive, I agree.

That was when the experimenting really got into gear. I decided to try to "watercolor" paint with the dye in a wet on wet style, using artists' brushes and double strength dye mix.

I started with the lightest color, yellow here, and flooded the piece, allowing it to get quite wet.

Then I added some green near the base of the center vein to show the last of the summer color hanging on. This was added while the yellow was still wet and allowed to just bleed with the grain. There's lots of room for experimentation here with different techniques, concentrations and solvent mixes. Aniline dyes can be mixed with water or alcohol or a mixture of the two. Further, there are three different alcohols (methyl, ethyl,and isopropyl) that you can use , each with it's own properties. Different combinations will exhibit different "bleed" characteristics.

Finally I added the dark decaying color around the edges. This didn't seem to bleed back into the yellow on it's own but after a bit of experimenting I discovered that I could blend it very nicely by re-wetting it. This can be done with water, an alcohol or, as I did here, by dragging a brush dipped in yellow from the yellow out into the burnt sienna. There's lots to play with here.


That about covers what I learned about dyeing in the "Cabinetree" project. It only scratches the surface of the potential for this style and there's lots of room to improve and expand the technique.
Next time I'll go into the new ways I used the technique in "Facets" and show some of the tricks I've learned.
Thanks for checking in and for your interest. I hope I can inspire you to experiment with this stuff. It is a ton of fun.
Paul
The early bird gets the worm but its the second mouse that gets the cheese.
4 Comments

Interesting process, but it allows one to get the colors that look right.
Main Street to the Mountains
Interesting, Paul. Thanks for sharing. I’ll definitely follow along.
Half of what we read or hear about finishing is right. We just don’t know which half! — Bob Flexner
Martin has made blog transfer sooooo easy!!
This whole series only took about 15 minutes!
This whole series only took about 15 minutes!
The early bird gets the worm but its the second mouse that gets the cheese.

Thanks Paul!
Artistry in action.
Artistry in action.