


Share your craft projects
Make new craft buddies
Ask craft questions
Blog your craft journey

Brit
593 posts
and
41 followers
in almost 12 years
in almost 12 years
More from Brit
YouTube makes me laugh
Beginner's Guide to Sharpening Western Saws
The Humble Hand Brace - A Beginner's Guide to Restoring, Buying and Using #8: Part 8 - Tips and Tricks on Using a Hand Brace
The Humble Hand Brace - A Beginner's Guide to Restoring, Buying and Using #7: Part 7 - Sharpening an Auger Bit
The Humble Hand Brace - A Beginner's Guide to Restoring, Buying and Using #6: Part 6 - What to Look for when Buying a Secondhand Brace and more
The Humble Hand Brace - A Beginner's Guide to Restoring, Buying and Using #2: Part 2 - Cleaning and Restoring a Brace to 'Like New' Condition
This is
part 2
in a
8 part
series:
The Humble Hand Brace - A Beginner's Guide to Restoring, Buying and Using
-
Part 1 - Restoring a Brace to 'Like New' Condition
-
Part 2 - Cleaning and Restoring a Brace to 'Like New' Condition
-
Part 3 - Cleaning and Restoring a Brace to 'Like New' Condition
...
- Part 1 - Restoring a Brace to 'Like New' Condition
- Part 2 - Cleaning and Restoring a Brace to 'Like New' Condition
- Part 3 - Cleaning and Restoring a Brace to 'Like New' Condition
...
Part 2 - Cleaning and Restoring a Brace to 'Like New' Condition
At the end of Part 1 I showed you a photo of the polished chuck. The outside was complete and the rust had been removed from the inside, but I still had to smooth the inside face to prevent it marking the jaws again. To do this, I cut a piece of dowel about 4" long, and marked approximately 1 1/6" in from one end using an awl.
At the end of Part 1 I showed you a photo of the polished chuck. The outside was complete and the rust had been removed from the inside, but I still had to smooth the inside face to prevent it marking the jaws again. To do this, I cut a piece of dowel about 4" long, and marked approximately 1 1/6" in from one end using an awl.

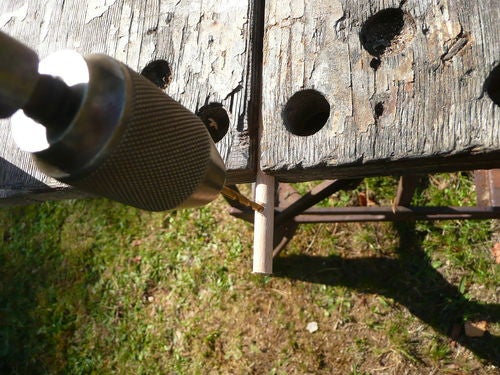
Then I drilled a 3mm hole using a hand drill. Well who's got time to charge batteries these days?
Using my dovetail saw, I cut a slot about 1/16" wide straight down to meet the hole. It doesn't have to look good and just to prove it…

I cut a piece of scouring pad and slid it down into the slot. The important thing here is that the size of your scouring pad is small enough so that it only works on the inside diameter of the chuck that the jaws mate with and not the internal thread. You don't want to wear the thread away or the chuck will be a sloppy fit when you come to reassemble it.
Then I mounted the other end of the dowel in my hand drill (yet another thing waiting to be loved).

After lowering the scouring pad into the hole, I turned the handle and after about 5 minutes the inside was nice and smooth. I couldn't get a good photo of the inside, so you'll just have to take my word for it.

With the chuck completely finished, I turned my attention to the brace body. The first step was to mask up the sweep handle.

De-rusting it is the same process that I used for the chuck and jaws. First I applied the degreaser.

After 5 minutes, I scrubbed it with an old toothbrush. The threads were caked in hardened black grease and grit and took quite a bit of scrubbing to get clean.

I then washed off the degreaser, dried it with a paper towel and applied the rust remover gel. (Where would I be without that old toothbrush?). On the first brace that I restored, I made the mistake of applying the gel to both ends at the same time. When it came time to scrub it with the wire brush, the only thing left to hold was the sweep handle which of course rotates freely. Therefore I couldn't hold the brace firmly while I was brushing it and got in a right mess. So now I work on each end individually, thus ensuring I've always got something dry to hold on to.

After 20 minutes, I scrubbed the ratchet end with my new wire brush, washed it off and dried it again with a paper towel.

As you can see, there is still some rust that needs to be removed.

I applied another coat of gel, waited 15 minutes, scrubbed it again with the wire brush and washed it off. The rust was now completely removed and therefore I needed to dry it thoroughly this time. So I borrowed the wife's hair dryer (I haven't needed one for some time now ) and kept the heat on it until the metal was very warm and any remaining moisture had evaporated.
Tip: It is better to take the hair dryer to the tool, than to let your better half catch you in the house with a dirty wet tool. Don't ask me how I know. Oh yeah, and wash your dirty hands before you use it too. You have been warned!

Even if you dry it straight away, you may still get some flash rust forming on the surface as shown below. This is nothing to worry about and will come off as quickly as it appeared.

At this point, before I begin cleaning and polishing the external metal surfaces, I like to start the healing process on the internal surfaces that you can't see. For this I rely on tried and tested 3-IN-ONE oil, which I think is pretty much universally available. It cleans, lubricates and prevents rust. Before I applied the oil, I used a pin to remove any grease and dirt from the oil hole. Its best to use a pin with a plastic head so you can't accidentally drop it in the hole. Just wiggle it around to clear out any crap that might be lurking there.

I applied a couple of drops of oil to each of the points shown in the photo below.

Then I turned the ratchet selector so as to engage the ratchet (it doesn't matter in which direction), gripped the threaded portion of the ratchet in one hand and began turning the sweep handle with my other hand so that the ratchet clicked. Whilst doing this, I held the brace at different angles to encourage the oil to flow over all the internal surfaces. After about a minute, the rust and dirt was carried out in the oil and I wiped it off with a paper towel.
Note: During the course of this restoration, I will repeat this step at various stages until the colour of the oil coming out is the same as the colour of the oil going in. That's how you know you're done. The reason I start applying the oil at this point is because as I start to file and sand the external metal surfaces, tiny particles of metal and abrasive will stick to the oil and work their way into the mechanism. By then applying more oil and working the ratchet again, the abrasive particles help to clean the internal surfaces too. When you've finished working the external surfaces, a couple more applications of oil will clear out any remaining metal dust and abrasive particles.

My approach to smoothing and polishing the ratchet and body is to start with the files, then work up through the grit sizes starting with P240, then P400, P600, P800 and finishing with P1200. Finally I polish all the surfaces that I can with 0000 steel wool. Don't let me mislead you here, it takes a while to do this by hand. Buffing wheels charged with various rouges would be quicker, but not everyone has them (including me). Also buffing wheels tend to blur the transitions between adjacent surfaces and round over edges too much.
Anyhow, I followed the above procedure on the ratchet mechanism and housing and then it was time to do the bar that connects the ratchet to the sweep handle. I gripped the brace in the vice as shown below.

At his point, I thought it might be useful to demonstrate how to file cylindrical objects whilst maintaining their roundness. I'm using a half-round file for this part, so I only need to turn it over in order to do the inside of the curve.

A lot of people would simply follow the curvature of the surface and that is a way to do it. However, you will maintain the roundness better if you employ the following technique.
Hold the file handle in your dominant hand and the tip of the file with your other hand (I'm left-handed). Place the tip of the file on the surface. The handle should be up in the air, so that the file is pointing downwards as shown below:

Using light to medium pressure, push the file forward and at the same time lower the handle. At the middle of the stroke, the file should be horizontal like this:

Keep pushing forward and lowering the handle until you end up in this position:

That completes one stroke of the file. LIFT the file off the surface and return to the starting position. Repeat this motion as you work your way around the metal bar. Keep your eyes on the scratch pattern you are leaving behind after each stroke and adapt your angle of approach accordingly.
Note: Lifting the file off after each stroke instead of dragging it back over the surface will double the life of your files. The teeth are only designed to cut in one direction and dragging them over a metal surface in reverse will only dull the teeth. Now back to the brace.
After filing the entire surface to remove any pitting, I turn to the sandpapers. Although they come in sheets, don't be afraid to cut off strips and fold the paper into shapes to suit the area you're working on.
Here I'm running a strip of P240 back and forth to remove the file marks.

After working up through the grits, and polishing it with the steel wool, it starts to shine. You know you've done it right if you see some nicely defined reflections in the surface.

To do the collar that keeps the ratchet selector from sliding up the bar, I used a flat file with a safe edge (no teeth).

This allowed me to file right next to the bar without marking the surface I'd just polished. To be on the safe side though, I also masked the bar up.

So there you have it, I'm going to call the ratchet end done. I think you'll agree it's a stark contrast to the other end.

The more astute amongst you will have noticed that I haven't bothered to file and sand every part. For instance the pawls and the ratchet selector. I left these for two reasons. Firstly, it would be difficult if not impossible to do and secondly, I like the contrast that they give to the more polished components. Here's a closer look at the ratchet end of the brace.

In Part 3, we'll do the other end of the brace and rub down the wood ready for finishing.
Thanks for watching!
Andy -- Old Chinese proverb say: If you think something can't be done, don't interrupt man who is doing it.
2 Comments

Plus 1
Main Street to the Mountains

Impressive progress!
More from Brit
YouTube makes me laugh
Beginner's Guide to Sharpening Western Saws
The Humble Hand Brace - A Beginner's Guide to Restoring, Buying and Using #8: Part 8 - Tips and Tricks on Using a Hand Brace
The Humble Hand Brace - A Beginner's Guide to Restoring, Buying and Using #7: Part 7 - Sharpening an Auger Bit
The Humble Hand Brace - A Beginner's Guide to Restoring, Buying and Using #6: Part 6 - What to Look for when Buying a Secondhand Brace and more