


Share your craft projects
Make new craft buddies
Ask craft questions
Blog your craft journey

Brit
593 posts
and
41 followers
in almost 12 years
in almost 12 years
More from Brit
YouTube makes me laugh
Beginner's Guide to Sharpening Western Saws
The Humble Hand Brace - A Beginner's Guide to Restoring, Buying and Using #8: Part 8 - Tips and Tricks on Using a Hand Brace
The Humble Hand Brace - A Beginner's Guide to Restoring, Buying and Using #7: Part 7 - Sharpening an Auger Bit
The Humble Hand Brace - A Beginner's Guide to Restoring, Buying and Using #6: Part 6 - What to Look for when Buying a Secondhand Brace and more
The Humble Hand Brace - A Beginner's Guide to Restoring, Buying and Using #3: Part 3 - Cleaning and Restoring a Brace to 'Like New' Condition
This is
part 3
in a
8 part
series:
The Humble Hand Brace - A Beginner's Guide to Restoring, Buying and Using
-
Part 2 - Cleaning and Restoring a Brace to 'Like New' Condition
-
Part 3 - Cleaning and Restoring a Brace to 'Like New' Condition
-
Part 4 - Cleaning and Restoring a Brace to 'Like New' Condition
...
- Part 2 - Cleaning and Restoring a Brace to 'Like New' Condition
- Part 3 - Cleaning and Restoring a Brace to 'Like New' Condition
- Part 4 - Cleaning and Restoring a Brace to 'Like New' Condition
...
At the end of Part 2, I left you with this photo showing how the ratchet end of the brace looked after de-rusting it and polishing it up. I still had the other end to do.
So I went ahead and de-rusted the 'Head' end of the brace using the same process I covered in Parts 1 and 2. You don't need to see that again. After the rust came off, I found confirmation that this was indeed a Skinner brace made in Sheffield, England. I was pretty sure it was, because I've got a 6" Skinner brace that is identical, but its nice to see it in the steel.

Before I started to file and polish the 'Head' end of the brace, I decided to try to fix something that I knew would irritate the hell out of me every time I used this brace, if I didn't fix it. As you can see from the photo below (taken before the rust was removed), there is quite a lot of excess movement between the sweep handle and the end caps. This is quite a common problem on old braces. When wood rubs against metal, guess which one looses? You can see that the metal end caps have worn an undercut in the ends of the sweep handle and it felt really sloppy in use. I've never tried to fix this problem on any other brace that I've restored, but I had to try this time if I was going to enjoy using it.

I grabbed a piece of scrap hardwood (Sapele in this case) about 1 3/4" x 1 3/4" and cut off a piece 5" long. The diameter of the metal bar on the brace is 12mm, so I found the centre of one of the sides, marked 6mm each side of the centre line and drew two parallel lines along the length of the wood. Using my carcass saw (filed rip), I sawed down to a depth of 1" on both the lines. Then I had a coffee while a rain cloud passed, dried my saw and gave it a light coat of Camellia oil.

After making the two rip cuts, I chiselled out the centre piece and cut it into two 2 ½ " pieces using my other carcass saw (filed crosscut).

Here's the two pieces that make up my jig for fixing the sloppy sweep handle.

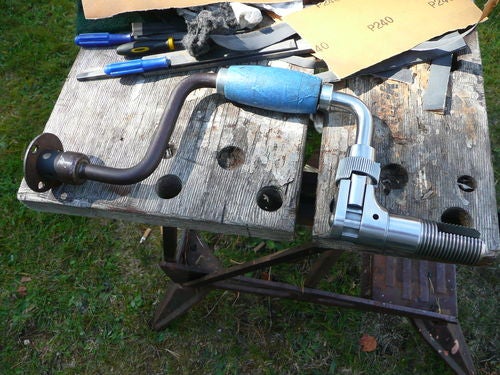
The photo below shows how the jig fits on the brace. The two pieces slide over the metal bar and end up centred over both of the end caps. This should allow me to apply an equal force over most of the end cap shoulders whilst keeping the end caps square to the ends of the sweep handle. At least, that's the plan.


I gripped one part of the jig in the vice, slotted the brace into it, held the other part of the jig in my hand and lightly tapped the top of the block with a mallet. I really sneeked up on the right amount of force, as I knew that too much would cause the sweep handle to lock up completely and that would be very difficult to fix. However, as it happened I lucked out. When I checked how much play was now in the sweep handle, it was perfect. I like it when a plan comes together.

So after breathing a sigh of relief, out came the files and the wet and dry paper and I set about removing the pitting from the Head end of the brace, polishing it up through the grits and finishing with 0000 steel wool. The following two photos show how the brace looks now. I still need to polish it a little more in a couple of places, but the grunt work is now behind me and the finish line is in sight.


I know I said at the end of Part 2 that I would rub down the wood in this episode, but the light was failing and I was getting really tired of getting everything out and putting it away again every time it rained, so I'll save that for Part 4. What I did do in preparation though, was to wipe over the sweep handle and the head with methylated spirit to remove most of the grease and dirt from the surface. I've found in the past that if you don't remove any grime before you sand, you end up smearing it over the newly exposed bare wood and having to sand more than you needed to get rid of the marks again.

So there you have it folks, we're nearly at the end of this restoration (YIPPEE!!!). In Part 4, I'll share a few finish recipes that I think are suitable for a hand brace along with the finishing regime for each one.
Don't forget that Part 4 will of course end with reassembly and THE GREAT UNVEILING
Andy -- Old Chinese proverb say: If you think something can't be done, don't interrupt man who is doing it.
1 Comment

+1
Main Street to the Mountains
More from Brit
YouTube makes me laugh
Beginner's Guide to Sharpening Western Saws
The Humble Hand Brace - A Beginner's Guide to Restoring, Buying and Using #8: Part 8 - Tips and Tricks on Using a Hand Brace
The Humble Hand Brace - A Beginner's Guide to Restoring, Buying and Using #7: Part 7 - Sharpening an Auger Bit
The Humble Hand Brace - A Beginner's Guide to Restoring, Buying and Using #6: Part 6 - What to Look for when Buying a Secondhand Brace and more