My BIL is/was a Navy Diver until this past weekend when he retired. Throughout his 24 year career he has collected a LOT of challenge coins and for a long time has been wanting a way to display them all. So when he scheduled his retirement last July my sister called me and said that he had hinted that he didn't care for the shadowboxes he's seen that the Navy provides and wondered if I'd be up for making his. Naturally I was more than happy to do it.
I'll try to keep this post to a minimum because I detailed the whole build pretty thoroughly in a blog series. So if you need any blanks filled in about construction or methods, give the blogs a gander.
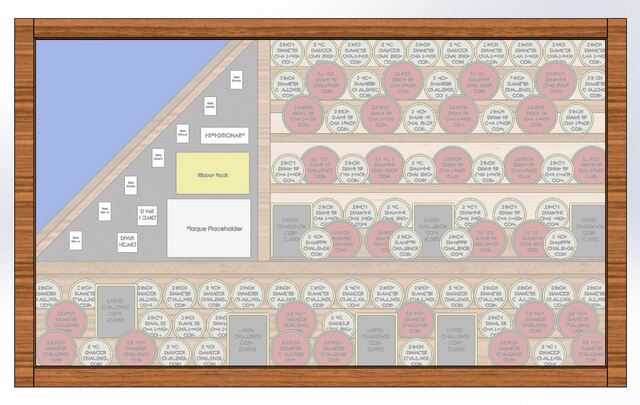
From discussions with him, he wanted it primarily to hold all his coins (at the time he said about 100, I think he underestimated...), his pins/ribbons, a small plaque, and his retirement flag. Initially he said "I really like all the stuff you've made for family so you can just do it however you think is best, I trust your instincts." But, since he had so many coins and had been wanting something like this for so long, rather than surprising him, I involved him heavily in the whole design process and I'm glad I did because I probably would have gone a different route.
We discussed overall shape first. Wide/short or tall/narrow? Door or rear access panel? Door lifts or swings? Etc. Etc. So he sent me some pics of designs he liked and they were all of the wide/short variety so I started there. He said he trades coins with other service members/Vets often so would need to access them easily so we went with a door. And he knew it would hang over his sofa so a door that lifted would be difficult to reach. So a swinging door it was.
I asked about what kind of wood and he was prompt to reply "all Walnut." So that was easy. I suggested some contrasting wood either for the background or for the shelves so it wasn't so dark and didn't all blend in together but he was pretty firm on everything being Walnut so that's how we went.
He has sent me a picture of one example he liked that was configured roughly like a flag with the upper left corner having the flag and medals and the rest of the box having a uniform and some other memorabilia and said he really liked it. So from there I had enough to launch a concept and created a CAD model to start from. Over the next few weeks, I would send him screen caps with questions and get his feedback and eventually we got to this design and he was happy with it. So from there, he said if it was generally like that he was good and wanted me to figure out the joinery and hardware myself so he didn't inadvertently make it more complex or harder than it needed to be. So that's what I did.
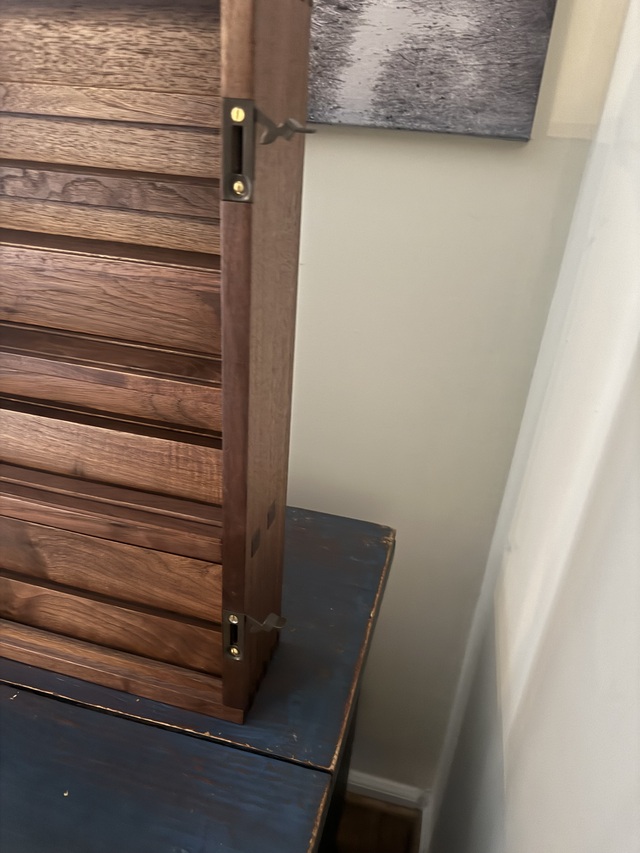
I settled on box joints for the case construction, thru M&T for the horizontal divider piece and all the shelves glued into dados in the 3/4" plywood back panel. I did ask him whether he wanted glass or acrylic in the door and he said he would prefer the acrylic so that's what I used. The door construction is rail and stile. It's basically like a raised panel door but with plexiglass instead of a raised panel.
I won't go into detail on the construction here. If you are interested, the blog series details it pretty thoroughly but feel free to ask any questions in the comments!
The construction is a Walnut plywood back panel and everything else is some air-dried Walnut I've had on the rack for a few years. The rough sawn air dried stock definitely presented a lot of challenges in dealing with knots and other defects but it was a helluva lot cheaper than buying cabinet grade KD stuff! The medals and pins are mounted on piece of 1/4" Walnut plywood. I had to drill pilot holes for all the pins but he was pretty sure he wanted them on wood rather than on felt so I was happy to do it. There are trim pieces around the flag section to hide the edges in case he had to "fudge" the folded flag to get the right size (which he did) and the 45 degree piece that seperates the flag from the medals was left loose so it can be removed to make it easier to get the flag positioned and so that if he changes his mind about the medals on wood he can remove that insert and I gave him a piece of black felt so he can take the plywood off and cover the piece of Kaizen foam behind it with the felt. He said it's a non-issue though because he really likes the wood backer.
The finish is Satin Arm R Seal. 3 coats were applied to everything except glue surfaces before the final glue up other than the exterior faces of the case and the back panel which were finished after assembly. I made a boo-boo and accidentally put finish on the glue surfaces of the stiles on the door and didn't catch it until after the fact. I warned him about it and sure enough, when he was loading it up, the joints on the hinge side popped loose 😫 Fortunately he had glue and sandpaper and clamps and after calling me to make sure he was doing it right, he sanded back past the finish on the joints and re-glued them and said they're rock solid now. Other than that issue, I did manage to catch and correct all my boo-boos along the way so I am really happy with the final product. And more importantly, HE is really happy with the final product.
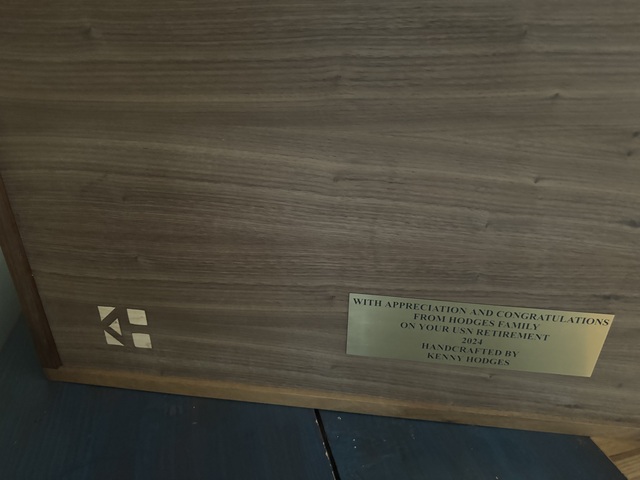
I included my maker's mark on the back panel with a Maple inlay. And he and my sister insisted they were paying for my materials and labor but I wasn't charging for labor as my retirement gift and a general thanks for his service. And I had no intention of letting them know how expensive Walnut has gotten so I figured I'd refuse and if they were overly insistent, I'd tell them $100 would cover everything. But then my mom called me a while back and said she and my brother had no idea what to get for a gift and wanted to know if I would let them pay me for the box as their gift. I was fine with that since it did run up a pretty significant tally even excluding the value of the Walnut I already had on hand. So they paid me what I let them and my mom (after asking my permission 😉) had a plaque made to go on the back.
The hardware is SOSS invisible hinges and on the opposite side, I used some casket latches that my buddy RyanGI powdercoated for me because I didn't care for the look of black which is the only finish I could find them in.
I think that's enough detail. Like I said, the blog series is available and is pretty exhaustive. I want to express thanks to all who followed the blog and offered suggestions and ideas when I was in need! Thanks for looking and questions and comments are welcomed as always!
i know how you sweated over some of the issues in building this but it really came out fantastic. i agree with your BIL on going all walnut. well done my friend.
working with my hands is a joy,it gives me a sense of fulfillment,somthing so many seek and so few find.-SAM MALOOF.
I don't know if you have served, but one of the most amazing things about having a nice display case such as this is that it makes-real the events that transpired. You're never allowed to talk about any of it, and sometimes that can lead to the situation where people question you, the stories, and it hurts.
What hurts even more is when the people that you can talk about those times with pass away.
You did good work, Ken.
As an aside, I just now saw the "KH" in your logo. Wow, I can't believe I didn't see it before.
All-in-all, I'd put your work on-par with Harvey Ellis. Very good stuff.
Excellent work Ken. It came out great. That is a LOT of challenge coins. I know from mine, some of them have a lot of heft. Good thing you added the extra strength. Great job!
WOW. Far and away the best, most detailed, and especially planned, shadowbox build I have ever seen. Kenny you nailed it and I imagine over the stock version available to the troops the BIL is a happy camper. Great build.