


Share your craft projects
Make new craft buddies
Ask craft questions
Blog your craft journey

Mike40
1078 posts
and
35 followers
in over 11 years
in over 11 years
A STORAGE SHED FOR MY BBQ GAS GRILL #1: CONSTRUCTION - THE SIDES
This is
part 1
in a
10 part
series:
A STORAGE SHED FOR MY BBQ GAS GRILL
The reason
My wife doesn’t like storing our big gas grill in our garden shed because it takes too much space (and she keeps buying more outdoor furniture to store in it over the winter). My solution to keep her sweet is to build a small shed to house the grill year around in the area on our terrace where we use it.
Construction details
The shed isn’t too different from any other building and a frame could just be knocked together with a hammer and nails, but what’s the fun in that? So looking for a way to stay in my shop and have some fun (it’s been raining every day anyway) I decided to do the side frames with mortise and tenon joinery and pinned joints. I know this is way overkill, but I had a lot of fun hand chopping the 12 mortises and I was real pleased that they were the most accurate ones I’ve ever done!
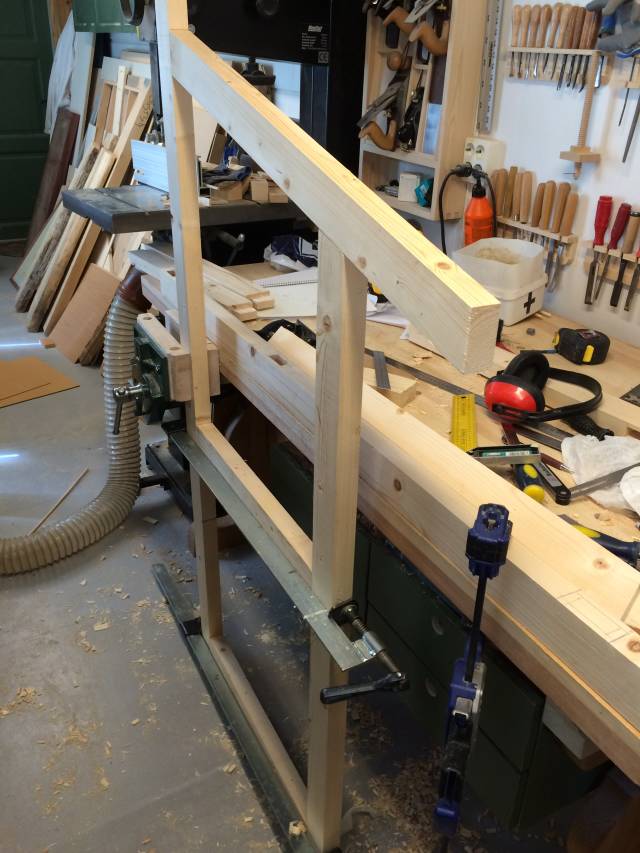
I did the tenon shoulders on my tablesaw to ensure nice 90 degree cuts, and then I cut off the cheeks and edges with my bandsaw. The glue-up went like a dream on my new big bench. Picture below shows dry assembly of the first side and you can see some of the tenon cuts in the background for use in the 2nd side and a couple of the mortise cuts also on the bench.
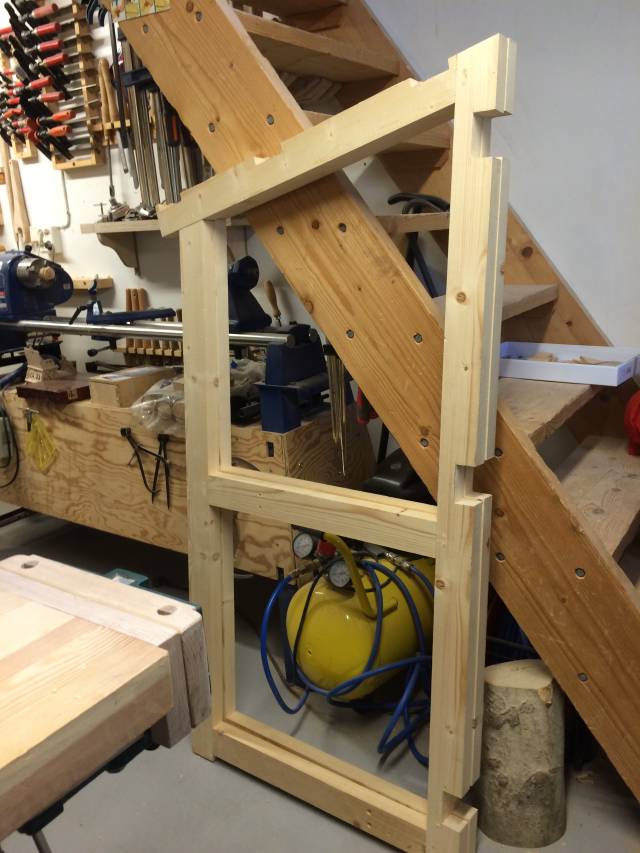
The photo below shows the two sides all glued up and with dowels installed to pin the tenons in place. A point about pinned tenons. They are used to draw the tenon shoulders tight to the mortised piece and they are used primarily in lieu of clamps. This is done by slightly offsetting the pin holes in the mortise slightly off-senter to the pin holes in the mortise piece. This is especially helpful if the joint can’t be clamped, but if it can be clamped you can glue-up the joints, clamp them, and then drill the pin holes without any offset then glue the pins in which will allow you to remove the clamps right away before the glue dries. This is especially helpful if you don’t have a lot of clamps or if they are too unwieldly
The next photo shows the two sides finished. Weather permitting I plan to do a test fitting into the space for the shed tomorrow and to make sure that the grill is a good fit before installing the boards that bind the ends together.
Mike, an American living in Norway
7 Comments

Great work. I bet it’s a lot of fun using softwood mortise and tenons, specially when we usually use hardwood this must have been way easier. I can’t wait to see the finished shed.
CHRIS, Charlottetown PEI Canada. Anytime you can repurpose, reuse, or recycle, everyone wins!
Wow
Timber frame shed that is impressive Mike !
Klaus

That’s overkill Mike.
Could not resist:)
You have the same problem I have. I find a tiny space and a couple of days later my wife has something to fill it.
After you all done I need to build one large enough for a smoker and 2 grills. I got carnivores in the house.
Abbas, Castro Valley, CA

Looks like fun Mike.
A quick story if I may:
This reminds me of an old Norwegian shipwright I once worked with who sold the small house that he had built and raised his family in. He had no idea how houses were built so he built it like he would build the wheelhouse on a boat with yellow cedar studs and half lapped in diagonals, etc. the new owners of course wanted a bigger house but when they got a bulldozer in to demolish it, it would not break. The dozer literally pushed it around the yard for a while before they brought in an excavator with hydraulic jaws to “chew it into bite size pieces”. It took a long time.
I suspect your bar-b-q shed will be equally tough. :-)
The early bird gets the worm but its the second mouse that gets the cheese.
Indeed Mike this is overkill, but with the raining weather you had fun.
But I have to ask you. Is this shed neccesarry. Isn,t there any room left in your shop to store the BBQ? LOL

That’s a steep staircase Mike : )
Thanks for those funny comments guys. I especially enjoyed the tale about the Norwegian shipwright. I hope they have to do that with some of my outdoor projects some day!
Mike, an American living in Norway