


Share your craft projects
Make new craft buddies
Ask craft questions
Blog your craft journey

Brian
2030 posts
and
31 followers
in almost 12 years
in almost 12 years
Walnut Dining Table #1: Early planning
This is
part 1
in a
1 part
series:
Walnut Dining Table
-
Early planning
- Early planning
I’m planning to build a dining table in walnut. I found a really fancy one at some store in Soho. Very ritzy place. Here is a picture of the table.
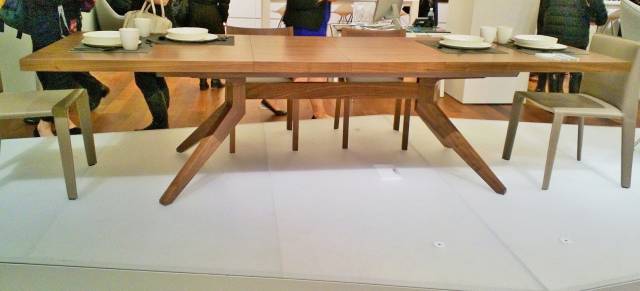
I got very excited when I saw this beautiful thing. I have no idea how to build it but I’m not afraid of diving in head first.
So the first issue is acquiring the lumber. That is a problem in itself. Have you seen the price of walnut lately? I think the material cost would be somewhere north of $500. That’s not good.
I grew up on a farm in upstate NY and I live in long island now. We have a few black walnut trees on the farm so I thought it would be far less expensive to have a tree sawn and deal with the 300 mile logistical issues than to buy it from a local lumber store. I happen to be upstate for the long weekend so I went out to find a tree. This is the one I’ve selected.
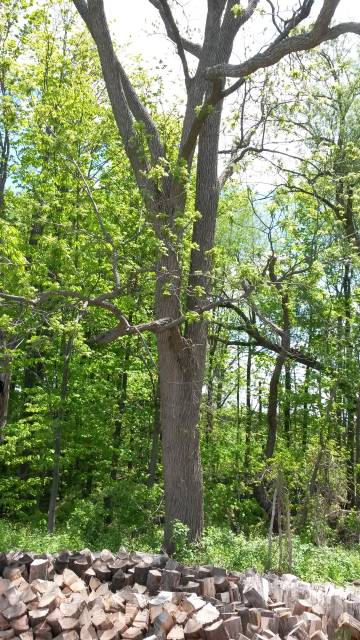
It’s maybe 20" diameter and 60 or 70 feet tall. All the lumber in front is just firewood. There is a second tree that might be suitable too if it makes sense to cut all that lumber. I wouldn’t be able to use it all, however I would like to make chairs someday as well.
I have never done anything like this before. I found a local Mennonite saw mill that charges 20 cents per foot (linear? board? Not sure) which seems cheap even though I’d have to borrow a trailer and haul it to the mill. That could take several trips. That’s several trips worth of gas, etc.
My plan is to enlist my cousin to go in with me and pay for some or all of the costs. In return, he will get the prototype table. That’s another 300 mile expense to consider.
It looks like my plan is a winner, and I could take pride in the fact that the lumber came from the farm I grew up on. But like I said I have never done anything this ambitious before and I don’t know what I don’t know – if you know what I mean. So any advice on tree selection, drying and anything else would be greatly appreciated. You guys can hold your construction advice until I get further down the path with this project. :-) I’m not even close to that part yet but I will gladly take advice when I get there.
Losing fingers since 1969
15 Comments
Brian:
Good luck on this one: I’m in Annapolis, I can’t get people to ‘harvest’ large trees (maple, Oak) coming from my property – we’ve had several downed trees from storms over the years; as well as trees which have simply died for one reason or another.
The mills are telling me the cost to take them down, transport, process, … make it un-economical. With the cost of Walnut, about $11/bf (if my memory is correct), the economics might shift in your favor.
The hard question is drying-time: I think it’s about a year/inch thickness – though, I’ve never seriously looked into this.
Please keep us posted on your progress: I hope you find a local wood mill that can help you on this.
MJCD
Brian, you don’t say where in Upstate the farm is located, but I guess maybe the central Finger Lakes area. In any event, unless you really want to cut a living tree from the family farm, you could buy your stock from a local sawyer. There are quite a few in that area. Here is one. This would save you all the time and trouble you listed. Also, if there happened to be any hardware embedded in the tree, you will pay for the blade(s). It will also have to be properly stacked and stored while it is drying. That table appears to be from 12/4 stock which will require a long time to dry unless you care to make a small kiln. It can all be done if you want to dedicate your time and effort to the project. HTH
—Art
-- Art
Art, you are correct – Penn Yan in the finger lakes to be exact. The farm losing a tree is no big deal. In fact my dad sold a bunch of trees to a logging outfit a couple of years ago who took a bunch of maple and cherry. Taking 1 or 2 living walnut trees is really no big deal at all. If I don’t take them they will become firewood when they die anyway.
The quote I got from the Mennonite saw mill was 20 cents per foot if I deliver the logs. That’s cheap as far as I can tell. One tree should cost less than $60. There’s a lot of sweat equity in that low price.
About the lumber yard link, I live in long island so if I’m going to buy lumber, I’m going to get it from a local dealer. There is only one quality yard in Nassau county that I’m aware of. Honestly I haven’t even called them up yet because I was thinking the price would be in the $10+/bf range. I will call them tomorrow sometime. I definitely want to build a prototype. Even if I do it in poplar that’s an added cost whereas walnut from my tree is free in the marginal sense since the whole operation is one fixed cost more or less. If I buy from a yard every inch is a marginal cost.
Also I would have everything sawn to 6/4 and laminate anything that needs to be thicker. How long would it take 6/4 to dry in a barn?
Losing fingers since 1969
From live tree to finished table…wow. That looks like a serious undertaking. I have absolutely nothing helpful to offer, but I will be watching this blog with much interest.
Where are the band-aids?---Pro Libertate!

I will be following too Brian.
I pay $12 per board foot for 8/4 and $6 to $8 depending on supplies for 4/4
Abbas, Castro Valley, CA
Brian, the best way to air dry lumber (to my knowledge) is to:
1. Prepare a flat, level space outdoors and put some gravel down to keep moisture out from under the stack. Orient it so the prevailing (west) wind will blow through the stack from end to end. Keep the stack reasonably narrow, maybe 3-4’ and as tall as you can reasonably reach.
2. Put some concrete blocks at 16" centers on the gravel to keep the lumber about 8-10 inches above the gravel. Ensure they are level.
3. Lay some 4×4s across the blocks and put stickers on top of the 4×4s. Stickers are about 3/4″×3/4".
4. Lay down your first layer of wood to be dried, then another course of stickers directly above the first ones. Repeat until you are out of wood to be dried.
5. Put a top on the stack to keep rain and snow off the stack. Steel siding works great. Angle the top to promote runoff.
6. Put as much weight on top of the stack as you can stand, more concrete blocks? This helps keep your stack from cupping, etc.
7. Wait a year, then you can consider a solar kiln to speed the process. In the beginning it needs to gl slowly to minimize checking, etc.
You will also want to get a moisture meter to track the drying progress. The reason I mentioned an upstate supplier is that I thought they would be less expensive that anything near the city.
—Art
-- Art
Man, I will be retired when you finish drying that stack LOL!
Abbas, Castro Valley, CA

Brian,
Art has given you very good advice. We mill most of our lumber, but we have a portable bandsaw mill come here. We pay an hourly rate which comes out to about 35 cents/board foot so your price is good but green lumber is very heavy and will cost a considerable amount to haul. It also makes for a lot more work, moving the boards multiple times.
From a voice of experience (learned the hard way), DON’T try to dry your wood inside. The humidity level for a large amount of wood will cause your pile to mold and mildew, and the building’s walls can even drip with moisture.
We can buy rough sawn walnut for about $4/board foot here in central Wisconsin. Here’s an example:
30 4/4 SB Walnut 8’ $4.00 Nice Stock
400 4/4 SB Walnut 7’ $4.52 Nice 7’ Walnut
130 4/4 SB Walnut 6’ $3.58 13/16" Clean S2S
90 4/4 SB Black Walnut Sappy 7 $2.00 Sap on the back
12Pcs. 2 1/2" Slabs Black Walnut 14-24" 7-9’ $95-180 Natural edge, Bar Tops, Mantles
When we had an opportunity to mill some walnut on a piece of property about 10 miles from here, after doing the math we decided it wasn’t cost effective.
Sometimes it’s nice to use your own lumber just because of the provenance, especially when it will be heirloom quality! Let us know what you decide.
L/W
“Those who would give up essential Liberty, to purchase a little temporary Safety, deserve neither Liberty nor Safety.” Benjamin Franklin
Ian, you’re probably right and I did want to finish this table this year. I still want to cut the tree because I know there is a project it there for that lumber, but I think I’m leaning toward buying the lumber for this table. I just can’t wait 2 years to start it.
Art and LWL, thank you so much for the info. This is precisely the reason I’m here!
Maybe the prototype will be the base only. It will be less cost and time and that’s the hard part anyway. I can do that with framing lumber to keep the cost down. If it comes out OK, maybe I can sell it on craigslist to offset some of the cost.
Losing fingers since 1969
It will be interesting to see how that angled joint holds.
I agree, start with the base.
Abbas, Castro Valley, CA
I have an idea for the leg angle that involves a double notice and tenon setup with a couple of dowels for added strength. I’m more concerned with joining the legs to each other at either end. I haven’t quite figured that out yet completely.
Losing fingers since 1969

MJCD, I’m in North Carolina and I’m getting nice walnut from a local mill at $4.00 a board foot. I wonder if it’s just because it’s not available as much in Annapolis. I used to live in Churchton a little south of you and I know the cost of living was higher there.
Brian, this kind of thing is really fun. What are you using for the prototype table?
David L. Whitehurst
I think I’m just going to mill some framing lumber into something – maybe 1" thick and start from there. Although there is some primed poplar 1×6s leftover on one of my job sites. I would prefer that if I can get my hands on it. I’m sure it’s finger jointed though and that could be a problem with constructing the legs or any other load bearing angular part. Maybe I should stick with the framing lumber. I’ll just paint it when it’s done.
Losing fingers since 1969

Brian-
I built a table very similar to this table you are talking about. The original design is from design within reach. The way I designed mine was with solid lumber 8 qtr and from what could decifer from looking many times at the table on line was that they use 4 qtr laminated together and then opposing lap joints where the three pieces come together for an individual leg. Like you I wanted m&t joints instead so there were minimal changes in grain. My first step was to make a template from mdf so I could determine where those joints should be in order to get the most stability and strength that also determined the angles where the joinery would be.
In terms of how the legs join the center rail it was actually a lot more simple than one can imagine I used flush mount hanger brackets recessed into the rail and flush on the leg to keep them together with seeing any hardware. I could go on and on but I will let you decide how yours should look message me if you have questions 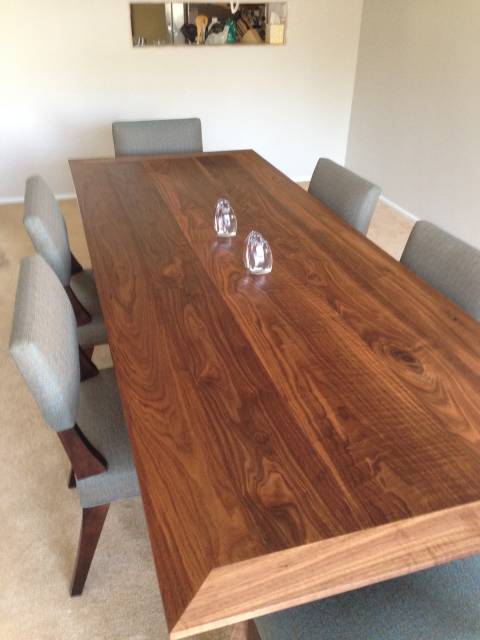

I saw that on the creations page this morning and I’m just getting time to respond. And wow that is exactly what I’m going for. I definitely will message you when I get further down the road with this. I have a newborn that is killing my shop time. He’s ruling over me like some kind of king LOL.
I hope to buy the lumber this weekend. The 2 years of drying time is putting a kink in my schedule. I will post here about that experience.
Losing fingers since 1969