


Share your craft projects
Make new craft buddies
Ask craft questions
Blog your craft journey

Mike40
1074 posts
and
35 followers
in about 12 years
in about 12 years
MAKING A WOODEN GEARED CLOCK #2: DAY 2 - THE FRAME
This is
part 2
in a
9 part
series:
MAKING A WOODEN GEARED CLOCK
-
Getting started, day 1
-
DAY 2 - THE FRAME
-
The Main Dial/Gear - day 3
...
- Getting started, day 1
- DAY 2 - THE FRAME
- The Main Dial/Gear - day 3
...
2nd Todays Work
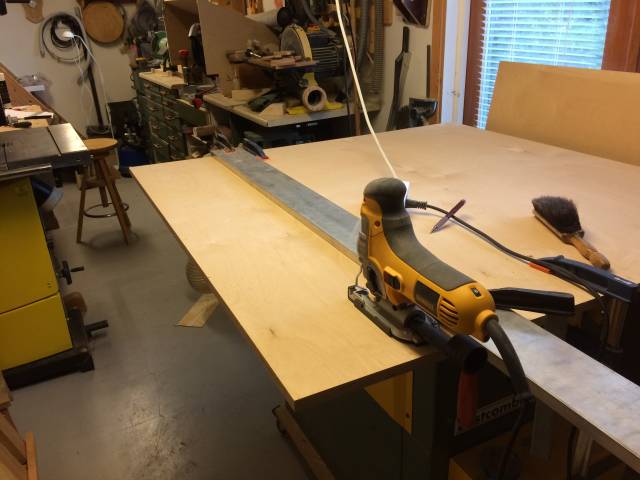
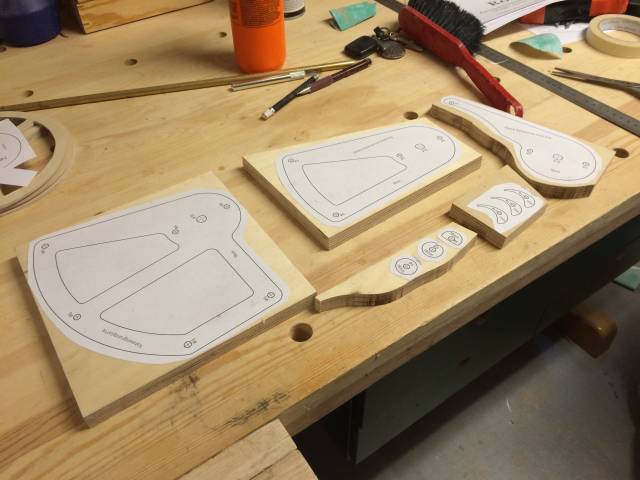
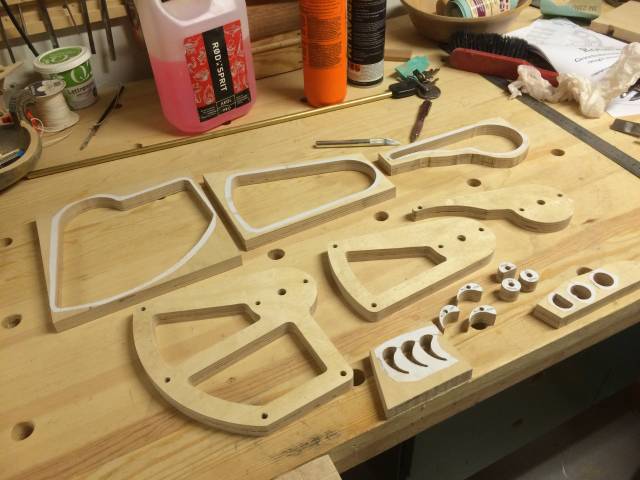
Materials were prepared for the frame cutouts. The 18mm (a little less than3/4") birch this time. There wasn’t enough space to cut the half platters so the table saw was used as a work table to cut off what I needed with my saber saw. the platter was then divided them up the bandsaw and the patterns were attached with adhesive First the holes in the pattern were drilled. I tried to do this very accurately and I think they came out ok. The scroll saw cutting also went well. the lighted magnifying glass on my scroll saw really helps to maintain accurate cuts.I also remade the one part for the winding barrel that I messed up last time.
Drilling Tips
I got some good advice from a wooden clock video. It was recommended that good quality brad point bits should be used, as accuracy of the holes for the various axles is very important. Unfortunately I couldn’t find quality drills in the 1/2 sizes called for in the plan so I had to buy a cheap set that had everything I needed at a cost of under $10. If I had been able to buy the good ones it would have cost be around $60. Prices here are about double of what everyone else pays, so maybe not a problem for you. Only time will tell (pun) if it really is a problem.
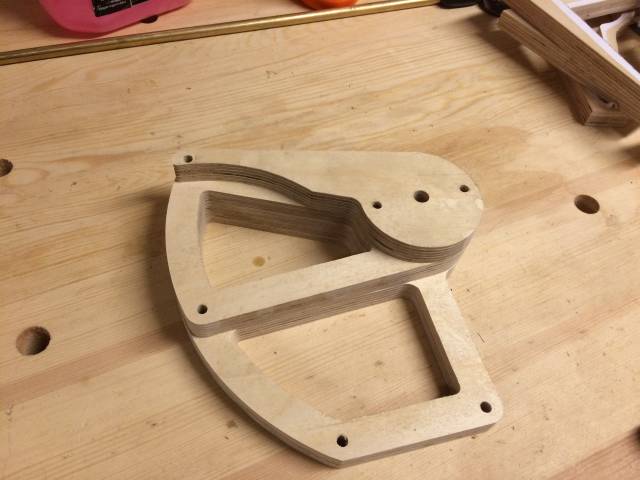
Here are the finished pieces together with some small items the same thickness that will be attached to the frame and the winding barrel (1st blog). The last photo shows how it will be glued together. The holes are for axels to hold the various gears and also a couple of screw holes to mount it on the wall with.
Clock Accuracy
You might wonder just how accurate these wooden gear clocks are. This one is supposed to be off by about 2 min. in a 24 hr. period. It has to be rewound every 24 hrs. so no big deal. The winding is very easy. It’s just to pull the handle attached to the string down on the left side of the clock and that raises the weight on the right side, which drives the clock for a new 24hrs.
Personally I’m not too worried about absolute accuracy. The fun of this type of clock is seeing it run, that is, seeing the pendulum swing back and forth and the escapement gear and other gears moving. we are otherwise surrounded by clocks on our computers, wristwatches, mobil phones and the kitchen stove, so we don’t need the exact time from this clock, just the kinetics.
Similar Alternative Projects
I should mention that you can also buy plans from the clock designers for kinetic sculptures. Some of these are very nice, but they due tend to have things waving about. Maybe too much of a good thing. For that reason I think a clock strikes a good balance with enough movement to be interesting, but not so much as to be distracting.
Thanks for reading!
Mike, an American living in Norway
6 Comments

This is a great project Mike.
woodworking classes, custom furniture maker

I like want I see so far.
-Madts.
Tor and Odin are the greatest of gods.

This is cool.

I can’t wait to see the finished clock . Where did you get your plans ?
Wheaties
Thanks guys.
Bruce Christopher Blasius here
Mike, an American living in Norway
I am so envious, can't wait to get started on building the clock. My plan is to use top shelf marine grade ply at the closest thickness that is available. Have not been able to figure out how to purchase the plans yet (any advice would very be welcome). Also hardware (metal parts) are not available where I live "Phuket Thailand" so am looking for on line "hardware kit" suppliers