


Share your craft projects
Make new craft buddies
Ask craft questions
Blog your craft journey

Mike40
1074 posts
and
35 followers
in about 12 years
in about 12 years
MAKING A WOODEN GEARED CLOCK #8: The Main Weight and Finishing Up Details - Day 8
This is
part 8
in a
9 part
series:
MAKING A WOODEN GEARED CLOCK
...
-
Bits and pieces - Day 7
-
The Main Weight and Finishing Up Details - Day 8
-
Gluing up and Trial Assembly - Day 9
...
- Bits and pieces - Day 7
- The Main Weight and Finishing Up Details - Day 8
- Gluing up and Trial Assembly - Day 9
Day 8 Work
The parts for the main weight were cut and some some small parts were finished. A couple of grub screws had to be custom made because I couldn’t find them at any store here. A sad comment on the retail availability of stuff here in my part of Norway.
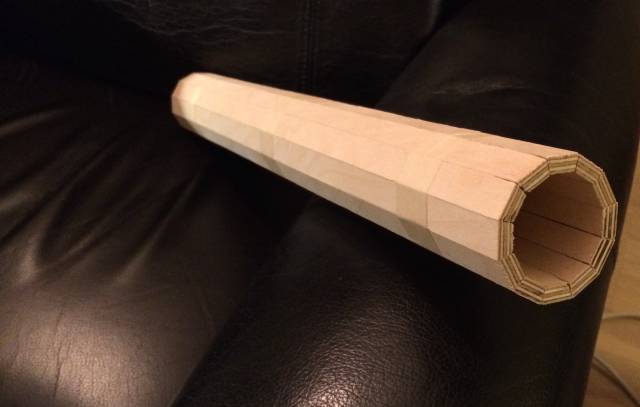
The main weight in the plan is a plastic tube almost 20" long and filled with about 2.4kg of divers lead (small lead round pellets). I didn’t like the look of the plastic so I made mine from wood. This involved a little coopering work. 12 staves 1/2" wide and about 20" long were cut on my table saw from 6mm (1/4") ply. It isn’t glued up yet, only held together with tape in the photo. I will probably cut it shorter later. photo below
I promised to take a shot of all the parts, which I did today. The only missing part is the ‘handle/counter weight’ to the main weight which is pulled down to raise the main weight to the start position. You might have to zoom in on the photo to read the labels. They are at the bottom of each part
Photo no. 1 below
This photo shows all of the parts including the individual pieces of some parts that will be assembled into one piece and glued together. The 5 wheels without gear teeth are the parts to the winding wheel. The winding wheel will also include 3 pawls held on with brass rods when assembled. The 3 frame pieces will also be glued together to provide different mounting heights for the different wheels (gears). The pendulum bob which consists of 3 pieces seen at far right bottom will form a shallow box when glued up. It will contain some lead pellets to give it some extra weight.
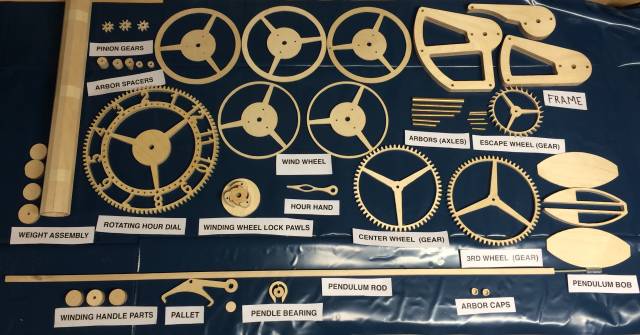
Photo no. 2 below shows the winding wheel, the frame and the pendulum bob as they are when the are glued up. This gives a better idea of the finished parts. The pendulum is sitting in the order it will be when assembled with the pallet at the top end. I didn’t have room in the photo frame for the bob at the bottom of the pendulum.
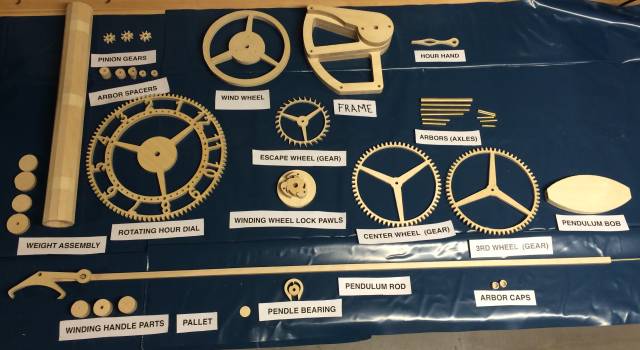
The labels reflect correct clock part terminology this time. Gears are called wheels. One wheel and pinion it will turn (the pinion is mounted on another wheel) are called a ‘wheel set’.
The 2nd wheel (idler wheel) is a helper wheel that is only used to keep the 3rd wheel rotating in the in a direction that will turn the escape wheel in the right direction. This is because the next wheel in the chain always runs in the opposite direction from the wheel driving it and an intermediate wheel is necessary to accomplish the reversal needed.
The pinions (the smallest gears) are driven by the prior large wheel in the train. The purpose of the pinion gear is to keep the clock movement compact by eliminating the need to have large wheels having to sit tooth to tooth. It also helps to reduce the diameter and number of teeth on the wheels.
As you can see from the last photo, this shows how few parts there can be in a clock and none of it is really difficult to cut or assemble. Accuracy is important though and it remains to be seen how good a job I’ve done on that.
To be honest, I am expecting problems and even having to recut some parts if necessary. This is very much a learning experience for me.
I will explain the order of movement of this particular clock design later to make it clear how it actually works when I get closer to completion.
I hope you are enjoying this blog and thank you for following with.
Mike, an American living in Norway
7 Comments

you have been busy. Would you have a deadline by any chance?
All looking very good.
-Madts.
Tor and Odin are the greatest of gods.
Madts No deadline yet. I actually finished the clock, but I haven’t got it running yet. I did give it a try, but I had to make some minor changes on the weight and counterweight/winding handle to allow more room for the pendulum to swing freely, and I haven’t tried it since. I’ve been down with a bad back almost two weeks now and it doesn’t seem to be getting much better. I will be able to bring this blog to the assembled stage, but getting it running will have to wait until I’m better.
Mike, an American living in Norway
Sorry to hear about the back. I have been there and feel your pain. I got mine fixed by 4 injections into the problem area.
Good luck my friend.
-Madts.
Tor and Odin are the greatest of gods.
Thanks Madts. Injections won’t do me any good, it’s my disks that are crumbled away from Arthritis in various places and they can’t operate either. I’m just real thankful that for the most part I can still work in my shop and even do some gardening and house upkeep in the warmer months.
My main concern is that I might not get the clock running before Christmas as it is supposed to be a gift. So I am sitting in my easy chair bored to death in the, which is much worse than any pain.
Mike, an American living in Norway

Sorry to hear about your back pain Mike.
I can relate to it probably much less intense than yours.
Hope you get well and finish it on time.
Abbas, Castro Valley, CA

A fantastic job of cutting all the pieces , hopefully a few minor adjustments will get it running like a Swiss watch .
Wheaties
Thanks Abbas and Bruce. I hope it will run, but I’m sure that some small work will be necessary to make that happen.
Looking at the PDF plan today, I did find that two of the pinion gears were slightly different in size, about, 1mm in diameter, and I’m not sure if I got the right pinions glued to the right wheels as I thought they were the same size. I will have to take some measurements to be sure and remake them if necessary as soon as I can.
I’m beginning to doubt I will be in shape to finish up before Christmas, but no problem as it is just an extra gift anyway.
Mike, an American living in Norway