


Share your craft projects
Make new craft buddies
Ask craft questions
Blog your craft journey
Ryan
26 posts
and
11 followers
in over 3 years
in over 3 years
More from Ryan


Bee on a "Honeycomb"


This is the third comb I have made, hopefully many more to come. They make for a nice little project that have lots of details involved. This comb is for a marquetry friend who gifted me a massive amount of veneers about a year ago and it took until now for an idea to come about. She is a bee keeper and jars her own honey (delicious as well!). I plan to make a box to give this to her. I don't have any pictures of my build process because I wasn't sure how it was going to come out.
The marquetry started by making the honeycomb background. I used 1/16th (1.5mm) veneers in mahogany and maple, with black dyed veneer for the outlines of the honeycombs. All of it was assembled on stretched craft paper with hide glue. When I completed the background I cut the bee's body in using the piece by piece method. I have come to really enjoy it (even cutting only 1 copy at a time) because it challenges me to cut with incredible accuracy to achieve tight joint results (I feel like I accomplished it with this bee for the most part).
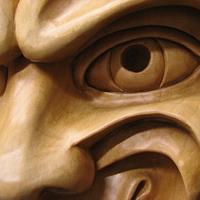
After inlaying the bee's body I came up with a possibly new idea for creating trompe l'oeil wings (and other interesting effects). I thinned some blonde steer horn down to about 1/32 (0.75mm), or half the thickness of the background and bee's body (this made the horn trasnparent). Then I glued the pattern for the wings onto the horn veneer and cut it out like normal. When gluing it down to paper I spaced all the parts of the wing by the thickness of the blade I cut them with. When the glue dried I filled the spaces with ebony dust and hide glue, packing it in tight.
I cut the wings off the paper and cleaned up the outside of them. The bee's body and background marquetry was inlaid into the jatoba I used to make the body of the comb. I used a dremel attached to the veritas pluge router to do all this part (my hands are getting worse from rheumatoid arthritis, so I have to cheat on my hand tools only love, shhhh don't tell anyone!). I dabbed a touch of glue on the wings so they would stay in place where I wanted them on the bee, then scribed the outline with an exacto knife. I routered down half way through these veneers (bee and background) and inlaid the wings into the cavity. Because the horn is transparent, you can see through the wings and see the background and bee's body behind them.
I have seen horn used many different ways (paint, pigment, gold leaf, even paintings) behind the horn give some really neat effects, but never inlaying it half way through to use the background and elements of the marquetry themselves. Obviously you would need to use thicker veneers for the background and main elements of the picture (commercial veneer it would most likely not work very well).
If anyone has seen this effect used in marquetry or inlay please direct me to where I can see more examples. I plan to use it on more pieces and have lots of ideas already forming to exploit this "transparent" marquetry technique.
Thanks for looking in, my next project I make like this I promise to take pictures of the process!
The marquetry started by making the honeycomb background. I used 1/16th (1.5mm) veneers in mahogany and maple, with black dyed veneer for the outlines of the honeycombs. All of it was assembled on stretched craft paper with hide glue. When I completed the background I cut the bee's body in using the piece by piece method. I have come to really enjoy it (even cutting only 1 copy at a time) because it challenges me to cut with incredible accuracy to achieve tight joint results (I feel like I accomplished it with this bee for the most part).
After inlaying the bee's body I came up with a possibly new idea for creating trompe l'oeil wings (and other interesting effects). I thinned some blonde steer horn down to about 1/32 (0.75mm), or half the thickness of the background and bee's body (this made the horn trasnparent). Then I glued the pattern for the wings onto the horn veneer and cut it out like normal. When gluing it down to paper I spaced all the parts of the wing by the thickness of the blade I cut them with. When the glue dried I filled the spaces with ebony dust and hide glue, packing it in tight.
I cut the wings off the paper and cleaned up the outside of them. The bee's body and background marquetry was inlaid into the jatoba I used to make the body of the comb. I used a dremel attached to the veritas pluge router to do all this part (my hands are getting worse from rheumatoid arthritis, so I have to cheat on my hand tools only love, shhhh don't tell anyone!). I dabbed a touch of glue on the wings so they would stay in place where I wanted them on the bee, then scribed the outline with an exacto knife. I routered down half way through these veneers (bee and background) and inlaid the wings into the cavity. Because the horn is transparent, you can see through the wings and see the background and bee's body behind them.
I have seen horn used many different ways (paint, pigment, gold leaf, even paintings) behind the horn give some really neat effects, but never inlaying it half way through to use the background and elements of the marquetry themselves. Obviously you would need to use thicker veneers for the background and main elements of the picture (commercial veneer it would most likely not work very well).
If anyone has seen this effect used in marquetry or inlay please direct me to where I can see more examples. I plan to use it on more pieces and have lots of ideas already forming to exploit this "transparent" marquetry technique.
Thanks for looking in, my next project I make like this I promise to take pictures of the process!
20 Comments

beautiful comb ryan. i love the technique you used to do the wings, a real cool look. she's gonna love this.
working with my hands is a joy,it gives me a sense of fulfillment,somthing so many seek and so few find.-SAM MALOOF.

Yes, beautiful! That horn inlay is interesting.
The Other Steven

Lots of things to like about this Ryan!
First of all, your piece by piece cuts are excellent. There is a reason it is the highest form of the art. I’m so glad you have embraced it.
Second, the creativity involved in the whole piece but particularly in the wing assembly.
Brilliant!
Third, the execution of the idea seems to be flawless and the result is a great illusion.
….and no, I haven’t heard of horn being used over half deuces marquetry. You may be unique in that.
I think I know who the lucky bee keeper is too. 😉
Great work! 👌👌👍👍
The early bird gets the worm but its the second mouse that gets the cheese.

Impressive!
I was drawn to the wings, trying to figure out "how". Thought you may have brushed in some yellowed shellac or clearish acrylic, then penned in the veins. But that couldn't be since it looks too crisp and clean.
Thanks for the info!
I was drawn to the wings, trying to figure out "how". Thought you may have brushed in some yellowed shellac or clearish acrylic, then penned in the veins. But that couldn't be since it looks too crisp and clean.
Thanks for the info!
Just incredible
TimV, "The understanding eye sees the maker's fingerprints, they are evident in every detail, leave Fingerprints." James Krenov

Awesome job! Great write up too. Thank you!
Ryan/// ~sigh~ I blew up another bowl. Moke told me "I made the inside bigger than the outside".

This is so creative and it looks flawless as well. I also thought you might have used epoxy and then a marker for the veins. It's hard to believe you have arthritis with the detailed type work you do. Amazing!
.................. John D....................

The whole piece in fantastic but those wings and the idea behind them gives it the "Wow" factor for me!
-- Paul--- Creativity is allowing yourself to make mistakes. Art is knowing which ones to keep. — Scott Adams
Thank you. And special thanks to Paul Miller, aka Shipwright. First, it was a post when I first started marquetry that he commented on someone else doing "transparency" for wings. They did a great job and he said that creating that effect is really hard to pull off, so that is one thing that has stuck with me for a couple years, trying to come up with a creative way of doing this differently. Plus he told me not to be afraid of making mistakes, and as far as this bee goes I managed not to blunder anything but I had my doubts going in (why I did not take any pictures, I thought this would be a better take 2 type project). But just those pieces of advice have really carried me in this craft and I couldn't thank him enough.
The next transparent marquetry I work on I will take more detailed pictures and notes of what I am doing and what I find is working well for me. And transparent marquetry is the only good name I seem to have come up with for this technique.
The next transparent marquetry I work on I will take more detailed pictures and notes of what I am doing and what I find is working well for me. And transparent marquetry is the only good name I seem to have come up with for this technique.


Great job RY... certainly way above my paygrade and while I will never venture down the marquetry lane, I'm sure many may learn from your detailed explanation.
Now where's that horn to hold my vino.
If your first cut is too short... Take the second cut from the longer end... LBD

Fantastic project and an excellent gift! I noticed the wings and am glad you shared your solution - Brilliant!
Thanks Ryan, A+++!
The early bird gets the worm but its the second mouse that gets the cheese.
The first thing that came to mind, was how cool is that! Beautiful Marquetry!
Dennis Zongker

Ryan,
Exquisite! And the horn inlay is genius.
L/W
Exquisite! And the horn inlay is genius.
L/W
“Those who would give up essential Liberty, to purchase a little temporary Safety, deserve neither Liberty nor Safety.” Benjamin Franklin
My head exploded a little bit. Truly amazing attention to detail. How you guys do it will never stop amazing me. I was wondering if there was CNC marquetry nowadays lol. Fantastic work. In all your projects!
Al in WV
I was wondering if there was CNC marquetry nowadays lol.
Well that is one thing I know nothing of. I cut everything with a chevalet, a hand powered guided saw invented in the 18c. One of the most accurate cutting tools out there imo.
Yes, there is CNC marquetry out there, mostly but not all laser cut. Same old arguments apply. 😁🤣
Ryan and I use a tool that was designed by the great French marqueteurs of the 18C and I for one (and I think Ryan agrees) think it would be rude to pretend we could improve on it.
….. just sayin…..
Ryan and I use a tool that was designed by the great French marqueteurs of the 18C and I for one (and I think Ryan agrees) think it would be rude to pretend we could improve on it.
….. just sayin…..
The early bird gets the worm but its the second mouse that gets the cheese.
Hell, 18C??? I though ford came before chevrolet. Who says you can't learn trivia here.
If your first cut is too short... Take the second cut from the longer end... LBD
🤣
working with my hands is a joy,it gives me a sense of fulfillment,somthing so many seek and so few find.-SAM MALOOF.
If only I had any hair to comb!
More from Ryan