Jim Jakosh
in over 3 years
More from Jim Jakosh
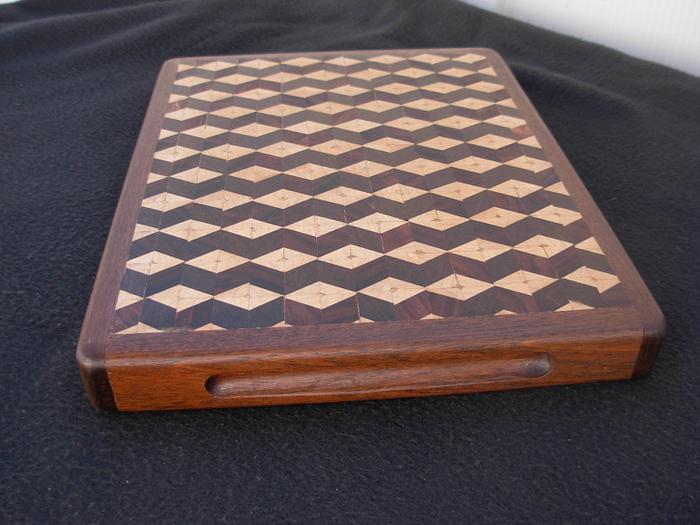
3D End Grain Cutting Board
I did not have the maple, cherry and walnut wood here in the desert so I used three woods I got from the saw mill and I should not have used two dark woods. The effect is better with a lighter wood on one side. I Had to re-saw the light wood twice to get it to 1/4" and that meant the dark wood had to be 1/2" . I only know that one of the woods is Acacia but have no idea of the other 2. It would be easier to handle the laminated pieces if they were bigger. I got a good degree of variation and it shows in the final product .
The finished board is 1 3/16" x 7 1/2" x 11" and is finished with Danish Oil and then Walrus Oil cutting board wax.
I looked at a lot of videos and this is the one I use for my guide:
Cheers, Jim ........................ Variety is the spice of life...............Learn something new every day
19 Comments
working with my hands is a joy,it gives me a sense of fulfillment,somthing so many seek and so few find.-SAM MALOOF.
Question: There is a design feature dead center on each light colored diamond, did you add this or is it the result of your assembling 4 separate pieces to make the diamond?
It might be evident on a larger screen, but I'm on a cell phone.
Thanks, Happy New Year, and nice work.
Ron
Ryan/// ~sigh~ I blew up another bowl. Moke told me "I made the inside bigger than the outside".
Hi Mike that sure did use a lot of glue!!!!!!!!!!!!!!!!!!!!!!!!
Hi Tom. If you look at the corners of all the light colored diamonds, you will see that some of them don't line up.
As for the centers of all the diamonds, that is a filler I had to add. I don't know how it happened but the corners of all those light colored pieces that make the diamonds got clipped off just a little bit when I cut them square in that second cut . That left a small opening where they all came together. There were 42 centers per side and I though of drilling them out and gluing in a dowel but I went with filler instead. This is just an experiment. I'm not sure what I'll do with this board but I will make one with walnut, cherry and maple when I get home. I have two other designs that I want to try as well and I have better tools at home.
I have orders for card carousels so I'll have to make about 12 of them, too. I really don't like production but if the product sells, I'll make more
Happy New Year........................................Cheers, Jim
Cheers, Jim ........................ Variety is the spice of life...............Learn something new every day
Agree about a LOT of glue, and a LOT of glue ups, then you just cut them up, almost seems silly, then you come around that last corner, and it's like Ohhhhhh I see... :-)
Happy New years back at ya.
Hi George, I have the bug to make a few more too. I found some interesting methods that I'll try when I get home. I could never get the straight cut on the BS. I use pushers and feather boards at home on the TS and they work real well.
Hi Joe. I buy Titebond III by the gallon too at home. I can just imagine how much glues is used on a 2" thick board!!!!!!!!!!!!!!! I'll try anything once !!
Cheers, Jim ........................ Variety is the spice of life...............Learn something new every day
Jim Jakosh
Hi George, I have the bug to make a few more too. I found some interesting methods that I'll try when I get home. I could never get the straight cut on the BS. I use pushers and feather boards at home on the TS and they work real well.
I didn't either prior to a class I just took with Alex Snodgrass. I have been setting up my bandsaw for resawing as he suggests for a while now, he has several sources for bandsaw tips, and videos, but going forward he is starting to slowly retire, so his personal site. "Bandsaw Life" and his Facebook, or YouTube accounts will likely be the best places to catch all of what he is doing. He also has a Facebook page, just about bandsaw boxes, though there are quite a few Reindeer cutters there as well. I'm finding them about as addictive as the boards.
Anyhow I found through him it's mostly about the blade, but coupled with his set up for drift free cuts, you can get as accurate with your bandsaw as your TS. You just know there is that slight frizzyness (is that a word?) fuzzy edge, that is easily scuffed off with a light sanding. Blades should be same as a good resaw, as wide as your saw will allow, but at least a 1/2" on a 14" saw, and 2 to 3 TPI, set up with good tension, and you will be amazed. I had always just resawn that way, and never gave a thought to ripping, for me it was a DOH!!!!! moment. Thinking hell, I've been here for years, and just never thought to rip. On bevels having the table tilted to 30, or more degrees actually causes the stock to stay put, down in it's little valley, and all you need is a slow steady feed, and straight ahead. Amazingly straight cuts.
I'm hiding next to Alex's left side in our group pic. It was a fun bunch. No I wasn't trying to be a kiss ass, they told us where to stand, and Tony put me there.

Cheers, Jim ........................ Variety is the spice of life...............Learn something new every day
Very well done!!!!
Regards.....Cliff.
Cheers, Jim ........................ Variety is the spice of life...............Learn something new every day
...woodicted


