


Share your craft projects
Make new craft buddies
Ask craft questions
Blog your craft journey

HorizontalMike
257 posts
and
20 followers
in over 12 years
in over 12 years
More from HorizontalMike


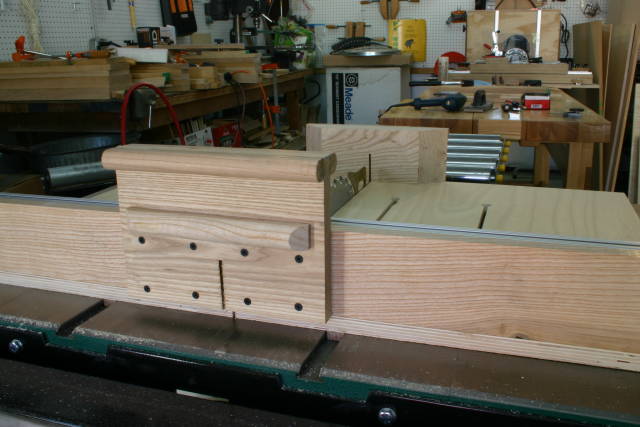
SuperSled for Table Saw


This has been an interesting project for me to research as well as to build, in that I sure had my challenges with the router. ;-) I not only read/watched everything that Eagle Lake Woodworking has on this table saw sled design and build, I also looked elsewhere for tips and techniques to make my execution/build of this project as accurate as possible. Steve Marin has a neat YouTube Video on accurately aligning and installing runners and fences that I found useful as well. Armed with this information I was off to the shop and making dust!
Some of the modifications that I made include:
++ Used 3/4in plywood for base— I want more durability/longevity and besides I can still cut 2 1/4in even with this thick of base ;-)
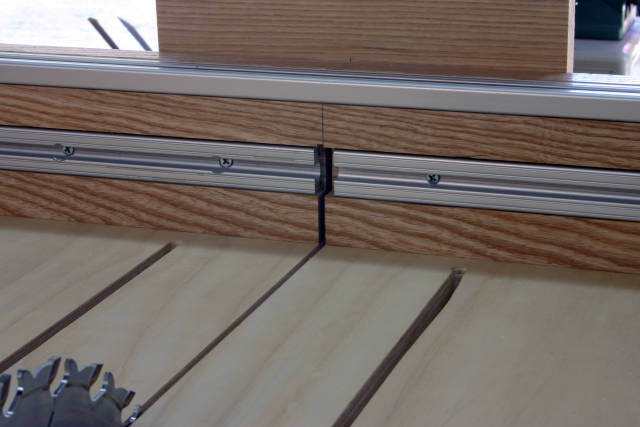
++ A 56in long main fence— I wanted to be able to cut multiple pieces as long as 36in in length, so I made the fence on the left stick out 38in to include enough for a stop block as well. Do note the gap in the vertical T-Track on the main fence so that the TS blade doesn’t have to cut through the T-Track.
++ I moved the “adjustable” fence slots closer together than the original plans called for as well— The plans called for the slots to be 7 1/2in apart, however, I found that only got me down to a max/min angle of ~60/30 degrees. I made the slots just 6in apart and when finished I can actually get a max/min angle 70/20 degrees, so that 22 1/2 degree angle is a doable on this sled.
++ I surface mounted the T-Track on the “adjustable” fences instead of routing them flush here— I did this in order to NOT have to depend on just 1/4in of material to hold down the T-Track. This works fine and does NOT try to pull the T-Track away from what it is mounted to.
++ I added the second “main fence” T-track as recommended on Eagle Lake WW Improvements— I did, however, move the vertical facing T-Track down to mid-board as in the Steve Marin video. I think that works better in that position.
++ Added a second “round-over” piece to the push/pull handle— I had this left over from making a longer piece for my handle needs and decided to use the leftovers as well. In the second image you can see a lower round-over piece on the handle that I placed there to keep my thumb from migrating any closer/lower toward the blade than it needed to be. It seems to serve as a tactile reminder of where to keep my thumb when pushing/pulling the sled (a safety feature).
(below) Once base board is squared and clamped in place, rslowly raise the running blade up through the base. This sets/locks the position in place.
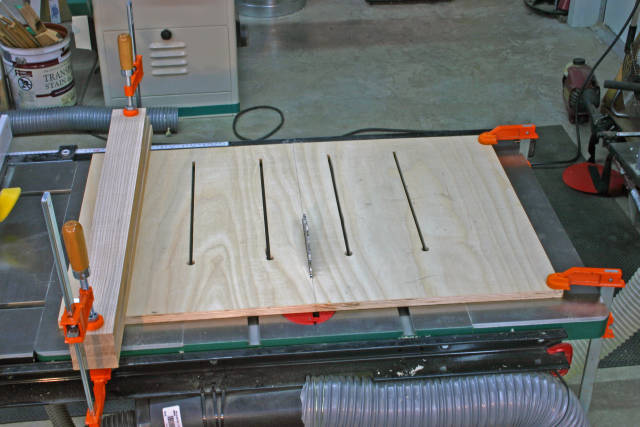
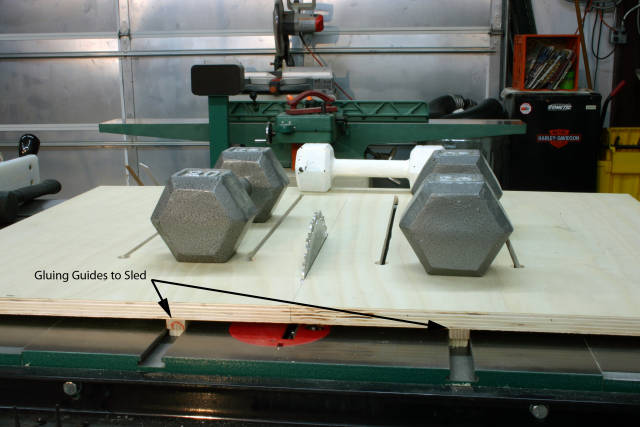
(below) I glued the miter runners in place, using the precut raised blade slot as a reference to keep things straight.
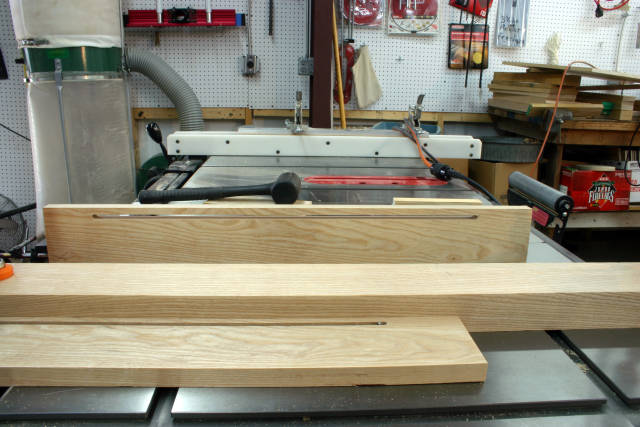
(next two below) Making the adjustable fences for making angled cuts.
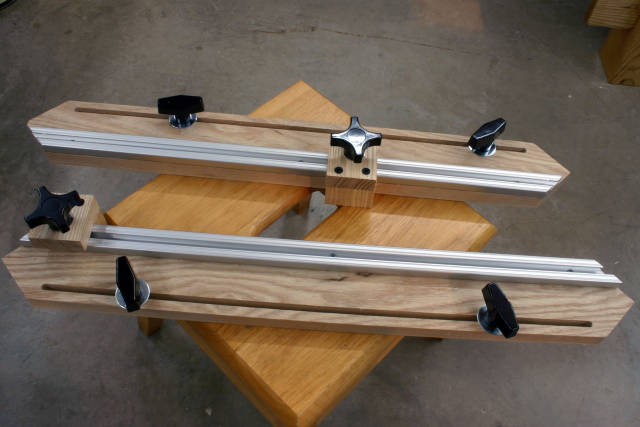
(last two below) My main fence, showing T-track and handle in place. I used a full 2in wide piece of Ash on this, as well as having the two T-tracks at right angles. This should keep everything very straight for a long time. These fences are screwed in place so that I can remove them and replace the plywood base as needed in the future. Thus far, 3yr down the road, that has not been needed.
HorizontalMike
13 Comments

I don’t know a lot about crosscut sleds but I do know beauty when I see it!!!! This is beautiful.
JAGO - just a grandma’s opinion

Great sled Mike.
Good call on bringing the slot together for “wider” angles.
The longer fence is definitely a plus.
Love the grain on the front fence.
Abbas, Castro Valley, CA
Good looking and well designed sled with a lot of thought going into it .
Thanks for the great write up very informative and good info.
Only thing I wish you would add is a blade guard where the blade exits to keep those hands safe .

Mike,
All you crosscut sled designers/builders are really making me want one. Thanks for some more great information.
L/W
“Those who would give up essential Liberty, to purchase a little temporary Safety, deserve neither Liberty nor Safety.” Benjamin Franklin
Thanks for the kudos folks!
FWIW, I added that extra lower round-over piece on the push handle to essentially act like, or in place of, a blade guard per say . I know that as long as my thumb rides on/touching that extra round-over while using/gripping the sled, that it is in a safe location away from the blade. That extra piece physically reminds me of this and I find that reassuring.
HorizontalMike
Awesome Mike, well thought out and executed…..
Mike
That’s a heck of a nice sled Mike! I’ll have to add that to my list of things to do, if I can ever finish with the wife’s list of things to do ;)
Where are the band-aids?---Pro Libertate!
I’m sorry Monty. YOU would have made a great friend, HOWEVER, I hope that you realize that you will NEVER complete that list on your wife’s “to-do list”.
And you had such great potential and ideas and such, and … ;-)
HorizontalMike
Nice sled Mike, great tool to have in the shop. The extra round over, good reminder to keep your thumb attached.

I really like this design. I am going to try to make one this fall, yours seems to be exactly what I was thinking of making. Thanks Mike.
CHRIS, Charlottetown PEI Canada. Anytime you can repurpose, reuse, or recycle, everyone wins!

A real top notch sled Mike,this should last you for years to come.
woodworking classes, custom furniture maker

Nice jig. I think I’ll have to make one for myself. Thanks again for sharing.
Daba

A really nice sled great design and workman ship. Job well done Mike.
-- Soli Deo gloria! ( To God alone be the Glory)
More from HorizontalMike