Kelly
in almost 12 years
More from Kelly
Table Repair
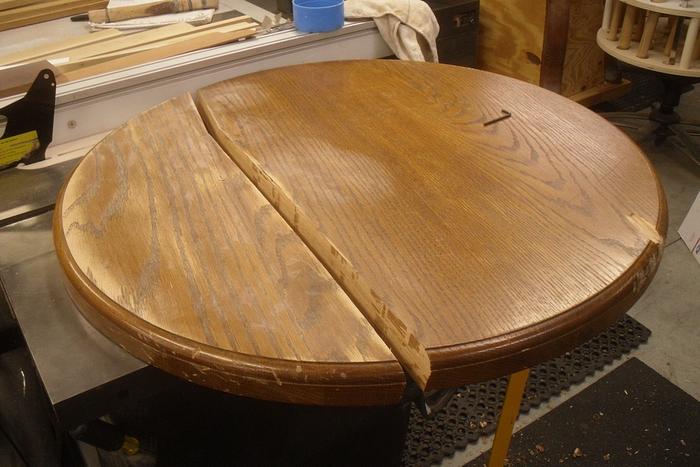
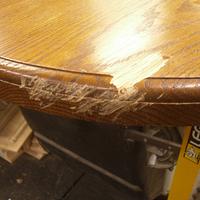
A lady brought me a table to repair, which she inherited from her grandmother. It had fallen out of the back of a pickup during a move.
Fortunately, the top was solid oak and about 1-1/2" thick, which made the repair a bit easier than having to patch veneer.
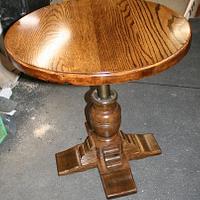
The table only lost about 1" off its diameter, when done.
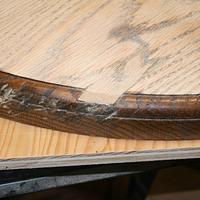
The hardest part of the repair was the large chip out of the face. If I just cleaned up the chip and inserted a butt jointed pieces of oak that, somewhat, matched the grain at the repair, the but joint would have stood out like a sore thumb.
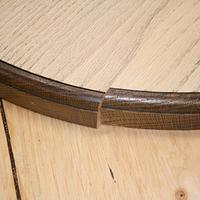
By cutting the replacement chip in a V (an angle might have worked), I didn’t end up with a line 90 degrees to all the other grain.
When done, I used an Exacto to make marks I HOPED would imitate the grain brought out by the stain. It worked and even I have to work hard to find the repair.
Putting the depth of the replacement chip down to the router line also helps avoid a line showing on the side, but which would not have been nearly as problematic in the end grain.
10 Comments
Very well done.
—Madts.
Tor and Odin are the greatest of gods.
Dang! Impressive
They must have cried when it fell off the trick and cried when they saw the repair!!
JAGO - just a grandma’s opinion
Excellent craftsmanship and repair technique. The top looks perfectly round in the last picture.What steps did you took to make the new circumference after the glue-up? I’m assuming you used a router and circle jig.
Thanks, all.
To get back to round:
1) I turned it upside down, so any hole I had to make would be hidden by the pedestal;
2) I did the usual measuring in to find the common center.
3) Once happy with taking as little off as possible, I marked center with an awl.
4) I drilled a 1/4" deep hole the size of a nail or rivet.
5) I made a long circle cutting base for the router from some 1/4" Plexi I grabbed at a yardsale.
6) I installed the removable bed I built for my bandsaw, to support large circle cuts (e.g., 48" diameter), then set the circle cutting jig up at the radius point. I mounted the table top on the circle jig, pushed the jig into the blade and gave the top a spin.
7) I took the top back to the bench and installed router (plunge base) and base with the nail at center.
8) I took about 1/8" off in in about four passes (about 3/8" at a time) using a 1/2" shank spiral bit.
9) I used about a 3/8" round-over bit to get the original line back on the upper edge.
The bandsaw jig got the cut to where I needed to be, with sanding, but I figured the router would leave a better cut. Just a bit of the gouged edge was still showing when I was done, so, rather than reset the bandsaw and make an edge cut (with more likelihood of blade wander, I went to the router.
If the bit of rough had not been left, the bandsaw circle jig would have got me within about 1/16th of round.
I could have used a hand held jig saw to take off excess stock, roughing the circle in.
I could have taken excess off to near a line using the band saw, In this instance, that would have been hard, because of the weight of the top.
I could have skipped the saws all together, since I was using a plunge router and only taking off a bit at a time, but I don’t like hogging off large amounts of material with a router, even with a good bit.
Thanks for replying with your method in getting the top into round and finishing it into its final shape. My bandsaw is a benchtop model, not having the power or the stability on its narrow base for such a cut. I would have opted to use my circle cutting router jig to size and remove the excess. When this pandemic is resolved, and the wife and I can resume looking for new home, its my hope we will find a place with workshop space that will allow for a full-size, free-standing bandsaw. Again, well done.
Kelly,
You did a fantastic job on that repair. The break looked like it could be clean enough to just glue up, but we’re assuming that wasn’t true since you lost some size to the table ?? Your customer must have been truly delighted.
Your last photo almost looks like the pedestal might have the ability to change the height. Is that true?
L/W
“Those who would give up essential Liberty, to purchase a little temporary Safety, deserve neither Liberty nor Safety.” Benjamin Franklin
The break was full on nasty. When I tried to pull it back together, it left about a 1/8" gap on the top and worse on the bottom.
A lever under the top allows the table to raise and lower. If too well lubed, it MIGHT have the ability to launch a Ming vase, so this may not be the perfect table around grand kids.
Beautiful repair Kelly, you have a great touch and talent.
Jack
When done, I used an Exacto to make marks I HOPED would imitate the grain brought out by the stain. It worked and even I have to work hard to find the repair.
Now there’s some creativity. One time I messed up with the router and took a good sized gouge out of a desk top. I filled it with wood putty and drew the grain with a pencil. After finishing it, you’d have to look for it to find it.
Losing fingers since 1969
HA! I love it, Brian.


