Share your craft projects
Make new craft buddies
Ask craft questions
Blog your craft journey

MsDebbieP
1435 posts
and
55 followers
in almost 12 years
in almost 12 years
Lola The Doll #2: Dola: The Body
This is
part 2
in a
5 part
series:
Lola The Doll
With the doll face sitting there, staring at me, it was time to make a body.
The pattern that I based the head on also had directions for a body but with the google translation, I decided not to use it.
Instead, I went back to the pattern that I used for my Amigurumi Moose and edited that to fit the head that I finished.
This pattern starts off by creating the two legs and then bringing them together for the body.
Before I started, however, I had to make some decisions:
What are the legs going to look like?
- shoe + leg?
- sock + leg?
- shoe + sock + leg?
- shoe + pants
- shoe + sock + leg? + pant?
- barefoot?
- sock + leg?
- sock + pants?
- or??
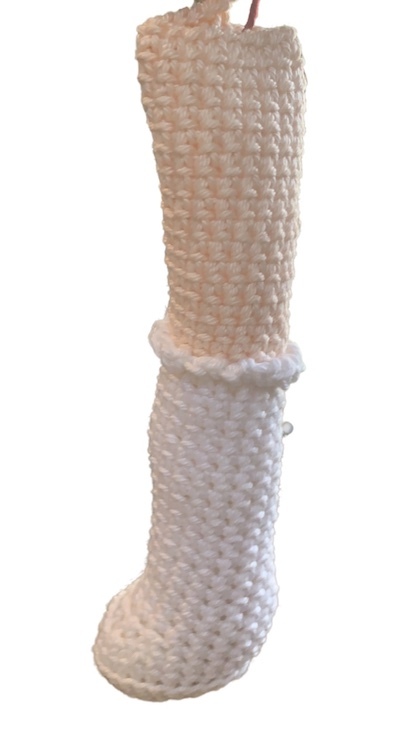
I opted for socks and legs and underwear, once I joined the legs together.
In hindsight, instead of just underwear, I wish I had made a one piece underwear/undershirt. Next time.
in colour of foot/boot/sock
Round 1: Create a magic circle with 6 SC
Round 2: SC INC in each st (12)
Round 3: SC in the first st, SC INC in the next, rep around (18)
Round 4: SC in the first 2 sts, SC INC in the next, rep around (24)
Round 5: SC in the first 3 sts, SC INC in the next, rep around (30)
Round 6: SC in the back loops only (30) < bottom of foot/shoe
NOTE: for the foot you wouldn't need to do the back loops only. Feet don't have a ridge!
NOTE: for the foot you wouldn't need to do the back loops only. Feet don't have a ridge!
Rounds 7: SC around (30) (NOTE: for a shoe, I would do 2 rows of this; but I was doing a foot/sock)
Round 8: SC in the first 9 sts, DEC, DEC, DEC, DEC, DEC, DEC, [that was 6 decreases] SC in the last 9 sts (24)
Round 9: SC in the first 6 sts, DEC, DEC, DEC, DEC, DEC, DEC, [that was 6 decreases] SC in the last 6 sts (18)
[NOTE: maybe if changing colour, I would do BLO in first row, to show the edge of a shoe.. or FLO to show a pantleg?]
> 14 rows of 18 stitches (in colour of boot/sock)...
STUFF FOOT & bottom of leg
Next row: (RUFFLE ON SOCK) turn work around (for me: working from outside the leg, rather than the inside) and do a row of CRAB STITCH in FLO.
NOTE: This is the top of the boot/sock. If you want it to be the bottom of a pantleg, then switch to pant colour for this.
Also: you may not want a ruffle, so just a SC round the edge would work or skip the edging all together
> Next row: switching to the colour of the leg or pant and work in BLO for the next row
> 22 rows of 18 stitches for the leg / pantleg
Next row: can be a change of colour to that of underwear...
> working in FLO, sc around
> Next row: in BLO, sc around
That's 2 rows of the underwear.
This is the end of the 1st leg being made.
Tie off.
Finish stuffing the leg.

SECOND LEG:
repeat but do not tie off at the end.
> (Crochet a few stitches around to the side, to line last stitches up so feet are facing the same direction when crocheted together) (9 stitches)
> chain 3 and then SC into the other leg; (this is the crotch area)
crochet all around the legs, back to the beginning of the chain ... the legs are now joined and the body has begun
crochet all around the legs, back to the beginning of the chain ... the legs are now joined and the body has begun
> 6 rows around
> change to skin colour and sc BLO around
> 9 rows
> next: SC in the first 5 sts, DEC in the next rep around (36)
> SC in the first 4 sts, DEC in the next, rep around (30)
> SC around (30)
> sc in 3, dec. around
> sc in 2, dec... around
> sc in 1, dec.. around
> 5 rows around (This is the neck)
Stuff the body
Now... from past experience, I know that if you have created a large head then it really needs to be secure on the body or it will wobble. I didn't want wobble.
So.... I purchased some bendy hair curlers and inserted one into the neck for stability. The bonus was that I can tilt the head. That's fun!
Next: arms.
Again, I adapted the MOOSE pattern to make a doll arm. (Basically, I wanted thumbs)
JAGO - just a grandma’s opinion


