A few months ago I spent many many hours trying to perfectly align a set of "box joint hinges" for my project " A Little Cabinetree" After I finally got them working I installed them on the edges of the MDF sides and doors and then veneered over the whole works.
The only good part was that there were enough left over prototype parts that I could make a hinge for my next project from the cast-offs
Then this week I was making a tea box for a friend and when the issue of hinges came up, as it will with these boxes, I decided to try to make the hinge integral to the box.
Like this:
This has numerous advantages.:
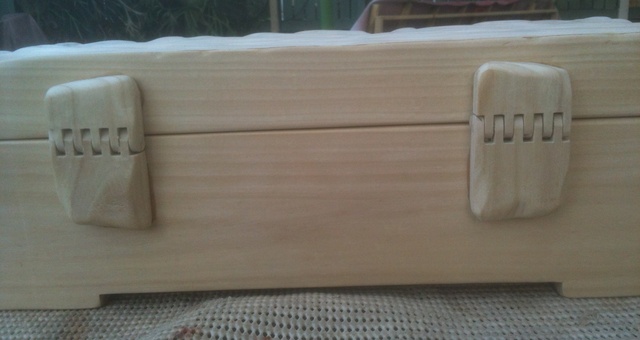
1) It's clean. There is only one "added part" - the pin, no protrusions or bumps or screws.
2) You don't have to install it. No rebates, no unsightly gaps where the hardware had to be realigned.
3) It is automatically perfectly aligned. All you have to do is make the top and bottom the same dimensions and square and they will be perfect.
4) It's really cheap. (The price of a foot of 1/8" brass rod.)
5) It automatically stops just past 90 degrees.
6) It only takes a half hour to make them .
7) They are sooooo easy.
You get the idea. I thought back on all those hours wrestling with little blocks that didn't want to be aligned.
I would have kicked myself (If I could)
So here's how you make them…. So you can kick yourself too.
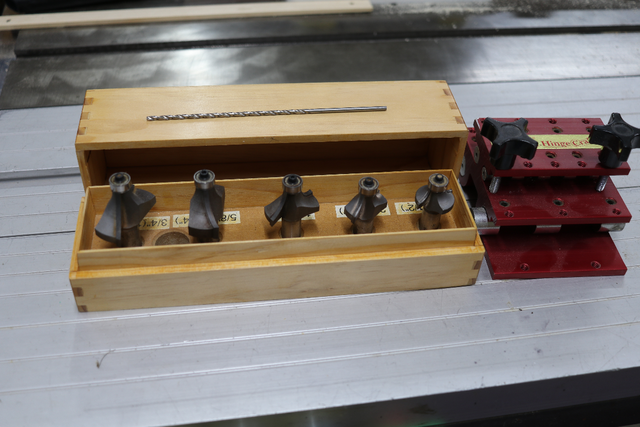
First, make up or get out whatever you use for a foolproof spacing jig, box joint jig or the like. (I made this one on the Q & D.) Use it to lay out the cuts between which the gaps will be removed.
Run a groove down the edge that will carry the pin. Cool that the pin and the saw blade are both 1/8", yes?
Round off the edges with a corner round bit on your router.
Chew out the waste areas.
Install the rod in the top part and glue in a little strip to fill in the remaining gap. Make sure you don't glue the rod to the wood. In this photo the strips are glued in oversize. They will be trimmed to the opening after the glue sets.
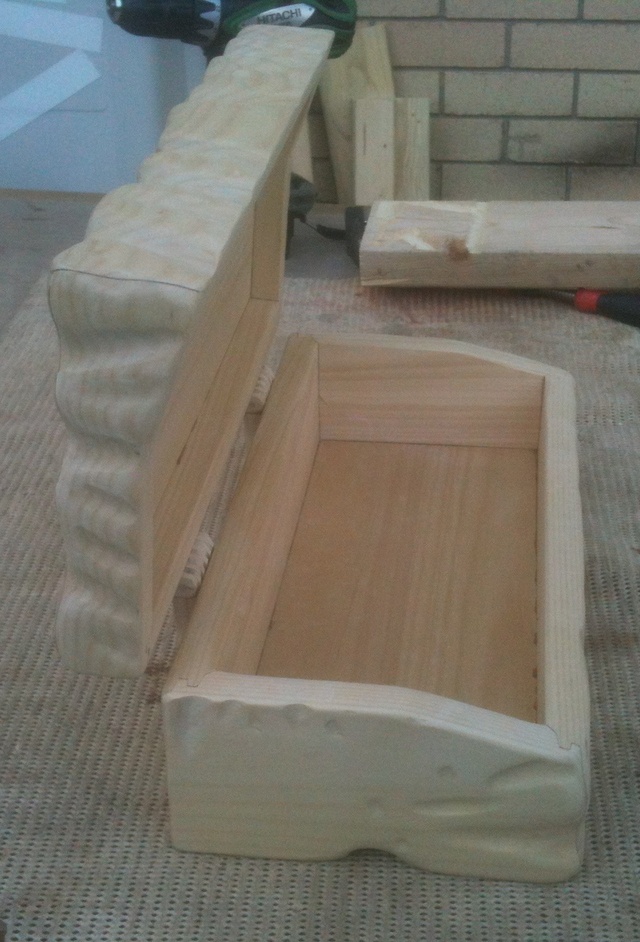
Then go ahead and finish making the box as you normally would. The only thing to make sure of is that the line dividing the top and bottom of box is on the centerline of the hinge pin. (Really important).
The half lap recess (if you are using a half lap) for the top to fit over is cut on the outside of the box and extends below that line. That is to say that the actual dividing line is the one you would see from the inside of the box, not the lower one you would see from the outside of the box. This is the only photo I have that shows the half lap.
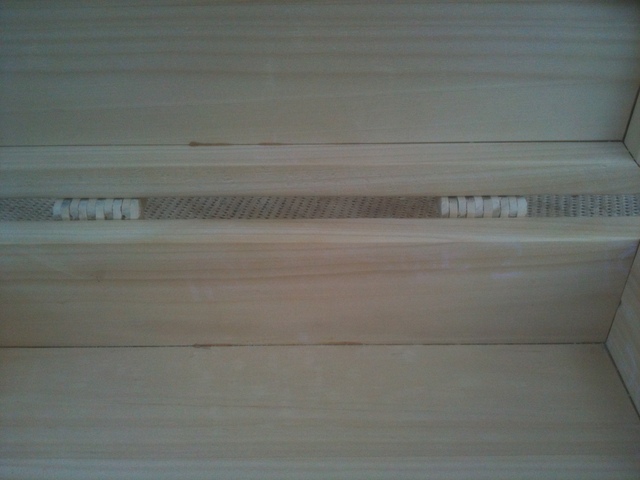
Completely finish the box and as the last step install the top, glue in the fillers and carefully sand and finish them. In this case I used spalted filler pieces and made them appear to match the pieces into which they were glued. They don't really match, but the eye wants them to so they do appear to.
I used fish glue to install the last fillers so that they could be easily disassembled at any time by simply getting them wet.
You don't have to add the last filler pieces in the bottom. The hinge works exactly the same without them, and the top is removable.
Hope some of you will use this idea. I can't believe that I've actually invented it but if I did you have my blessing to use it.
It's just soooooooo darn easy !!
Thanks for looking in and good luck with your hinges.
Followed Chuck's link, excellent way to do the hinge!
Makes me think of the same method, but leaving the lower hinge wing to join up with the boxes back (half lap, spline?)
Then the pin could be installed before putting on the lid. (I always hate trying to install small bits to conceal a cut unless I have easy access for a hammer 8^)
Easily beats dealing with standard box hinge installs and looks so much better!
I've often stated boxes are boxes and I have gradually morphed into a beligerant, "MDF, laser cut" boxing beast overnight. In the past, my boxing gloves included these in the padding, however, the creations possible were governed by the length of the 3mm (1/8") drill bit... and I've busted a few in the past.
This concept is just brilliant... why didn't you post this 5 years ago? Thanks for sharing and thanks for the SU model... I run 2018, but at least I can download the Collada format.
If your first cut is too short... Take the second cut from the longer end... LBD
May I add my hinge I made Jun 2013 its effectively a movable finger joint with a Japanese skewer for a hinge pin! I didn't get it under my finger nails though!