


Share your craft projects
Make new craft buddies
Ask craft questions
Blog your craft journey

shipwright
2073 posts
and
113 followers
in over 12 years
in over 12 years
Shipyard Memories #3: Bending the Ribs
This is
part 3
in a
22 part
series:
Shipyard Memories
Note: I was new to blogging when I wrote these. They get a little too technical. 😁
If you lose me, just skip to the pictures. If you are intrigued, fill yer boots! 👍
OK, the time has come to explain the reasons for the jogged frames and the inside and outside ribbands. (I hope I'm not just confusing you) The usual way to set up for ribbing is to make the station frames to fit the inside of the planking. Then the ribbands go outside the frames and the ribs bend entirely inside the boat against the inside of the ribbands, That puts the outer faces of the ribs where they should be, at the inside of the planking. Then stringers are bent inside the ribs. In this method the ribbands remain in place to brace the ribs as the planking begins. They are only removed as the approaching planking demands. The plans for this hull however required that a 5" x 1/8" bronze strap be installed in an "M" pattern over the ribs and under the planking to stiffen the ship against the strains of the square rigging she was to get. In order to install this strip we needed to be able to access the outside of the ribs over the whole hull before any planking was on.
The first photo jumps ahead to show this bronze strap and you can see that it could not be installed with ribbands outside the ribs.
In the second photo, we are bending one of the 1 1/2" x 2 1/4" oak ribs. Hot from the steam box the rib is pre-bent at the bottom and then inserted between the ribbands at the jog so that when the rib sockets into it's pocket in the keelson, it can be bent outward against the inside of the lower ribbands and then back inward over the outsides of the upper ribbbands and stringers. It should be becoming clearer now. Sorry for the intrigue but it was a complex process and required a lot of planning at the time.

In photo #3 I've moved up to the deck to finish the bend while my helper (on deck with me) and the owner stand by with clamps to secure the piece. Once clamped carriage bolts are used to fasten the rib to each stringer and the sheer clamp. Two screws go in at the pocket.

In this one the bending is finished and the lower ribbands have been removed to allow the bronze to be inset into the ribs. It is screwed into each rib and after planking, back screwed into the planks. You can see the heads of the carriage bolts holding the ribs to the stringers. I just love the patterns made by these pieces. They just look good from any angle.

Here you can see the bronze strap let into the ribs and the stem.

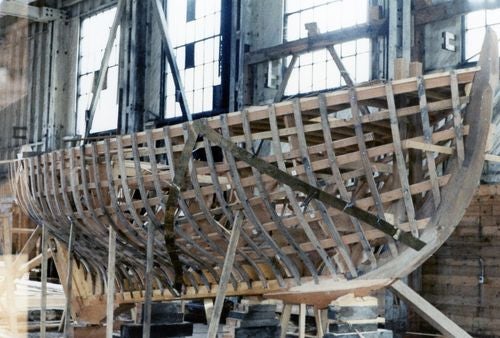
In this photo the hull is completely framed, the ribs trimmed off at the sheer and she's almost ready for her skin.

This photo shows the "floors" that are bolted to each rib pair and drifted into the keelson to form a rigid and very strong unit. The beginnings of the engine beds are in the background.

Before planking can begin the rabbets must be chopped in the stem, sternpost and deadwood with a mallet and chisel and the deadwood must be faired. There's no tool made that does this job like an adze.

Thanks for watching and as always comments , critiques, and questions are encouraged.
Tomorrow we plank!
Paul
The early bird gets the worm but its the second mouse that gets the cheese.
4 Comments

Well, I learned quite a few things from that. Bronze strip to strengthen things is a completely new one to me. Thanks for the tutorial!
May you have the day you deserve!

I never heard about the bronze strip, but it makes total sense for the strength to support the mast. Oh, she has some pretty lines.
Main Street to the Mountains
That strip is not a common thing at all. The designer himself owned the first boat built from this plan and thought he could feel the hull moving a little under square sails in ocean swells so he added them to make sure this one was solid.
The early bird gets the worm but its the second mouse that gets the cheese.
I can see where the bracing is critical. It must be pretty hard to keep one half mirrored to the other half with all the pressure of the ribs pulling on it. Do you add a rib to one side, then move to the opposite side for the next? go back and forth?
Yeah, there’s a lot of bracing, and yes, you work both sides together.
….. and you are constantly standing back and looking for anything that doesn’t look right.
….. and measuring, checking plumb, checking level … in lots of places. 😁😁
….. and you are constantly standing back and looking for anything that doesn’t look right.
….. and measuring, checking plumb, checking level … in lots of places. 😁😁
The early bird gets the worm but its the second mouse that gets the cheese.