


Share your craft projects
Make new craft buddies
Ask craft questions
Blog your craft journey

shipwright
2073 posts
and
113 followers
in over 12 years
in over 12 years
Shipyard Memories #2: Backbone and Framing
This is
part 2
in a
22 part
series:
Shipyard Memories
Besides the yellow cedar which will be used for planking, deck framing and various timbers and knees, an assortment of other woods and materials have been gathered together from their various sources and the actual building can now begin. The traditional "laying of the keel" was not however, the first step. In this case the main body of the keel will be the lead ballast casting which we will come to much later so for now the backbone setup will consist of the erection of the stem, sternpost, keelson and the stubby bits of the keel that will fit in front of and behind the lead keel.
In the first photo the stem has been assembled and mounted on the forward end of the keelson. The stem was cut from 6" thick Malaysian Gumwood. These pieces are too big and heavy to cut on the bandsaw so they are roughed out with a chainsaw and fitted with chisels, power planes and final fitted by repeatedly running a handsaw through the joint until it fits perfectly. The fit is checked by chalking one side and fitting them together and then checking for chalk transfer. At the waterline this assembly is about 18" through….. very strong. The pieces are bolted together with 1/2" galvanized steel rod bolts.

The next photo shows the sternpost assembly with the top part of the propeller aperture ellipse. The sternpost itself is douglas fir and the deadwood is yellow cedar. There are some interesting locking joints here. This photo also shows the bit of actual keel that will fill in behind the lead and the after end of the keelson with the pockets chopped in anticipation of the ribs. These parts are douglas fir.

The next shows most of the building stations erected on the keelson. The gap for the lead keel is easily seen here. This is the first real chance to see her in three dimensions and excitement is running high. There aren't enough hours in the day. If you look closely you may notice that the bottom ends of the station frames have a big jog in them making the bottom foot or so much bigger than the rest of the frame. This will be easier to explain later, but it's interesting.

Now the stations are all up and the permanent stringers are being fitted. Normally the stringers go in after the ribbing is done but for the same reason as the jogs mentioned above we had to do it this way. I will explain when we get there. The stringers are clear 2" x 3 1/2" douglas fir.

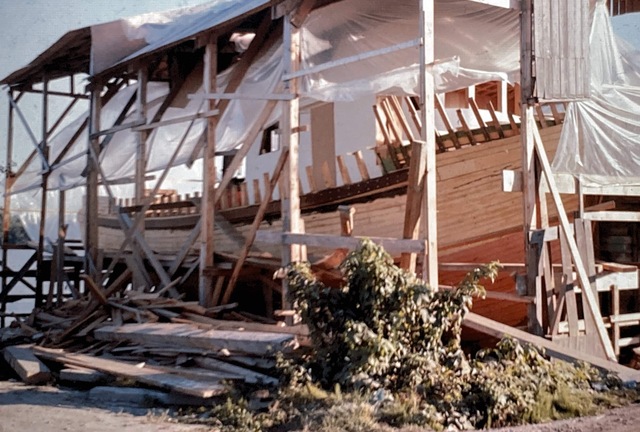
This was from the start and still is one of the nicest angles from which to view this hull. Her sweet lines are the work of yacht designer and personal friend Jay R Benford. During this setup period constant checks are being made to assure that everything is plumb, level and square. A small mistake here can cause a lot of grief later. As I remember the sternpost was 6" x 6" and at this point has been rough shaped as has the stem.

The permanent stringers alone don't give enough support or shape to bend the ribs over so "ribbands" are added to fill in the spaces and the sheer clamp and beam shelf (deck edge members) are fitted to strengthen the frame for the stresses of bending
1 1/2" oak. Again you will notice that the ribbands at the bottom fit over the stem while those above fit against the side of the stem.

In the last picture the deck framing has been added because with the ribbing method we are going to use, the stronger we can make the frame the better. Bending all those ribs puts a tremendous strain on the whole structure. The deck framing is all yellow cedar and for the most part it is sided 1 1/2" with strong beams larger.

Tomorrow we'll fire up the steam box and bend some ribs. See you there!
As usual all feedback and questions are welcome.
Paul
The early bird gets the worm but its the second mouse that gets the cheese.
7 Comments

I have a lot of questions because I am ignorant in the ways of boatbuilding, but I expect you’ll be answering them later.
May you have the day you deserve!
This is so cool! I have been following the build of Tally Ho on you tube for a long time. If yo haven't seen that you should definitely check it out. I will probably never build a boat but it sure is neat learning about it
Jerry-Holland Mi

I love seeing how boats are built. There is a really cool YouTube series about restoring the historic Western Flyer. Very fascinating to see how its done, including sourcing the wood.
--Nathan, TX. Hire the lazy man. He may not do as much work but that's because he will find a better way.
new
I love seeing how boats are built. There is a really cool YouTube series about restoring the historic Western Flyer. Very fascinating to see how its done, including sourcing the wood.
I learned the trade building that kind of boat, mostly seiners and trollers at North Arm Boatworks and Sather Boatworks in New Westminster on the Fraser River.
The early bird gets the worm but its the second mouse that gets the cheese.
I think that one of the things that fascinates me so much is using straight lumber to make so many curves.
--Nathan, TX. Hire the lazy man. He may not do as much work but that's because he will find a better way.

Enjoying the read Paul. I remember some of the terms you are using, I have read a few books on the subject and they are coming back to me.
Main Street to the Mountains
Most of the bracing is temporary Bently. 🤣
The early bird gets the worm but its the second mouse that gets the cheese.