


Share your craft projects
Make new craft buddies
Ask craft questions
Blog your craft journey

shipwright
2073 posts
and
113 followers
in over 12 years
in over 12 years
Shipyard Memories #5: Decking and Casting the Keel
This is
part 5
in a
22 part
series:
Shipyard Memories
One of the more common complaints against wooden boats is leaking decks. With a traditional caulked deck this can certainly be a challenge. Decks are exposed to the sun and if they dry out too much leaks are almost inevitable. We wanted to have a traditional looking deck on Smaug but wanted to make use of "modern" technology to see if we couldn't eliminate the problem. The deck we designed for her was built in three layers.
The first photo shows the fore deck from the inside of the boat. What you see is a 3/8" layer of red cedar strips that have been chamfered to simulate T & G. The opening will be the forward cabin skylight.

The next shot shows the second layer, 1/2" marine plywood and the third layer, 5/8" fir strips. Each fir strip has a rabbet of about 1/8" x 1/8" for Thiokol seam compound and the fir is bedded in Fibergum (bituminous roofing compound). The 4×4's are gumwood sampson posts that go below decks and fasten to the stem. They will anchor the bowsprit and serve as forward mooring bits. The pieces sticking up through the covering board are called stanchions and they will support the bulwarks to be added soon.

Here you see the completed fore deck. All that shows is a traditional looking fir deck, sprung and fitted to a king plank in the center. In the foreground you can see the cabin has been started. Also more stanchions have been fitted, although they haven't been fastened yet and some have slid down inside a bit.

This shot shows the completed after deck with cutouts for the cockpit and the cockpit lockers. The hole at the after end of the deck is actually beyond the end of the hull. The rudder head will come up through this hole. This rather different type of after deck is known as a "pinky" or "pinked stern" and owes it's heritage to fishing boats on the East coast in the early 1900's.

This is what the pinky stern looks from the outside. Yes, the plywood will be covered up.

Some time has passed.The cabin is started and the bulwarks are going on. The rubbing strakes (or guards) are in place and the heavy "channels" are installed in way of the chain plates that will support the rig. (Will be clearer later.) This job is now a back burner affair. The other boat you can see is a salmon troller that we are replacing the wheel house on.

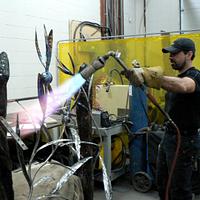
Here you can see the mold for the 9,500 pounds of lead that will be cast for the keel. This was my first one and I had been told that you could use an old bathtub to melt the lead. Well, maybe you can but it better be cast iron because this one cracked on us before we even got started. I built another one from an old hydraulic fluid tank and it worked for several keels including this one eventually. The mold is made of planks, heavily re-enforced against the weight of the molten lead and coated liberally on the inside with water-glass to reduce charring. A mold like this for a keel that must fit in an already existing space is layed out 1/8" in a foot oversize to account for shrinkage upon cooling. It worked very well.

In this last photo the keel is installed. An interesting story I often tell about the installation recalls a moment when we were raising this massive bar of lead up into position with three 5 ton hydraulic jacks. A thought crossed my mind that if this thing were to roll off the jacks and land on my leg, it wouldn't likely stop until it reached the concrete floor. That wouldn't have left a lot of room for my leg. The thought passed and we got it in position without any trouble at all… but I do remember the thought. (Notice the troller is gone and a 19' catboat is started.)

Well, that's it for now. After this point the photos are mostly of the finished boat so I'll get some together and you can see how she came out next time….or two
Thanks!
Questions / critiques welcome.
Paul
The early bird gets the worm but its the second mouse that gets the cheese.
4 Comments

That is a process for the keel, yes you have to think about the safety lifting that kind of weight.
Main Street to the Mountains
Nice work. Very cool build!
Angellos
Not many more of this keel but I have it covered better in the Cold Molding blog that I’m posting now.
The early bird gets the worm but its the second mouse that gets the cheese.
Thanks for your answer on the planking also. I think there is an art to it.
You might just be right…😉
The early bird gets the worm but its the second mouse that gets the cheese.