


Share your craft projects
Make new craft buddies
Ask craft questions
Blog your craft journey

shipwright
2073 posts
and
113 followers
in over 12 years
in over 12 years
Shipyard Memories #20: The Jig, Patterns, and Hull Glue Up
This is
part 20
in a
22 part
series:
Shipyard Memories
...
-
The Harbour Ferries: Stitch and Glue Construction.
-
The Jig, Patterns, and Hull Glue Up
-
Closing Up the Hull
...
- The Harbour Ferries: Stitch and Glue Construction.
- The Jig, Patterns, and Hull Glue Up
- Closing Up the Hull
As these boats are a little larger than the usual stitch and glue hull and because some of the bends are difficult, I chose to make a female jig in which to assemble the hulls.
This photo was taken when the jig was first built at my old yard in Coal Harbour B.C. It was disassembled and reassembled many times after that. The supports are the opposite of construction frames that you would build a hull outside of , taken from the boat's lofting. Against the wall in the background you can see some long sheets of scarfed plywood and the pattern for 1/2 of the bottom leaning against them. (if your eyes are good)

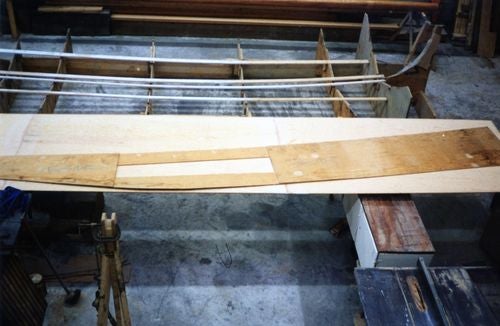
In the next photo you can see the jig in the background. It's over ten years old now and has had ten boats built in it. In the foreground one of the sides is being laid out with the side pattern. Both sides will come out of a single 4' x 24' sheet.
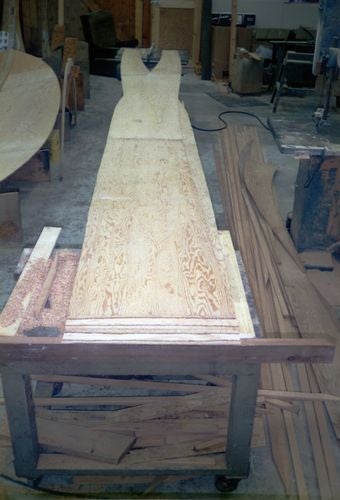
Here the two pieces of the bottom have been forced into place and clamped to the jig. The bend in the bow is extreme, although it may not appear so, and the pieces have been kerfed to facilitate the bend. To answer the question I know will be asked, no, the strength is not compromised appreciably because the kerfs will be filled with epoxy and the hull configuration there is very strong because of the angles and the glass chines.
What doesn't show here is the pieces of tie wire used to pull the pieces tightly together along their length before application of the epoxy fillet. These are the "stitches" in the stitch and glue.
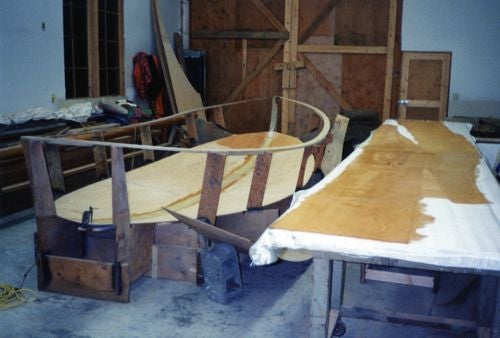
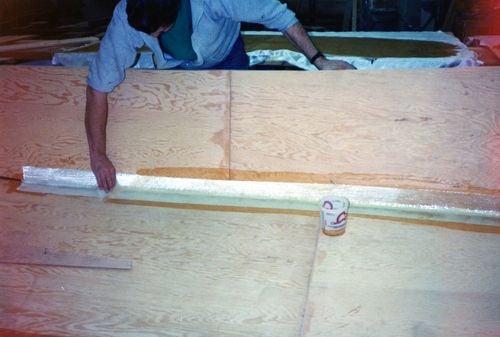
Now the bottom is in place and has been glassed together by first applying a smooth fillet of thickened epoxy followed, while the fillet is still wet, by a layer of 24 oz. triaxial fiberglass cloth and more epoxy. Doing it this way uses less epoxy and saves a lot of sanding of the fillets. The bow area has had the kerfs filled and the sides of the jig have been set up in anticipation of fitting the side panels.
On the right, you can see the two side pieces are being 'glassed prior to assembly. It's just easier that way.
A note about triaxial cloth.
This is a fiberglass material that consists of a layer of parallel strands of glass equal to 1/2 the thickness (12 oz), overlaid with two layers of parallel fibers laid at opposing 45 degree angles to the first layer. The layers are then sewn together.This material has a huge advantage over standard woven cloth or roving where the strands are at 90 degrees to each other because if you cut it into strips (we used 4" to 6" wide) across the heavy strands, the strip will when laid on a joint have all of it's fibers crossing the joint. If you lay standard cloth or roving along a joint it will have 1/2 of it's fibers running parallel to the joint and adding no strength. You can cut standard roving diagonally but it will become completely unstable and will likely fall apart.
Suffice to say that three layers of 18 oz. roving with half of it's strands serving no purpose will give you 27 0z. of glass crossing the joint. The joint, because of the woven nature of the roving and the number of layers, will be 1/2" thick or better. That's a lot of very expensive epoxy. A joint made with 24oz. triaxial cloth will have 24oz of glass crossing the joint and will be about 1/8" thick. It will be just as strong, way cheaper and more resiliant than the roving joint. Sorry to go on about that but it is a very important point.
The next one shows the sides cut out and scarfed for the joint to the round stern piece. They are quite narrow at the bow because there is a third piece that facilitates the steep bend as the bottom transitions to the stem.
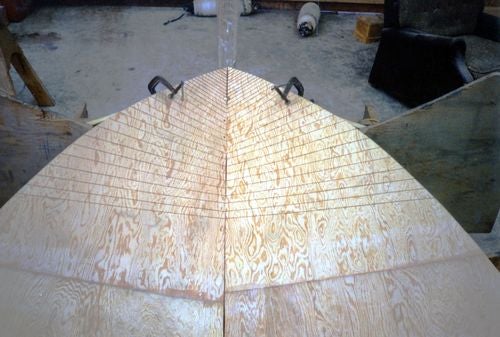
The last one for this segment is a shot of the way the sides are attached to the bottom. After being placed into the jig, coaxed into their curvature and clamped into position, the adjacent edges are again stitched with tie wire through small drilled holes every foot or so as required to make a nice fair chine line. It's worth saying here that the fits don't have to be good. As long as you get a nice fair curve the odd 1/4" gap means exactly nothing. We used to call them "drywall boats" because close was good enough. I mean it, really. If you spend a lot of time making the joints fit perfectly the only thing you will accomplish is to take more time.
Once the joints are wired A fillet of thickened epoxy is applied as before and the triaxial cloth is laid on the fillet and more epoxy is massaged into it with a bondo spreader. That's actually me this time. I guess Jim got hold of the camera.
I've had enough for now and I'm sure you have too so we'll call it a day and next time we'll finish up the hull with that round stern and roll it over.
Thanks for watching.
Comments critiques and questions…. all good.
Paul
The early bird gets the worm but its the second mouse that gets the cheese.
3 Comments

Interesting fact about the epoxy fillets but it does make total sense with the direction of the fibers, and probably easier than using a thickened epoxy. I have seen in the recent reading on boat building they use zip-ties now in the stich n glue.
Main Street to the Mountains
Zip ties would work for sure. Tie wire is cheaper and makes smaller holes. Lots of right ways to do things.😁
The early bird gets the worm but its the second mouse that gets the cheese.
That make since too, was not thinking about the size of the needed holes. And cheap too.
Main Street to the Mountains