


Share your craft projects
Make new craft buddies
Ask craft questions
Blog your craft journey

shipwright
2073 posts
and
113 followers
in over 12 years
in over 12 years
Shipyard Memories #19: The Harbour Ferries: Stitch and Glue Construction.
This is
part 19
in a
22 part
series:
Shipyard Memories
...
-
Finished, Launched and Sailing
-
The Harbour Ferries: Stitch and Glue Construction.
-
The Jig, Patterns, and Hull Glue Up
...
...
- Finished, Launched and Sailing
- The Harbour Ferries: Stitch and Glue Construction.
- The Jig, Patterns, and Hull Glue Up
...
This is the fourth and last blog on the different styles of construction that I have used in wooden boat building. Preceding blogs have covered Carvel Plank construction, Framed Plywood construction, and Cold Molded Construction. This one will cover what has become known as "Stitch and Glue" style. It is generally associated with but not exclusive to use with plywood.
I wasn't as into photographing the progress then as I am now. In fact if I hadn't decided to build two boats in the winter of 1994, in anticipation of the Commonwealth Games coming to Victoria that summer, I would not have hired help that year and likely wouldn't have any photos at all. Many of the photos will feature Jim Kennedy who helped me that winter building Harbour Six and Harbour Seven.
I also apologize for not having photos of a few key components (like the stitching) but I will try to explain well enough to give you a clear picture of how it's done.
There are several ways to approach stitch and glue but most start with the various components of the hull being cut from patterns either supplied by the designer or created from a full size lofting from the plans. These components are then assembled by stitching the adjoining edges together whereupon the hull takes on three dimensions as the curved edges are brought together.
These boats are a little large for that so I built a jig from the lines plan and took the patterns from the jig. We'll get to all that soon enough but for now let's start at the beginning. The first order of business in building a twenty foot boat in this style is to acquire twenty four foot plywood.
I always scarf my plywood with an 8:1 scarf and cold cure epoxy. There is no need to back this joint with anything because it is as strong as the rest of the plywood. The first thing you need to do is set up a scarfing station that will support a stack of plywood and has at one end a solid, flat wood surface. Then you stack as many sheets as you will be scarfing in a staggered pile with the offset equal to 8x the plywood thickness. In our case with 3/8" plywood the offsets are 3". The sheets can be tacked together with a pin tacker staying away from areas that will be planed off.
Next is simply to plane off a flat surface in a plane from the lower edge of the bottom piece to a line 3" back from the upper edge of the top piece. Keeping the glue lines in the plywood straight will ensure an even cut and when you are finished you will have 3" scarfs with knife edges. As we were scarfing three pieces to get 24' some of the pieces were flipped end for end and done again to give scarfs on both ends of the center pieces. By the way, that's a Skil 100 power plane, the best power plane ever made IMHO. I guess you could use a hand plane if you were a purist, but it takes about ten minutes with the 100.
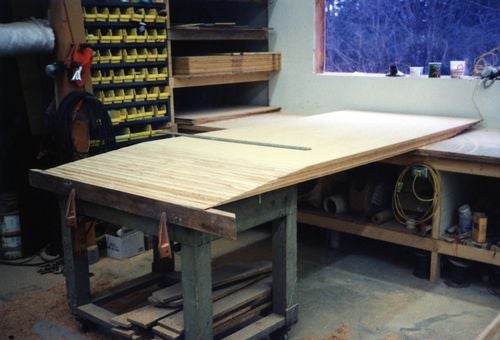
Once the contact faces are cut you set the pieces up on your custom designed 4' by 32' scarfing bench and glue them up. In this shot Jim is spreading epoxy on both sides of a joint. Under the joint is a strip of polyethylene which conveniently does not stick to epoxy (or vice versa).

Once the glue is spread, one sheet is flipped over and the scarfs are aligned. A couple of tacks away from the joint will assure that nothing moves. Then more poly is placed over the joint followed by a strip of 1/4" plywood 3" wide exactly over the scarf. In this photo Jim is pressing down with the air stapler until he sees glue squeezed out of the joint (under the poly) before firing a pattern of staples to clamp the joint. When both scarfs are stapled up the next set of three sheets is laid up in the same manner on top of the first one. This is repeated until all the pieces are done. When the glue sets up the plywood strips are pried off and if you're living right, most of the staples come with them.

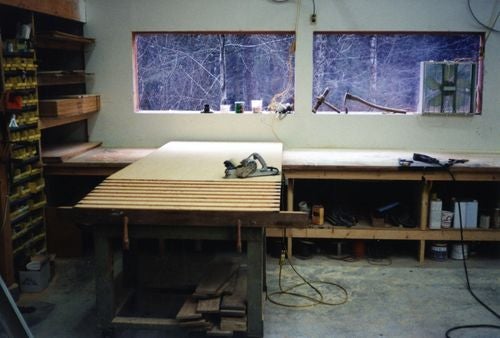
This shop was 40' x 60' and was built on our property specifically to build and do annual maintenance on these boats, so the scarfing bench was a high priority.The last photo shows the shop set up I used for scarfing. The plywood rack was at one end of the bench (see first photo) so pieces could easily be pulled out by one person and there were two 4' infrared heaters located 8' apart that could be lowered right down to a couple of feet above the scarfs to cure them overnight. (note the snow outside).

That's it for tonight, next time I'll cover the jig, patterns and hull assembly.
Hope you're enjoying this as much as I am.
Comments, critiques and especially questions are encouraged.
Paul
The early bird gets the worm but its the second mouse that gets the cheese.
1 Comment

I'm enjoying following along.
Main Street to the Mountains