


Share your craft projects
Make new craft buddies
Ask craft questions
Blog your craft journey

Mike40
1074 posts
and
35 followers
in about 12 years
in about 12 years
How I Get The Most Out Of My Small Shop
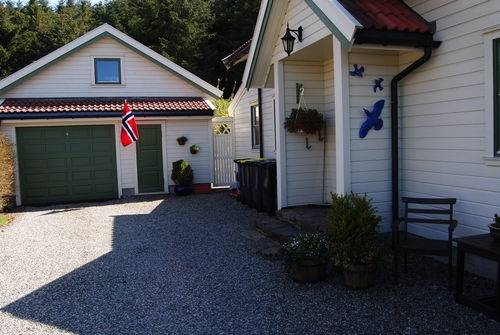
Most hobby woodworkers probably have small shops, the majority most likely in one half of a two car garage. My set-up was a 2 car garage size but with only one enclosed bay and the other half was an open carport, but both are under the same roof with a loft above them.
The garage length is 24 ft. and there was originally a small storage space/work shop across the entire rear of the garage and carport with a total length of 17ft. across and about 6-1/2ft. wide. I built my shop in the carport area which then formed an ‘L’ shaped floor plan. The longest part of the ‘L’ running from the entrance at the front of the garage all the way to the rear and the ‘L’ swinging to the left behind the walled off enclosed car bay.
Here is what it looks like from the front entrance. see below
I won’t go into the details of the shop construction as my main purpose here is to show you how I have utilized the space available in case someone else might find some useful ideas there. Let it suffice to say that I can work all year around comfortably in my shop as it is heated and air-conditioned (heat pump).
Here is what you see when you enter the shop.
- On the left I have platter storage and I also keep some planks there. It is 6 or 7 ft. long with wheels.
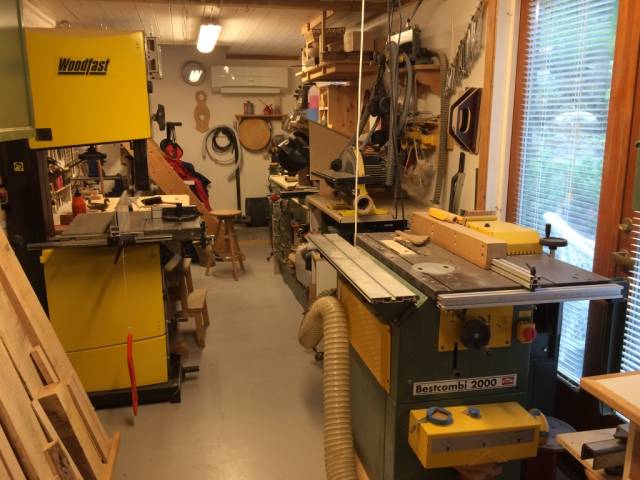
- The machine on the right is a combination machine with 5 functions. Table saw, shaper, mortiser, jointer and planer. I have to spin it around to the other side with it’s wheels to use the Joint, planer and mortising functions. This machine is 20 years old and gets a lot of use though it is a relatively cheap machine it has performed very well and continues to do so. It’s best feature is that it saves a whole lot of space.
- On the left you can see my 18" bandsaw, A Chinese Woodfast brand. Inexpensive, but a real workhorse and it cuts very accurate veneers and resaws like a dream. My shop vacuum is right across from it and it serves the combo machine and the bandsaw from where it sits, but I have to move it for use with my other machines so it is also mounted on wheels. see below
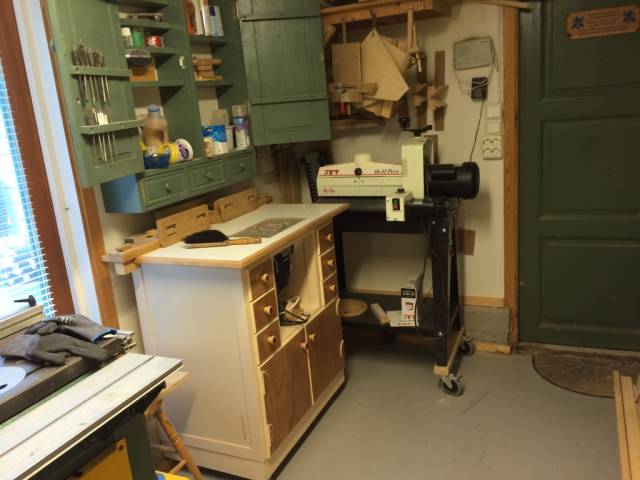
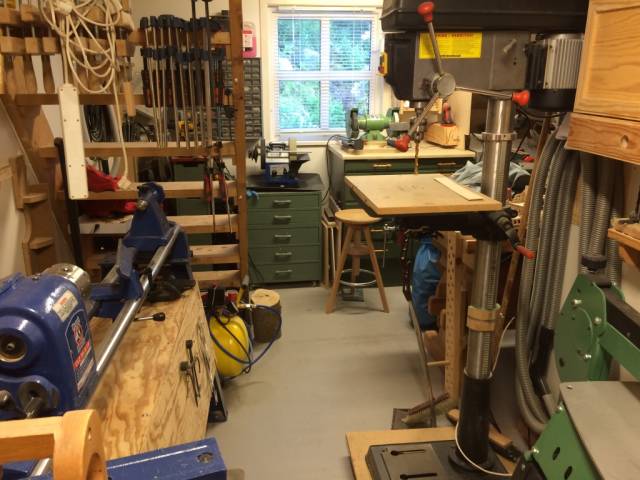
This view taken from the opposite direction shows my shop made router table and my relatively new drum sander. The router table is the same height as the table saw so it also functions as an outfeed table for the tablesaw. The router table and the drum sander are also mounted on wheels and I have to pull the drum sander out of the corner to use it. see below
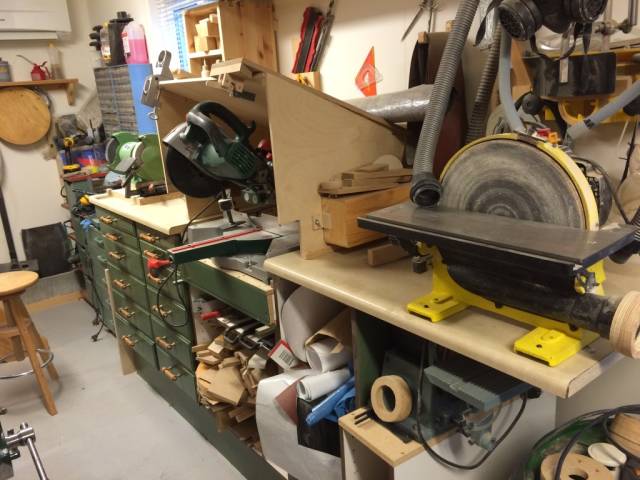
This shot, looking the other way again shows my 12" disk sander, along with built-in cabinets (my son’s old oak kitchen). Under the counter is a combination belt/disk sander on a cart with wheels and which has to be pulled out to use it. In the center of cabinets I have my sliding miter saw which sits under a dust shroud which works very well. The miter saw is on a pullout torsion box table. It is placed so that very long pieces can be cut on it and it slides in for storage. Quite handy with such a narrow working space where there isn’t much cross-cut capacity on my tablesaw or bandsaw. see below
Now looking toward the bandsaw from the opposite direct you can see my bench which was made from an old but very solid and well built trestle table which I picked up at a 2nd hand store. I love it. It is quite large and it allows me to make big things with comfort. The 2nd photo is a close-up of my plane till based on Chris Gochnour’s Fine Woodworking article. It is very convenient and easy to use. I have an air/dust filter machine mounted above the workbench. I forgot to get a picture of that see below
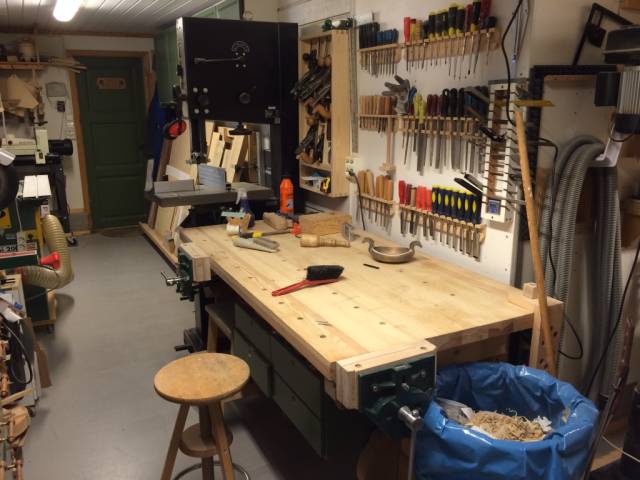
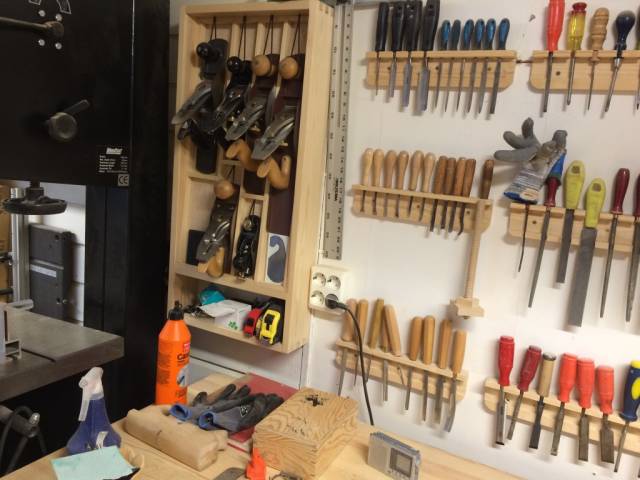 <
<
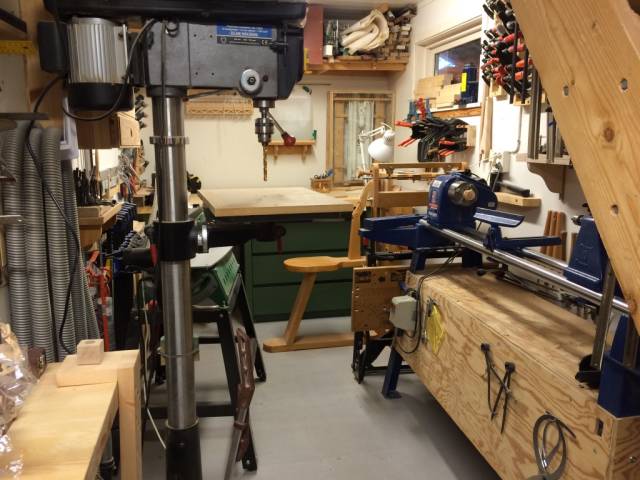
This is the part of the ‘L’ that runs behind the enclosed car bay. I have a lot of stuff in there, but it all works very well.
- In the left side of the photo is first the drill press and then next on the same side my scroll saw.
- On the right side is my lathe which is nestled under the stairs to the loft
- Next comes my shop built Chevalet de Marqueterie (Thanks to Shipwrght’s Sketchup plans).
- At the end is my shop made bench with an Ikea drawer unit nestled under it. I store all my marquetry tools/accessories and veneer in the drawers.
- My light table is stored against the wall on the right side of the bench.
- On the lower left wall I have the components of my veneer press stored .
- My water supply is the water container you can see in the middle of the far wall. I use it for my Tormek sharpening machine and also to make hot hide glue with. see below
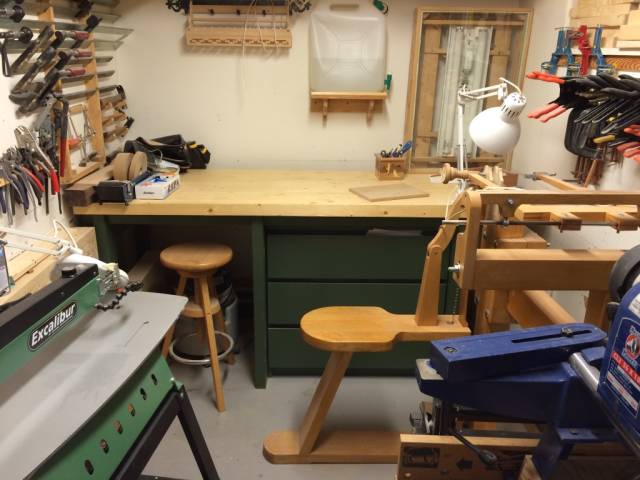
Now a view in the opposite direction. The shop made drawer unit is mainly my sharpening center and my Tormek is mounted on it. To the left of the Tormek is my hand power tool storage unit with accessory drawer in the middle and the power tools mounted on the shelves. Both units are mounted on wheels. My bench grinder is mounted on the counter to the right at the end. Sorry the power tool unit doesn’t show in the photo. see below
My shop is very narrow and maybe looks way to crowded, but in fact it functions quite well for most any size project, but it has one major disadvantage and that is the difficulty in keeping it tidy and clean. It helps to have almost everything mounted on wheels (including my drill press), but it is still very difficult to keep any sort of control over cut-offs with a project in progress and the dust gets into all the little nooks and crannies and everything has to be moved to sweep. That is my only real complaint.
One main thing I wanted to show you was how long work boards can be cut or drilled on every machine and that they are set up to help each other support work pieces. I forgot to mention above that the table saw is at the same height as the miter saw so it helps to support long pieces being cut in the miter saw.
There are certainly better and much more glamorous shops than mine, but I see myself as more of the average person when it comes to neatness, organization and beautification. My shop is not fancy at all, but it is functional except for the aforementioned cleaning problems. That doesn’t mean it can’t be improved, so if you have any ideas as to how it could make it better, please don’t hold them back.
Thanks for reading.
Mike, an American living in Norway
11 Comments

Very nice Mike. I am just going to empty my shop and start all over again. It is ridiculous too see how much space you have out of such a small space.
Well done.
Madts.
Tor and Odin are the greatest of gods.

Everything in its place and a place for everything ,Well done Mike,As Always.
woodworking classes, custom furniture maker
Everything in its place and a place for everything ,Well done Mike,As Always.
woodworking classes, custom furniture maker

Mike you have extraordinary organizational skills. Thank you for the tour.
Jack

To paraphrase Churchill, “Never has so much stuff been fitted so well in so little space.”
There has obviously been a great deal of creative thinking involved in this setup over the years.
Well done!
…….. What door hinges?
The early bird gets the worm but its the second mouse that gets the cheese.

An organizational dream shop. Everything thought out to the nth degree, ergonomics at its finest.
CHRIS, Charlottetown PEI Canada. Anytime you can repurpose, reuse, or recycle, everyone wins!

very nice job of organizing . My first shop was an old corn bin . 6’ X 10 ’. Like you I had a place for everything .
Wheaties
Thanks fellas. Extraordinary organization skills doesn’t really fit my MO, but I have the machines placed pretty well.
Paul The title accidentally got changed to my shed blog series. I have corrected it now.
Now the confession
After completing the shed the shop was it’s usual mess with cut-offs laying everywhere, with a thick coat of dust on everything. Sound familiar?
Compounding the mess were some bags of older cut-offs from the recent giga bookshelf project I did for my son, plus a years long accumulation of different platters and boards stored on my platter cart. So many that the passage from the door into the shop was becoming severely restricted.
Like most of you, I find it hard to throw anything away that is wood, but I figured that the time had come to sacrifice some of that useless material so I could breathe again. I filled up a whole trailer load of stuff and took it to the recycling center. I couldn’t believe the transformation. I haven’t been so happy since my son’s wedding!
And then later when I cleaned up after the shed project and mounted my new air filter it seemed like a whole new world. So it occurred to me that I could take photos of it and fool everyone into thinking that I could actually organize something.
Mike, an American living in Norway

I’m in the middle of a multi decade shop reorganization LOL. Seems like decades anyway. My place is small and kind of similar. I’m also using the one-height surface approach so every table serves double duty as support for every other table. It’s very efficient that way and I set it up so long stuff can poke out the garage door without running into anything else. I’m not done but what I have so far has really worked out well.
Losing fingers since 1969
Way to go Brian. Most of us have to work around space restrictions and other obstacles and we have to set up things to suit the type of work we do. My shop has been reconfigured numerous times through the years to cope with different types of work and also to accommodate new or larger machines. I doubt it will be changing again though as my age is rapidly catching up with me!
Mike, an American living in Norway
Mike you did a wonderful job keeping the shop organised and all your tools seem to be accessible when needed and it also looks nice and clean .
I have done similar approaches over the years but always find that I have to relocate tools from time to time but I think that is just the way a shop evolves .
The biggest problem is dust and I think that some major thinking has to go into collecting dust at the source and not just try to solve the issue with more pipes, filter, etc. which still leaves a tremendous amount of air born dust floating around .
Thanks for letting us have a look into your nice shop .
Klaus